
explore the world through the universal language of food

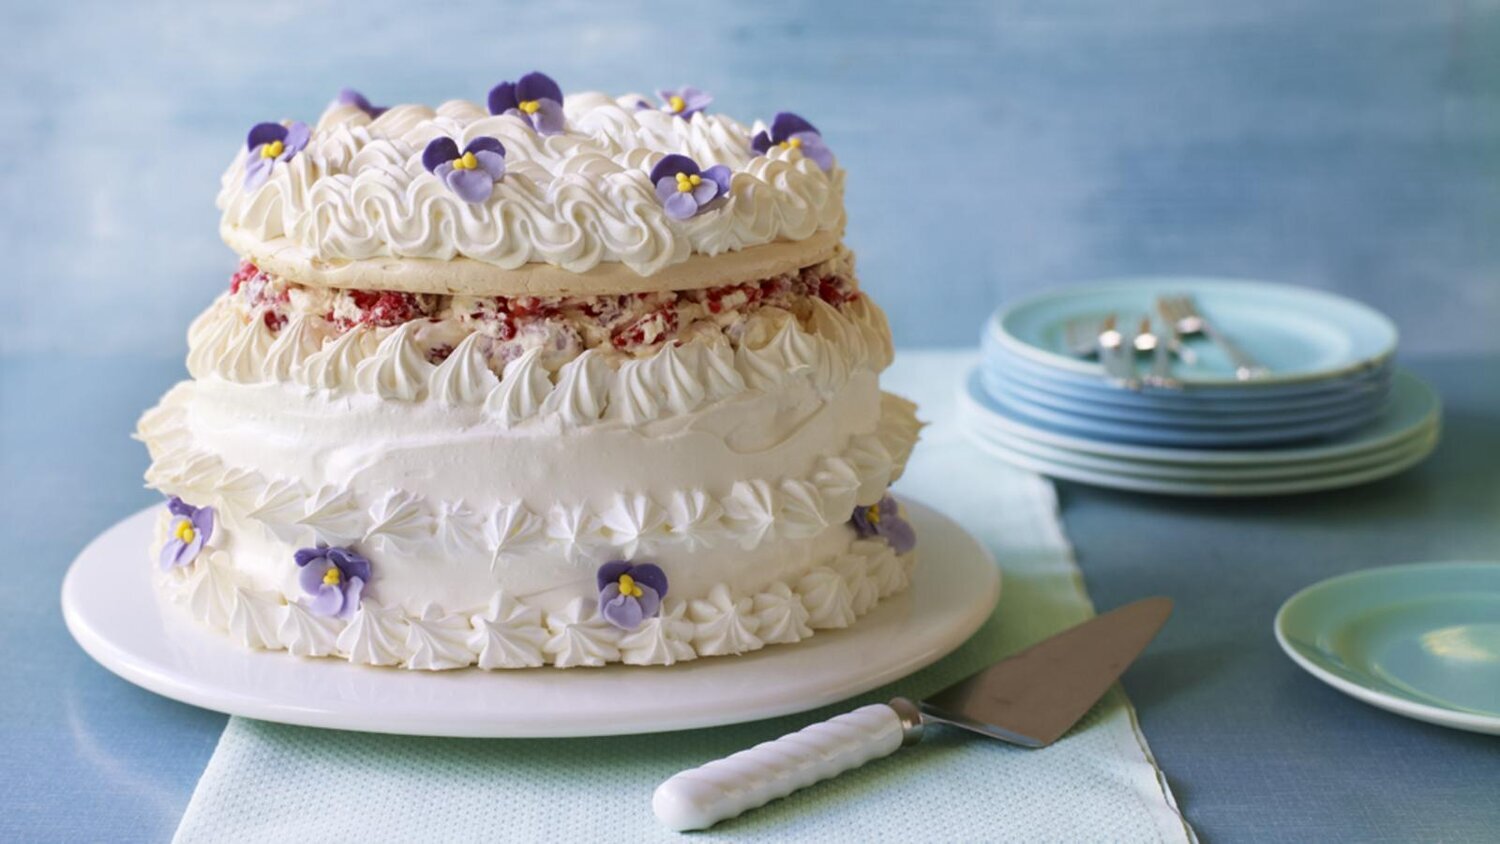
Cranberry, Almond and Chocolate Pashka
The Recipe
Serves: 4
Preparation: Overnight
Cooking Time: 15 minutes
In Russia, they make Pashka, a type of cheesecake without the base, full of fruit, nuts, cream, and cheese shaped to look like a tomb.

Growing up in a non-religious household, Easter to me was all about the basket of chocolate eggs some mysterious bunny left outside my bedroom door and eating toasted hot cross buns with a slathering of salted butter for breakfast. No religious reference of Christ rising or the pagan spring equinox festival was part of my Easter vocabulary – only food.
From breaded wreaths in Greece, hot cross buns in Australia or Simnel cake in the UK, there’s always an excuse for some Easter indulgence. In Russia, they make Pashka, a type of cheesecake without the base, full of fruit, nuts, cream, and cheese shaped to look like a tomb. Here’s my version, less tomb like with a touch of red wine and chocolate!
INGREDIENTS
Pashka
60g cranberries
4tblsp red wine
2 egg yolks
60g caster sugar
100g thickened cream
30g/2 tblsp honey
Zest of 2 small orange
4 tsp lemon juice
Pinch cinnamon powder
400g cream cheese (room temperature)
2 tsp good vanilla essence
50g dark chocolate, roughly chopped
50g toasted almonds, roughly chopped
Cranberry Sauce
80g cranberries
40g sugar
4tblsp red wine
METHOD
Soak cranberries in red wine for 20 minutes
Whisk egg yolk and sugar until creamy and pale in colour
Slowly heat cream until almost boiling
Reduce heat, mix in egg yolk slowly (don’t scramble the eggs!) Set aside to cool
Whisk cream cheese until smooth
Mix in honey, cinnamon, vanilla, honey, orange zest, and lemon juice
Strain cranberries, reserving the wine
Add the cooled egg custard mix to the cream cheese
Add nuts, chocolate & strained cranberries
Line yoghurt containers with cheesecloth and pour in mixture to the top
Place in fridge overnight on stand so liquid drains out
Cook cranberries, sugar, and wine until syrupy
Turn out pashkas, and decorate with cranberry jam & flowers

Pisco Sour Tart - A Cocktail Dessert
The Recipe
Serves: 6 slices
Preparation: 40 minutes
Baking Time: 30-40 minutes
Lemon meringue pie is a dessert that is believed to have originated in Europe in the late 18th century. However, the exact origins of the pie are unclear, as there are various stories and legends surrounding its creation.

Dessert. It is my favourite part of a meal and there is always room for it, even if you had the biggest meal of your life, there is always room for a little sweet.
When working in the kitchen, my focus was more on savoury dishes for the restaurant, my forever happy place was and always will be baking and making desserts. When I worked in London, there was a little Italian restaurant a few doors down and I regularly treated myself to a lemon tart and a rich shot of hot chocolate. The lemon filling was tart - more than usual but not too much which worked perfectly with the crumbly buttery pastry it sat upon. This pisco sour tart is based on a classic lemon meringue tart, which was an 18th-century invention in Europe.
This recipe combines all the essential elements to make a pisco sour - and thrown into a pie form which then led me down the rabbit hole of learning more about pisco, a clear grape brandy whose origins will forever be debated over and which country has the best; Chile or Peru.
Here is more of the history behind Pisco.
For now, it is most important we get down to it and start baking this delicious tart.
INGREDIENTS
PASTRY
200g plain flour
80g unsalted butter
80g icing sugar
A pinch of salt
1 egg
FILLING
2tbsp/30g cornflour
180g caster sugar
Zest of 2 lemons & 3 limes
240mls lime and lemon juice (strained)
130g unsalted butter
4 egg yolks
1 whole egg
180mls Pisco (you can also use gin or tequila if pisco is not readily available
MERINGUE
4 egg whites
200g caster sugar
2tsp cornflour
METHOD
Add flour, salt, and icing sugar in a mixing bowl
With the paddle attachment on your electric mixer, combine the dry ingredients
Slowly add in the butter until a fine breadcrumb consistency
Add the egg until the pastry comes together
Remove and shape into a flat disk. Wrap in cling film and refrigerate for a minimum of 30 minutes
In a medium saucepan, mix sugar, lemon zest, and cornflour together.
Add in lemon juice and heat on a low setting, whisking continuously.
Slowly add in the Pisco and when the mixture starts to bubble, turn off the heat.
Slowly add egg yolks and whole egg, continuously stirring. If the mixture has become too hot, allow it to cool slightly before adding the eggs as they will scramble!
Finally, add the butter and mix until everything is combined, allow to cool and thicken.
Whisk the egg whites until soft peaks form
Add a little bit of sugar at a time and then the cornflour until stiff peaks form.
ASSEMBLY
Preheat oven to 180’C
Remove the now firm pastry from the fridge and roll out on a well-floured surface until it is just under 1cm thick.
Line the 20cm pie tin with pastry and trim off the edges
Line the inside of the pastry case with baking paper filled with rice to weigh down the paper and blind bake the pastry for 15-20minutes.
Take out the rice and paper and bake the pie base for a further 8-10minutes.
Spread the lemon filling into the slightly cooled pie case and top with the meringue – spreading it out to the edges.
Use a fork to create peaks on the meringue which will give it a lovely texture and uneven browning once cooked.
Bake the pie in the oven for 10 – 15 minutes until the meringue on top has browned.
Allow the pie to cool for about 30 minutes at room temperature before serving.
Drizzle with Angostura bitters to finish off your Pisco sour tart.

Lemon Curd Pavlova
The Recipe
Serves: 8
Preparation: 30 minutes
Baking Time: 1.5-2 hours
Now, the Pavlova’s origins are somewhat a debatable affair between Australia and New Zealand with each country claiming to have invented and made a type of Pavlova in honour of the popular ballerina, Anna Pavlova.

December is upon us again. Living in the tropics means we don't have ‘proper’ season which I believe is why time goes so fast here (that’s my theory, anyway). The year has flown by but I always look forward to this month as it is the perfect excuse to bake, cook and eat.
Growing up in Australia, I could never relate to Christmas movies that aired on TV in December. Despite being so positive and full of holiday joy, they were mostly set in the wintertime with romantic snowy backdrops and people rugged up in coats, gloves and beanies.
Christmas in Australia was and is most of the time, hot and dry. Traditionalists in my country like to cook the full roast dinner, despite the sweltering heat, with turkey, ham and all the trimmings but because of the warm weather it is the perfect excuse to put on a fresh seafood spread, cheese platter and a seasonal fruit Pavlova.
Now, the Pavlova’s origins are somewhat a debatable affair between Australia and New Zealand with each country claiming to have invented and made a type of Pavlova in honour of the popular ballerina, Anna Pavlova. However, the dish as we know it seems to have its roots way before 1926 when Anna Pavlova toured to both Australia and New Zealand.

Anna Pavlova, 1924. Credit: James Abbe
The Spanische Windtorte, an Austrian dessert that was popular in the 18th century, contains all the key elements of a Pavlova – meringue, cream, and colourful decorations. The Schaum torte from Germany also has a striking resemblance to the Pavlova adorned with fresh fruit and cream. Both these desserts use meringue, which is hard all the way through, unlike a Pavlova which is soft in the centre. In the late 1800s, there was a surge in the popularity of meringue-based desserts as this was around the time when the handheld egg beater was invented.
Spanische Windtorte. Credit: BBC food
The Spanische Windtorte, an Austrian dessert that was popular in the 18th century, contains all the key elements of a Pavlova – meringue, cream and colourful decorations. The Schaum torte from Germany also has a striking resemblance to the Pavlova adorned with fresh fruit and cream. Both these desserts use meringue, which is hard all the way through, unlike a Pavlova which is soft in the centre. In the late 1800s, there was a surge in the popularity of meringue-based desserts as this was around the time when the handheld egg beater was invented
The idea of Pavlova, as we know it in Australia, through research of countless recipes by food historians, started in Europe. However, the inclusion of cornstarch into a typical meringue recipe seems to be a small but significant contribution by America. Duryea Maizena, a company that developed cornstarch in the USA, published a variety of corporate recipe booklets as part of marketing to promote their product as well as helping housewives experiment with new recipes.
The inclusion of cornstarch in a meringue mixture when baked resulted in a crisp exterior and a pillow, marshmallow-like interior. The export of this cornstarch product to Australia and New Zealand enabled cooks to create Pavlova as we know it today. So, thank you to the American food industrialists of the 19th Century for developing the recipe for our beloved Pavlova.
It’s not difficult to make – but does require a bit of time and patience. The meringue base is a blank canvas for you to be as crazy as you want with ingredients. Whipped cream is a must but you can omit the lemon curd and change the fruit I have used.
INGREDIENTS
7 medium egg whites (at room temperature) Pinch of salt
400g caster sugar 2tblsp cornflour 1tsp white vinegar
1tsp vanilla bean paste (optional)
METHOD
Preheat the oven to 140’C
Line a baking tray with baking paper with a 20cm circle drawn on it. When the meringue is done you can ‘glue’ the paper onto the tray by dabbing a tiny bit of it in each of the 4 corners of the paper.
Whisk the egg whites and a pinch of salt in an electric mixer on medium speed until light soft peaks form Gradually add the sugar, bit by bit until it is all incorporated
Whisk on high until egg whites become velvety and stiff peaks form With a spatula, lightly incorporate the cornflour and vinegar
Pile the meringue high in the centre of the drawn circle, smooth the outside with an offset spatula, if you have one.
Bit by bit spread out the meringue until it fills in the 20cm circle
Flatten the top of the meringue and create a little lip on the outside edges Turn the oven down to 100’C and place meringue in the oven
Bake for 1.5-2hrs. Turn the oven off and allow the pavlova to sit in the oven, cooling gradually, overnight. This lessens the risk of cracks and your pavlova sinking.
The next day, dress and decorate your pavlova with lemon curd, cream, berries and mint.
GARNISH
Strawberries, blueberries, mint or any fresh fruit in season that take your fancy
Whipped Cream
400mls whipping cream 1 tsp vanilla bean paste
Whisk cream and vanilla until a pillowy cream forms
Lemon Curd
I like my lemon curd quite tart – if it’s not your thing you can hold back on the zest.
110g unsalted butter
125g lemon juice (3-4 lemons) Zest of lemons
5 medium egg yolks 100g caster sugar
Melt butter. Add lemon juice and rind (if using)
In a heatproof bowl, whisk egg yolks and sugar until the mixture looks lovely and pale. Add the warm butter mixture to the eggs then place over a saucepan of simmering water Mix the curd until it becomes a thick yoghurt consistency
Remove from heat and place cling film directly on top of the surface (to prevent a skin from forming) Allow to cool then place in a container in the refrigerator until ready to use.


No Churn Brigadeiro Ice Cream
The Recipe
Makes: 500mls
Preparation: 20 minutes
Freezing Time: Overnight
Lemon meringue pie is a dessert that is believed to have originated in Europe in the late 18th century. However, the exact origins of the pie are unclear, as there are various stories and legends surrounding its creation.

Now a national favourite, the Brigadeiro is a sweet that was developed as part of a political campaign in Brazil after WWII in 1945. Made to raise funds for Eduardo Gomez, the handsome Brigadier who was running for President.
Now ice cream, other than cheese is my favourite food group….
There’s always room for ice cream whether it is for breakfast, dinner or even in the middle of the night.
I have wished many times that I had a paco jet or I would even settle for a nice ice cream machine…. but until those wishes come true I like to make an ice cream made from condensed milk. It doesn’t require any churning and the result is a silky smooth frozen deliciously rich ice cream.
Combine this favourite Brazilian sweet and make it into ice cream - you have an easy show-stopping winner. Serve it in a cone with sprinkles on top or in a bowl with crushed up wafers… you will be back for seconds, I guarantee it
INGREDIENTS
(392g) 1 can of condensed milk – the full-fat kind please!
50g good cocoa powder
30g unsalted butter
Pinch of salt
320mls whipping cream
80mls heavy cream
1 tsp vanilla extract
METHOD
Heat the cocoa, salt, condensed milk, and butter over low heat in a medium saucepan until the ingredients are combined, and the mixture has thickened. Stir constantly to dishearten the mixture from sticking to the bottom!
Stir in the heavy cream, and vanilla and allow to cool before whipping the cream
Whip the other cream until firm and then add in the cooled condensed milk mixture. Fold and stir through until it becomes a delicious chocolaty gooey mess
Pop in a container and freeze overnight.
When serving use a spoon dipped in hot water to make life easier.
Scoop ice cream into cones or bowls, cover with chocolate sprinkles (hundreds and thousands would work too!)
SERVING
Waffle ice cream cones, chocolate sprinkles, or hundreds and thousands

Deep Dish Spiced Apple Pie
Whether you serve it with ice cream, custard, double cream or even American cheddar - you can't deny that apple pie is a classic. It's a comforting warm dessert that conjures all sorts of romantic notions of sitting by the fireplace, rugged up in your warm woolies, indulging in a giant slice of crumbly pastry and spiced sweet apples.....
Each country has their own version of apple pie whether it be the tarte tartin (France), a latice style pie (Dutch), a crumble topping (Sweden) or a good classic top and bottom pastry pie (USA & UK).
Original recipes, found in the 1380's, of any sort of sweet pie actually contained a rather inedible bland pastry. It was merely a casing called a 'cofyn' to hold the internals of the pie. Although sugar was available during this time, it was an expensive ingredient and not commonplace until mid 16th century when the apple pie in it's entirety could be consumed.
Depending on apples types and size of your pie will depend on cooking time. Some recipes call for a blind bake approach but you can throw everything in at the one time and allow your oven to do the magic.
The Recipe
Makes a 22cm deep dish round pie which will serve 6-8 people, depending on the slice size.
The Ingredients - Pastry
500g plain unbleached flour
140g icing sugar
zest of 1 lemon
270g cold, unsalted butter cut into cubes
2 medium egg yolks
3-4 tblsp cold water
pinch of sea salt
The Method - Pastry
Put the flour, icing sugar, lemon zest and salt into a large bowl.
Rub in the cold butter until it becomes a fine bread crumb consistency
Add in egg yolks and combine through the flour mixture
Slowly add cold water and mix until dough is combined and pliable
Shape into a flat disc, wrap in cling film and refrigerate for about 30 minutes before using.
If you have a mixer at home you can make this pastry quite easily with a paddle attachment. I personally like to use my hands because nothing beats the feeling of flour and butter in between my fingers!
The Ingredients - Filling
1kg green apples
1 tblsp lemon juice
150g brown sugar
2g/1.5 tsp ground cloves
4g/1tsp ground cinnamon
60g plain unbleached flour
egg, lightly beaten for brushing the the pastry
The Method
Pre heat oven to 180'C
While the pastry is chilling in the fridge, brush a 22cm pie dish or cake ban with butter and lightly dust with flour. Turn out the cake pan to get rid of the excess flour and place the pan into the fridge until the pastry is ready.
Core and peel the apples, slice to about 5mm thick and place in a mixing bowl
Throw the rest of the ingredients in with the apples (except the egg!!) and mix until combined. Set aside
When the pastry is chilled, cut off about three quarters and roll out onto a floured surface. Roll pastry to about 8mm thick and large enough to line the base and sides of the tin with a little excess. Press firmly into the tin. If a bit falls off, it's ok.. do a bit of a patchwork job. Leave a little bit of excess pastry as overhang on the edges.
Fill the pastry case with the apple mix
Roll the last quarter of the pastry to top of the pie, again at about 8mm thick on a floured surface and place on top to cover the pie. Trim off the excess pastry
Tuck the top layer of pstry under the bottom layer to create a nice clean lip on the rim of the pie tin. Crimp the top edges of the pie with index finger and thumb or you can use a fork.
Poke a few holes in the top of the pie to let out excess steam from the apples when they are cooking in the oven.
Bake for about 20minutes and then brush the top of the pie with egg wash. Cook for another 10-20 minutes until the apples inside are tender and the pastry is nice and golden.
Allow the pie to cool slightly before cutting into generous wedges and topping it with double cream or a good vanilla bean ice cream.
A wonderous winter warmer... Enjoy!
And you can check out the video here