
explore the world through the universal language of food

Colombian Chicken Soup
The Recipe
Serves: 6-8 People
Preparation: 30 minutes
Cooking Time: 40-60 minutes
“The very name of this soup, Ajiaco, includes the word Aji, meaning chilli pepper, in the language of the Taino people.”
Ajiaco is a traditional soup that has evolved with the history and culinary landscape of Colombia. More than a soup, it is a stew consisting of filling ingredients that is perfect for cooler seasons and is accompanied by a variety of sides making it a very substantial meal.
Honestly, it is quite difficult to replicate the exact taste of this dish if you do not have the access to Colombian guascas or potatoes, but you can adapt and tweak a little like I have done for this recipe. (Purists, please close on eye).
Try this simply delish soup - make it in bulk and share the warmth and comfort of my favourite Colombian dish.
Or read a little more about its history HERE
THE INGREDIENTS
1 bone in chicken breasts (200g)
2 cloves of garlic
2 tbsp. extra virgin olive oil
120g spring onions (whole)
500g/3 white potatoes, peeled diced into 2cm cubes
500g/3 red potatoes, peeled and diced into 2cm cubes
3 ears of fresh corn, cut into halves
1 jalapeno (optional, finely sliced)
1.5 tsp dried oregano
10g finely chopped coriander stalks
2 litres of good chicken stock OR 2 litres of water and 2 bouillon chicken stock cubes
1/2 -1 tsp salt (depending on the slat level of your stock)
1/2 tsp cracked black pepper (or more if you wish)
10g coriander
Garnish
120mls cream
15g capers
chopped coriander leaves
finely chopped spring onion
THE METHOD
In a large pot (4L), on medium heat, warm olive oil and sear the chicken breast skin down first.
Add in the garlic, spring onions, coriander stems and salt, cook for 3 m before adding the corn, chopped potatoes and oregano. You can add in the chilli here if you are including it.Once the ingredients are seared, pour in the stock and turn and lower the heat. Cook for about 1 hour until the chicken is soft and tender and the stock is slightly reduced.
Remove the chicken breast and shred the meat off the bone, remove the spring onions and discard.
Place pieces of corn in serving bowls, add in the shredded chicken and ladle in the soup.
Leave room for a splash of cream
Top with chopped coriander, spring onions and a sprinkle of capers.
Serve with white rice and fresh, buttery sliced avocado


Khmer Herb Linguine
The Recipe
Serves: 2-3 People
Preparation: 12 minutes
Cooking Time: 15 minutes
“As well as for medicinal purposes, Khmer herbs are also used for beauty and culinary applications.”

Khmer herbs are one of the unique building blocks of Cambodian cuisine. The country’s rich biodiversity is where around 3000 vascular plant species grow and just over a third of this number are medicinal plants used to treat a variety of illnesses. Traditional medicine practitioners in Cambodia are known as Kru Khmer, who prescribe a variety of herbs and tonics to patients, from a combine lineage of Ayurveda, Theravada Buddhism, and traditional Chinese Medicine. As well as for medicinal purposes, Khmer herbs are also used for beauty and culinary applications.
Herbs such as neem, noni leaves, and holy basil are quite bitter when eaten raw, yet once cooked, take on a different flavour profile, making them an extremely important element in the country’s cuisine. Amok Trei (Fish Amok) is a perfect example of this with the inclusion of noni leaves, creating a unique texture and flavour to one of Cambodia’s most recognised dishes.
When cooking with Khmer herbs, those with a more intense and bitter profile are best chopped or sliced finely before being incorporated into a dish, the others are fine to be blended – I did a lot of tasting to decipher which to blend or slice making this pesto. I just had to add Cambodian cashews (salty skins and all) into this dish, because I am addicted to them!
It’s a simple recipe, allowing the herbs to shine and cling nicely to strands of flat linguine. Some of the herbs listed below may not be available to you but don’t worry, you can simply take a chance and explore the herbs that are, and experiment to make your own unique blend - think coriander and pumpkin seeds, sage and oregano with sunflower seeds, whatever you fancy. I would love to know the results so let me know!!
If you would like to read on, here’s a wonderful study on the medicinal herbs in Cambodia, as well as the culinary herbs.

Credit ChangKran Khmer
THE INGREDIENTS
300g linguine, spaghetti etc
1 tbsp sea salt
KHMER HERB PASTE
80g mixed Khmer herbs.
(sawtooth coriander, rice paddy herb, holy basil, shining bush plant/peperomia pellucida, neem) *
50g cashews
150g olive oil
2 cloves garlic
1 x lime juice
30g parmesan cheese
½ tsp salt, ½ tsp pepper
Sliced red chillies and herbs.
*when using bitter herbs, make sure you include no more than 20% into the paste otherwise it will be extremely bitter… and no one wants that.
THE METHOD
Taste your herbs, and slice the more bitter tasting ones, set them aside
For the more neutral herbs, place into a food processor or blender
Add in nuts, garlic, oil, cheese, lime, salt and pepper.
Blend these dry ingredients first until they are fine, then slowly add in the oil in stages, taking into account the consistency of the paste. Feel free to add more or less oil, it’s entirely up to you, just make sure it is the right consistency to coat the pasta.
Mix the sliced herbs into the paste and set aside.
Meanwhile bring a small pot of water to a rolling boil and add salt
Cook pasta according to instructions
Mix through the paste and plate
Garnish with sliced red chillies and herbs


Cauliflower & Split Pea Daal
The Recipe
Serves: 4
Preparation: 10 minutes
Cooking Time: 25-30 minutes
“Turmeric has been used for almost 4000 years as a culinary ingredient, medicine as well as a holding religious significance in some cultures”.

There was a week or two I was reading and writing a lot about turmeric and the wonderful natural benefits it has on the body. Sure, you can take it in a supplement, but why not put it in your favourite drink, dessert or main meal? This cauliflower and split pea daal is a no-brainer and it is super easy to make, and look, you can serve it straight from the pan. Fry up some roti and you have the perfect sharing dish for 2 or 3 of your favourite people.
So here is a little bit about turmeric….
The vibrantly coloured rhizome turmeric that is turmeric stems from the ginger family and has been used as a culinary ingredient and medicine for 4000 years. It is native to Indonesia and India but is now used widely throughout the world.
It is regarded highly in both Ayurvedic and modern medicine, popularly known for its anti-inflammatory and anti-bacterial properties. The primary active substance in turmeric is curcumin which needs the help of black pepper to allow it to be easily absorbed into the body.
Just a small shpeel for you today - enjoy the recipe as much as I did !
THE INGREDIENTS
250g yellow split peas
2 tbsp of ghee (you can also use butter)
1/2 or 100g brown onion, finely chopped
1 tsp mustard seeds
1 tsp cumin
1/2 tsp black pepper
2 cloves garlic, finely chopped
5 g fresh ginger, grated
10g fresh turmeric (grated) or 2 tsp turmeric powder**
1.5 tsp of chat masala or garam masala*
1.5 tsp salt
400 mls coconut milk
200g water
400g cauliflower (cut into medium sized florets - you can use the stalk as well!)
Squeeze of lemon if you wish
Garnish with sliced red chilli and some green stuff of your choice (coriander or basil)
THE METHOD
Immerse the yellow split peas in water and allow to soak overnight. Drain before using.
In a medium saucepan or pot, heat the ghee on a medium heat and add in the onions. Cook until transluscent.
Add the mustard seeds and cumin seeds until fragrant.
Stir in the ginger, garlic and turmeric and stir until combined.
Now add the cauliflower, split peas, masala, coconut milk and water. Allow to cook on a medium heat until the cauliflower is tender and the split peas are cooked, stir occasionally.
Sprinkle in the salt to taste and add a squeeze of lemon if you wish.
Serve with rice or roti, garnish with greens and chilli.
Eat and enjoy !
* when using chaat masala, you can reduce the amount of salt to the recipe.
** to prevent extreme stains on your fingers when using fresh turmeric, oil your hand slightly before handling.

Homemade Ramen
The Recipe
Serves: 4 people
Preparation: 20 minutes + 2days marinating (eggs)
Cooking Time: 25 minutes
“Ramen is a humble dish of wheat noodles, broth, toppings and is synonymous with Japanese food and culture, developing over the years with the evolution of Japan.”

Throughout Asia, noodle dishes are one of the most popular to eat and come in varying types of textures, ingredients used, serving, and cooking methods. While each country prides itself on a significant noodle dish, one of the most recognized types of noodles within both the region and internationally is ramen. Ramen is a humble dish of wheat noodles, broth, and toppings and is synonymous with Japanese food and culture, developing over the years with the evolution of Japan. Read more about the history of ramen.
I made a ramen stock with a kilo of pig’s trotters, tare, and dashi from scratch to learn the entire process, but I wouldn’t put you through that!!!
Here’s a quick ramen you can do with either roasted chicken or roasted pork.
THE INGREDIENTS
AJITSUKE RAMEN (this needs to be made 2 days in advance)
4 medium eggs
60mls soy sauce
60mls mirin
100-120 mls water
RAMEN STOCK
1.5L chicken stock or pork stock (low or no salt)
30mls mirin
30mls sake
60mls soy sauce
60 mls dashi stock*
½ tsp rice wine vinegar
½ tsp brown sugar
1 clove garlic, peeled
thumb size piece of ginger, peeled
10g spring onion, roughly chopped
*if you cannot get your hands on kombu or dashi, try 30g of dried shiitake mushrooms
400g ramen noodles (if you can find the alkalized noodles and not the instant ones!)
THE METHOD
Bring water to a rolling boil
Drop in eggs and reduce the water to a simmer for about 7 mins, move the eggs around the saucepan
When the timer is done, place the eggs into an ice bath to stop the cooking process immediately.
Peel the eggs and place them in a sealed bag with the liquid. Allow to marinate for a minimum 2 days
Add all the ingredients into a large pot, bring to a light boil then reduce to a simmer. Allow to simmer for 20-30 minutes, fine strain twice before serving. Taste and season accordingly.
Bring a medium-sized pot of water to a boil, and add in ramen.
Cook until al dente and strain out the noodles
TO SERVE
In large warmed bowls, ladle in the ramen stock and the cooked noodles
Top with roasted meat, ajitsuke tamago, bamboo, spring onions and a sheet of nori

Sicilian Inspired Seafood Couscous
The Recipe
Serves: 4 people
Preparation: 30 minutes
Baking Time: 1hr 30 minutes
This is a unique and flavourful dish that originates from the Sicilian city of Trapani in Italy. This dish is a fusion of Italian, North African, and Arab culinary traditions, reflecting the cultural influences that have shaped the region's history.

I have journeyed back to Sicily again to create this wonderfully full-flavoured seafood dish using all local seafood and vegetables. Trapani is known for their seafood couscous dishes and this is a little variation of it. The leftover broth can be added when serving this dish or you can simply freeze it and save it for another day. It is a fabulous communal dish that should be shared with friends and a delicious bottle of wine.
INGREDIENTS
PESTO
150 ml extra virgin olive oil
10g flat-leaf parsley leaves
60g almonds
1 tsp salt
10g/2-3 cloves garlic
FISH STOCK BROTH
4tblsp good olive oil
120g/1 small onion, roughly chopped
80g/1 stick celery, roughly chopped
100g/1 small carrot, roughly chopped
2-4 stalks of parsley (reserve the leaves
2tsp salt
2 bay leaves
250mls passata
1 tsp chilli flakes
100mls white wine
1L water
Seabass head and bones
Half of the prawn heads and shells
COUSCOUS
200g couscous
300g fish stock broth
¼ tsp cinnamon powder
SEAFOOD
400g seabass, whole
400g prawns
250g clams
Chopped parsley leaves
METHOD
Blend all ingredients and season to taste. I like to keep the pesto a little bit chunky but you can blend until smooth if your heart desires. Set aside
Heat olive oil in a medium saucepan
Cook onions until soft, add in parsley stalks, chopped celery, carrot, fish scraps and prawn shells
Add in bay leaves, salt, white wine, passata, chilli flakes and water
Bring this mixture to the boil and then allow it to simmer for a good 45mins – 1 hour, covered. Halfway through the simmer, add half of the pesto. When the broth is done, check and taste for seasoning. Add a little cracked pepper.
Finely strain the stock and keep warm
Mix the cinnamon powder through the couscous. Add it to the warm stock and cover for 8-10 minutes then fluff up nicely with a fork
Heat 2 tablespoons of oil in a medium fry pan
Add in clams, fish and prawns with a dash of white wine, chopped parsley leaves and 150 ml of the stock. Toss and cover and allow to steam until clams have opened and the fish is cooked through.
TO SERVE
Mix fish, shelled prawns and clams through the couscous and spoon onto a large serving plate.
Top the couscous off with the whole cooked prawns and the remaining pesto.

Handmade Pork Dumplings with Tom Yum Bechamel
Delicious pork dumblings smothered in a tom yum bechamel.
The Recipe
Serves: 3-4 people
Preparation: 20 minutes
Cooking time: 10-15 minutes
“Dumplings can be traced back to ancient China, where they were made from a simple mixture of flour and water, and often filled with meat or vegetables.”

Tom Yum soup is a classic and this dish isn’t.
I absolutely love dumplings whether they are steamed or fried, with or without meat, and always with a delightful sauce, preferably with chilli.
Whenever I get that dumpling craving I will buy from the experts - my half-Chinese heritage is definitely halved again when it comes to cooking anything authentic from my Dad’s side. I read about it, and I try - so be nice.
In all serious (ness) this is an easy quick dish to make and can be made with dumplings you already have in the freezer.
If you have the time and nimble fingers - make the dumplings too!
THE INGREDIENTS
DUMPLINGS
300g fatty pork mince
a small thumb size piece of ginger, finely chopped
2 cloves finely chopped garlic
50g soaked and finely
20g finely chopped spring onion
1tsp white pepper
pinch of salt or a dash of soy sauce
Round dumpling wrappers
TOM YUM ‘BECHAMEL’
30g salted butter
30g plain flour
270mls coconut milk
135mls water or chicken stock
1 tsp white pepper
1-2 tsp fish sauce
1 x lime juice
80g good tom yum paste
THE METHOD
Combine all the above ingredients, except for the wrappers, of course
Lay out each wrapper, one at a time (make sure the others are covered otherwise they will dry out)
Place a generous teaspoon of the filling in the centre of the wrapper, brush one side with water and press down to make a semi-circle.
Make sure the dumpling is sealed and all the air is squeezed out.
Crimp the edges of the dumpling skin to secure the seal. I am not an expert in this but I did stumble upon this little video that shows you close up on different ways to fold your dumplings.
Once they are all crimped to your liking, set aside and make Tom Yum ‘bechamel’.
While making the bechamel have your steamer ready to pop in the dumplings as soon as the sauce is almost done.
Heat the butter in a saucepan on a medium to low heat. When it has melted, add the flour and stir for a few minutes.
While stirring, add the coconut milk gradually and then the water/stock.
Once the sauce is smooth and can coat the back of a spoon, whisk in fish sauce, tom yum paste and lime juice.
Adjust the seasoning as your heart desires.
When the dumplings are done, stir through the sauce carefully and garnish with chillies, coriander and nori salt.
Easy!
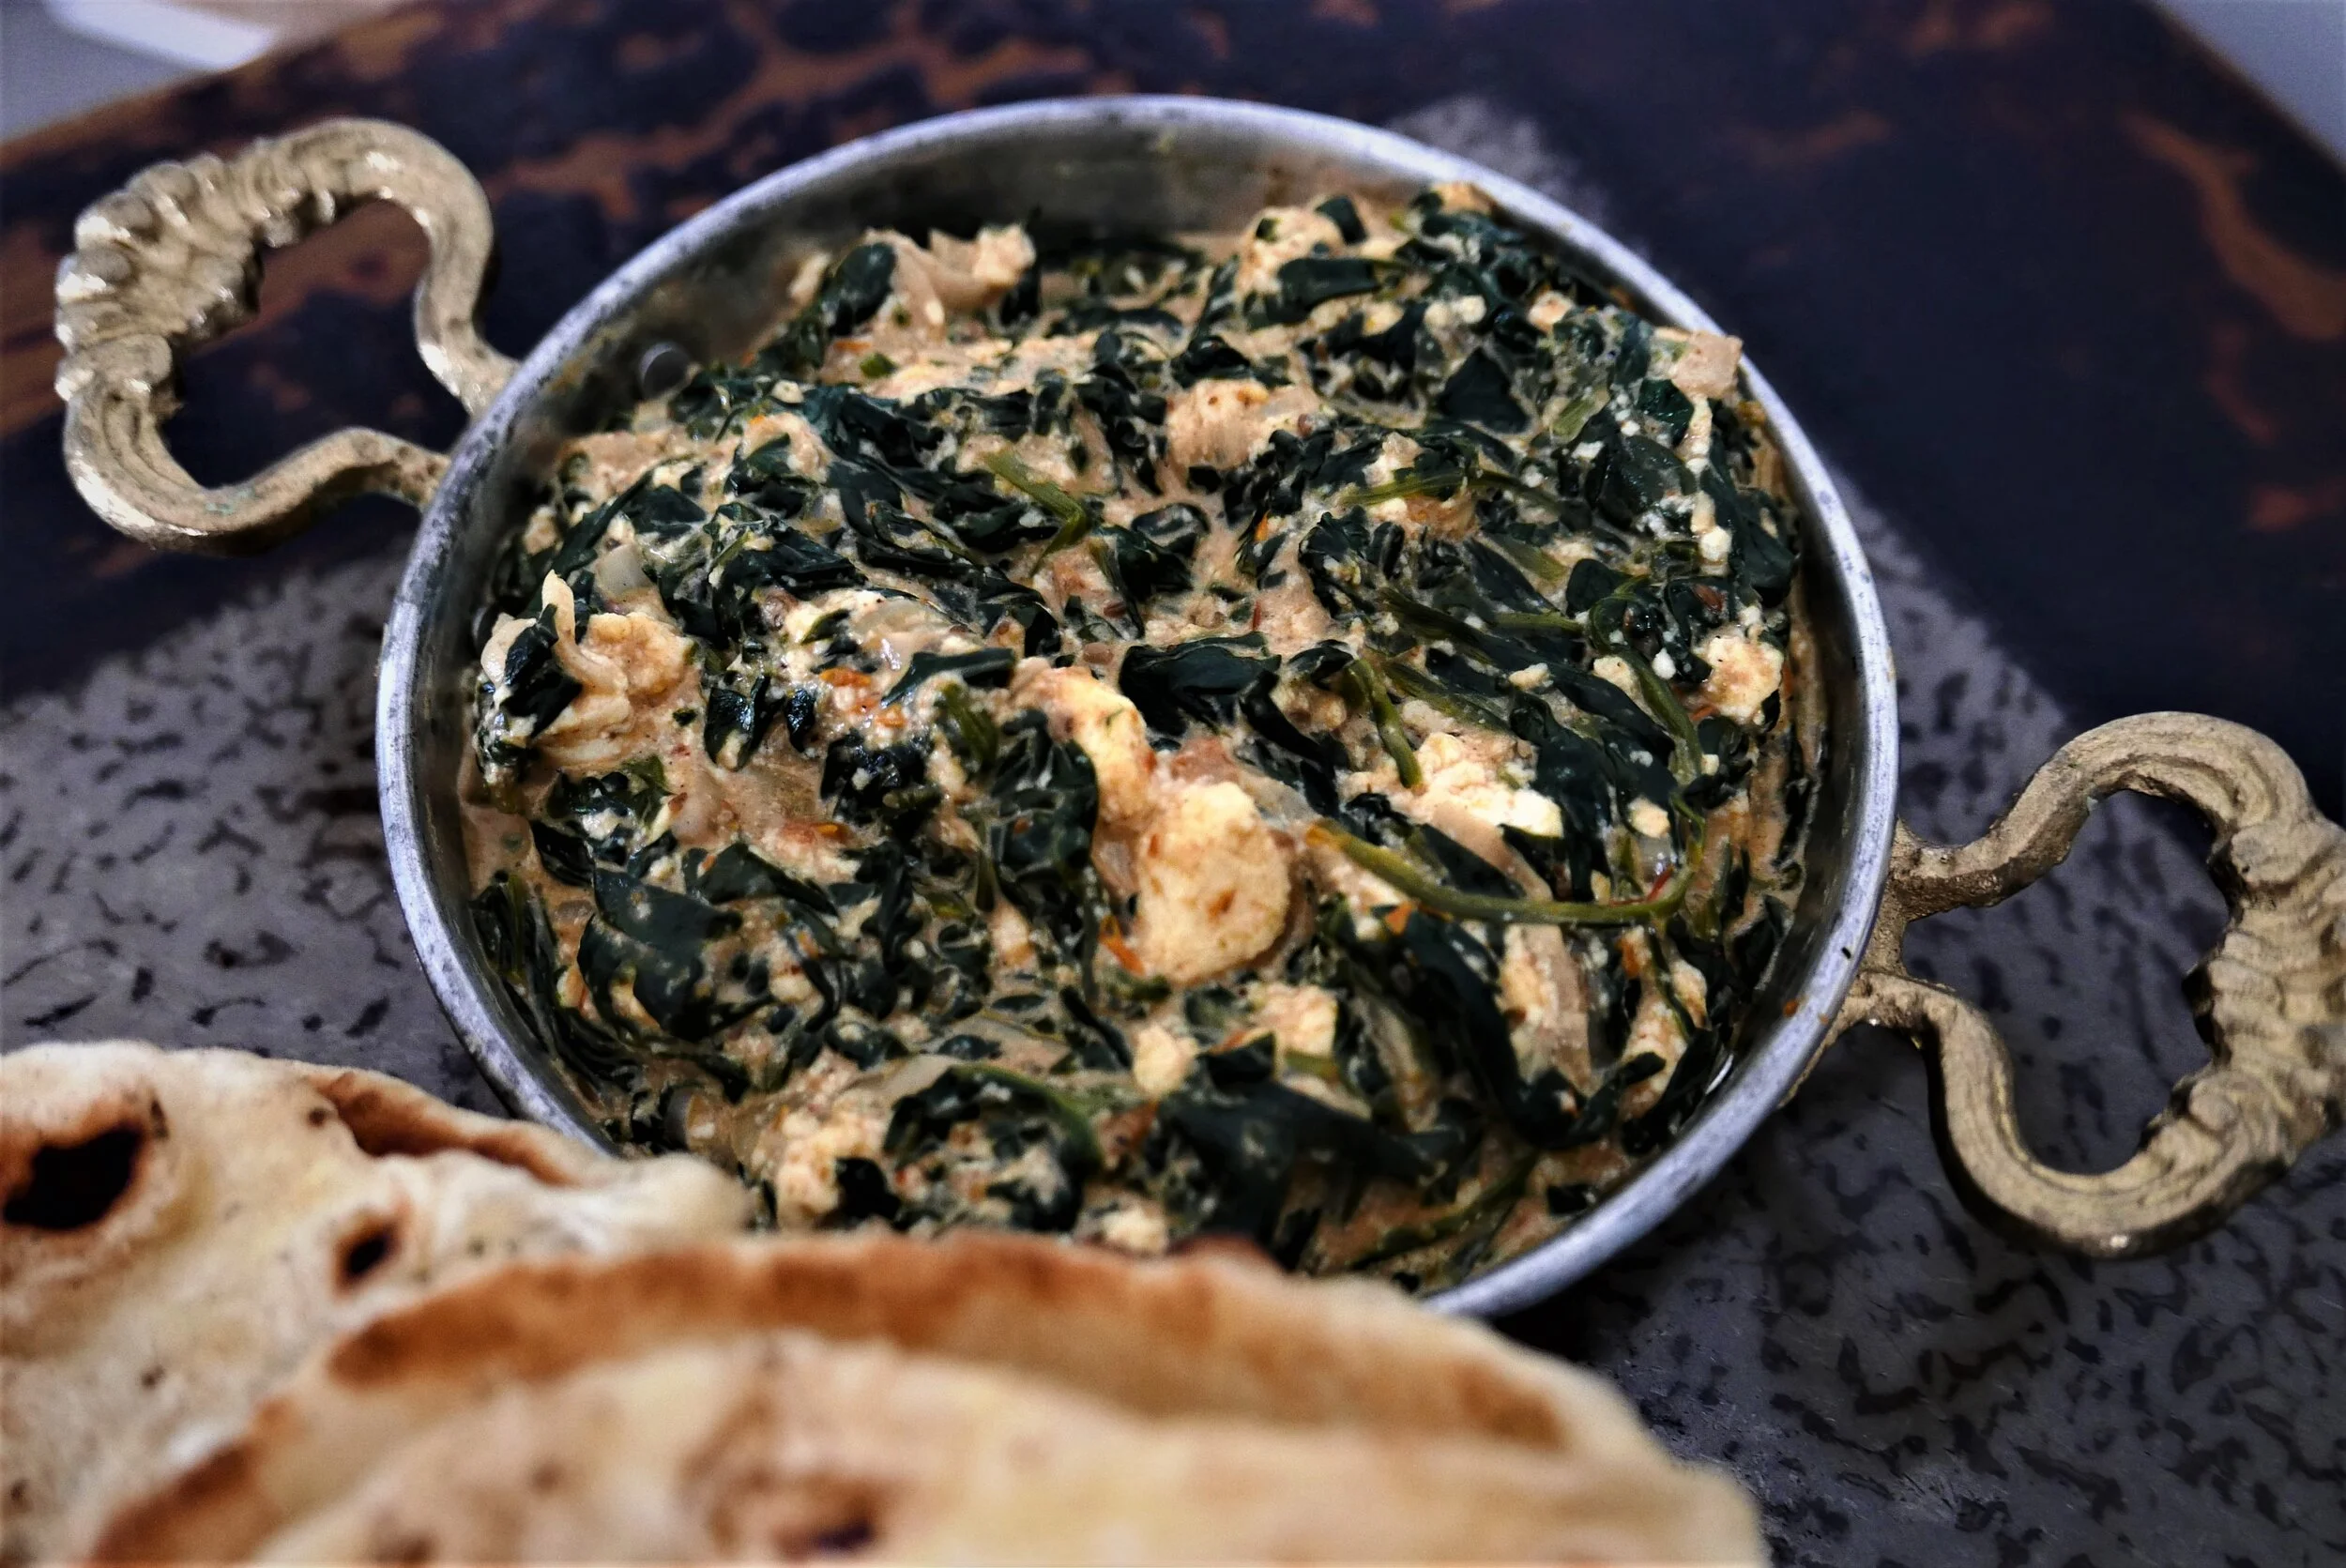
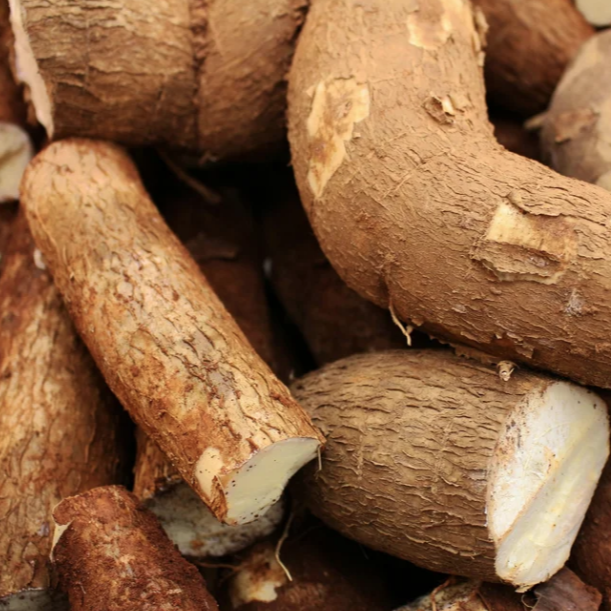
Chunky Palak Paneer with Stove Top Naan
The Recipe
Serves: 4 people
Preparation: 15 minutes
Cooking Time: 30 minutes
Eating Time: depends on how hungry you are
“Possibly of North Indian origins, palak paneer is a dish supposedly developed by Mughals, a powerful Muslim dynasty that ruled over parts of the Indian subcontinent from the early 16th century to the mid-19th century.”
Indian food. I crave it. Often.
Especially my all time favourite dish - Palak Paneer.
Palak Paneer is originally a Punjabi vegetarian dish but is now found in variations all over India. It is a spinach curry dish with tomatoes, a mix of spices, onions and paneer (a simple rennet free cheese). You can find my paneer recipe here - it takes but a moment to make and just needs to be strained and pressed over night. If you don't have the time or can't find paneer at your local market, cottage cheese will do the job just fine.
Rather than blending the spinach like a curry, how it usually comes, I have actually left it chunky so it is like a thick stew. Team it with some simple naan bread (it's so easy to make from scratch!) and you have your Indian food cravings sorted.
INGREDIENTS
PALAK PANEER
600g baby spinach
4 tbsp vegetable oil
½ tsp cumin seeds
1 tsp fenugreek
1 tsp chilli powder
1 tsp ground turmeric
2 tsp garam masala
120g / 1 yellow onion, finely sliced
20g / a thumb sized piece of ginger, peeled
20g / 3-4 cloves of garlic, peeled
100g / 1 tomato
80g/ 4tblsp cream
2 tbsp lemon juice
150g paneer
STOVE TOP NAAN
3g/1 tsp instant yeast
180mls/ ¾ cup warm water
7g / 2tsp caster sugar
¼ tsp baking powder
300g plain white unbleached flour
2 tsp fine sea salt
15g/ 2.5tsp olive oil
50g/ 3tblsp yoghurt
METHOD
Grind the spices until fine, set aside
In a food processor blend the tomato, garlic and ginger until it resembles a nice smooth paste
In a large saucepan, bring salted water to the boil and have a bowl of iced water on stand by
Drop spinach into the boiling water for about 10 seconds until blanched, immediately drain and
place into the ice water to stop the cooking process and to retain the vibrant green
In a medium saucepan, heat the oil and fry the onion until translucent
Add in the garlic, ginger, tomato and spices
Finally add the cream, lemon juice, spinach and cook for another 10-15 minutes
When the ingredients are combined and fragrant, crumble in the paneer and mix through
Place the water, sugar, and yeast into a bowl and allow to sit for 10-15 minutes
In a separate bowl, sift the flour, salt, and baking powder
Mix the yeast mixture with the dry mixture. Add in olive oil and yoghurt
Knead for 10-15 minutes until the dough is pliable. If the mixture is too sticky you may add a small sprinkling of flour
Place in a well-oiled bowl and wrap with cling film
Allow the dough to double in size in a warm environment for about 2 hours
When the dough is ready, roll it out onto a floured surface. Shape out into rounds or teardrop shapes that are about 1 cm thick
Heat a frying pan – for the best-charred results a cast iron pan works like a dream
In the smoking hot pan, add a little oil and cook the dough, the bread will bubble and have charred spots on it. It shouldn’t take any longer than 30 seconds on each side of the bread to cook
Before adding the next piece of dough, lightly oil the pan again.
When all the bread has been cooked – it is time to dig in!
Tear the naan into pieces and dip it into the deliciously fresh, made-from-scratch palak paneer.

Za'atar Chicken with Colourful Israeli Cous Cous
The Recipe
Serves: 4 people
Preparation: 20 minutes
Cooking Time: 20-25 minutes
“The use of za'atar as a seasoning dates back thousands of years, with references to the herb mixture found in ancient Egyptian and Mesopotamian texts. It was also mentioned in the Bible as a symbol of prosperity and was used in Jewish religious rituals.”

Israeli couscous or ptitium is a type of toasted pasta shaped into little balls. It was developed between 1949-1959 as a wheat-based substitute for rice. Ben Gurion, Israel's first Prime Minister contacted a food manufacturer to develop it when rice supplies were scarce.
Despite the fact that I cook Latin American food for a living, I would have to say my comfort food is either Italian or Middle Eastern. I think I enjoy the idea of many dishes prepared and plopped in the middle of the table for all to share. In Middle Eastern cuisine I love the use of warm spices such as cumin and when it is combined with tangy flavours like preserved lemon or pomegranate, it really is a winning combination.
This dish was invented and prepared for filming for a competition I currently am in called eatliststar. It contains a few base elements such as za'atar and pomegranate molasses that are hard to come by in Singapore so I decided to make my own. Recipes for these are found at the bottom of this post.
INGREDIENTS
Za'atar Chicken
8 chicken thighs, bone out, skin on or 4 chicken breasts, skin off
16g/4heaped teaspoons of za'atar spice mix
50g good extra virgin olive oil
4g/1tsp sea salt
Cous Cous Salad
160g Israeli couscous
350g water
½ tsp/4g good sea salt
½ tsp or 130g large yellow capsicum
8pcs or 100g ruby red cherry tomatoes
15g flat-leaf parsley leaves
15g mint leaves
30g of rocket
70g black or golden raisins
20g extra virgin olive oil
1 – 2 tbsp /5-8g pomegranate molasses
½- 1 tsp sea salt
METHOD
Chicken
Trim chicken of excess fat and sinew
Mix olive oil, salt and za’atar together and smother all over the chicken.
Allow to marinate while you prepare the salad
Once salad is prepared, heat frypan over a medium heat. Fry the chicken (skin side down first) until golden, turn the chicken over and fry until cooked through
Set aside to allow to cool slightly. Cut thighs in half diagonally. If you are using chicken breast, cut into quarters.
Cous Cous
Boil salt and water together in a saucepan. Once the water is boiling add couscous, turn the temperature down to low, and cover with a lid.
Allow to cook for 5-8minutes until couscous is tender.
Drain couscous and rinse with cold water. Set aside in a large bowl
Deseed and slice capsicum into rough 1cm size cubes
Cut cherry tomatoes into quarters
Roughly chop mint and parsley leaves
Add capsicum, tomatoes, raisins, herbs, rocket, olive oil and salt to the cooked couscous
Finally add the pomegranate molasses and plate onto serving dishes
Top the salad with the chicken and garnish with pomegranate seeds, a good spoon of labneh or yoghurt and a sprinkling of extra za’atar
You can also check out the video here.
* Substitute Notes
If you don’t have these exact ingredients on hand, you can add or play around with whatever you have. The za'atar mix can be replaced with any kind of spice blend and pomegranate molasses can be substituted for a good thick balsamic. The Israeli couscous can be substituted for regular couscous, barley, small-sized pasta, or even quinoa
*Ingredient Notes
Za’atar is the name of a Middle Eastern herb and the name of a spice mix. Maimonides, a 12th Century Jewish philosopher said it was fantastic brain food. Variations use fresh thyme, marjoram, or oregano. This is a dry spice mix that I can keep in my pantry to last a little longer.
ZA’ATAR RECIPE- makes about 100g
4tblsp/ 40g white sesame seeds
4tblsp/ 25g sumac,
2tsp/8g sea salt
2tblsp/12g cumin seeds
4tblsp/10g dried thyme
Toast the sesame seeds until golden, set aside, and allow them to cool. Toast the cumin seeds. Rely on your sense of smell rather than on the colour of the cumin. Blend all the ingredients together and store them in a sealed glass jar.
POMEGRANATE MOLASSES is a sweet and sour syrup that is used in many middle eastern countries where pomegranates are widely available. It differs in flavour profile depending on the type of pomegranates used.
Recipe - makes about 180mls
330mls pomegranate juice
45g lemon juice
60g sugar
Put all the ingredients in a deep heavy-based saucepan. Boil until the sugar is dissolved. Turn down the heat and allow to simmer for about 40 minutes until it is reduced to a nice syrupy consistency. Allow cooling slightly before pouring into a clean glass jar with a tight seal.

Rocket & Macadamia Pesto Seabass
The Recipe
Serves: 5 people
Preparation: 15 minutes
Cooking Time: 20 Minutes
Pesto actually comes form the Genoese word "pestare" meaning to pound or crush. The original pesto that we know, made from pine nuts, garlic, basil, parmigiano reggiano and pecorino sardo (sheeps milk cheese) came from Genoa

So I had a little bit of rocket leftover from a shoot I did the other week...
I love a good rocket salad but I just wasn’t feeling in a salady mood so I decided to make a rocket type of pesto paste thing.
Pesto actually comes form the Genoese word "pestare" meaning to pound or crush. The original pesto that we know, made from pine nuts, garlic, basil, parmigiano reggiano and pecorino sardo (sheeps milk cheese) came from Genoa. Apparantly this tremendous Ligurian concoction was developed around the 16th Century.
The Romans once made a paste called 'moretom' which was a mixture of crushed cheese, garlic and herbs. In Provence, the French do their own version called "Pistou" (sounds so posh!) which is made from olive oil, garlic and basil.
On the basis that pesto does not necessarily have to have basil, I can safey say this is my little rendition of pesto that goes with a meaty white fish and a crunchy light salad.
INGREDIENTS
Pesto
60g rocket
15 g flat leaf parsley leaves
4g garlic
100g good olive oil
6g or 3/4 tsp lemon juice
40g toasted macadamias
2g or 1/2 tsp salt
2g or 1/2 tsp ground black pepper
Salad
250g red radishes (two generous handfuls)
250g Japanese cucumbers (2-3 pieces)
250g yellow capsicum (1-2 pieces)
10g dill (small handful), chopped finely.
10g mint (small handful), chopped finely.
zest of 1 orange
Dressing
Juice of 1 orange
pinch of sugar
1 tsp fine sea salt
1 tsp coarsely ground black pepper
15g/ 1-2tsp good balsamic vinegar
6g/1tsp lemon juice
Fish
About 900g of meaty white fish, skin on, divided into 5 prtions.
I used palla but seabass would also work quite well
Garnish
About 20g extra roasted macadamia nuts, roughly chopped
METHOD
Pesto
Combine rocket, parsley, garlic, nuts, lemon juice, salt and pepper in a blender.
Slowly add in the olive oil and blitz until a nice smooth paste. Add extra salt to taste if you wish!
Salad
Using a mandolin or if you have the patience, a nice sharp knife, slice the radishes and cucumbers in discs about 2mm thick
De seed and slice out pith (white bits) of the capsicum and slice into ribbons about 3mm thick.
Throw the rest of the salad ingredients into a bowl and mix until colours are dispersed evenly
Dressing
For the dressing, mix salt and vinegar together until salt has dissolved slightly, add other ingredients and set aside.
Fish
Preheat oven to 160' Celsius. Lightly season the fish on both sides. Heat oil in a saucepan and carefully place the fish, skin side down, cook until the skin is crispy. Remove from pan and place on a lined baking tray, meat side down.
Scoop 2 generous tablespoons of pesto onto the skin of the fish and smooth out, covering the whole topside.
Bake in the oven for about 10-12 minutes until the fish is cooked through. You can test if the fish is cooked by inserting a thermometer or metal skewer into the thickest part and see if it is hot. Depending on your oven, you may need to bake the fish for a little longer.
Plating
When the fish is cooked, take it out of the oven and allow it to rest slightly, pour the dressing over the salad and mix through. Arrange salad and fish on a plate (however you want) and top the fish with roughly chopped macadamia nuts.
Dig in and enjoy!!!


Silverbeet and Ricotta Pie
The Recipe
Serves: 6 people
Preparation: 20 minutes
Baking Time: 30 minutes
Silver beet is also known as Swiss chard and is from the same family the beetroot comes from, mainly cultivated for its roots. The silver beet has abundantly thick green leaves and white stalks. I, being me, hate to throw any kind of food away so I love that you can use the whole damn leaf and stalk in the recipe

It has been a good 10 years since I last stepped upon the black sandy beaches of Santorini. The sunsets in Ohia really took my breath away, as did driving up there on the windy, windy narrow roads. The beautiful waters and equally beautiful people in Greece have really stayed with me – I hope to return again there in the near future. I remember raiding off the road bakeries, crunching down on crispy spanakopitas, sipping on Rakomelo in Paros as the fishermen brought in their catch of the day and feasting on sun dried octopus while watching the sun set over the Mediterranean sea… Sounds like a dream? Well, yes it was and I had Alex, my partner in crime at the time by my side.
Staring off into space, I forgot for a second that I am inside, sitting on the couch next to my ever-so-adorable nephew and the rain is pouring down in a constant stream outside.
Why does it always rain here??
So I have learned to adapt many a recipe cooking for kids in the last few months, cooking in bulk and cooking more economically. So here it is, not quite a spanakopita, more like a silver beet pie… but loosely, ever much so on my memories of the sun-kissed Mediterranean.
Silver beet, by the kilogram, is so much better price-wise than buying a kilogram of baby leaf spinach. In doing this, you can allow yourself to splurge a little bit more on good crumbly Greek feta as opposed to less lip-smacking Danish feta.
Silver beet is also known as Swiss chard and is from the same family the beetroot comes from, mainly cultivated for its roots. The silver beet has abundantly thick green leaves and white stalks. I, being me, hate to throw any kind of food away so I love that you can use the whole damn leaf and stalk in the recipe. As long as you cut up the stem finely and lightly fry it to take out the bitterness before popping it into a pie.
INGREDIENTS
200g good quality Greek feta
200g fresh ricotta
250g cottage cheese
1kg spinach, most of the stem removed and finely hopped
large red onion, finely chopped
1/4 tsp ground nutmeg
1 tsp paprika
2 medium eggs
200g filo pastry
2 tsp sea salt
1 tsp ground black pepper
20g melted butter
METHOD
Thoroughly wash the leaves of the silverbeet, immersing it in water at least 3 times and completely dry – there’s nothing worse than finding even just a speck of grit in your food!
Now, finely chop the silverbeet.Turn on the oven. Fan forced at about 160’C and take out the filo pastry. Keep the pastry wrapped but allow it to come to room temperature
In a large fry pan, throw in a good knob of butter and fry onions until translucent, add first the stalks of the silverbeet until they have softened, and lastly the leaves.
In a large bowl while the silverbeet is cooking, crack the eggs crumble all the cheeses and throw in some salt and pepper.
Mix and mush all these ingredients up in the bowl with a spoon, or, as I like to do with my hands (it would be nice if you washed them first.)
Sprinkle paprika and nutmeg in the cheese mixture and mix through.
Now the silverbeet onion mix needs to be added to the cheesy stuff. Make sure you just slightly heat the leaves of the silverbeet as it will cook further in the oven. It is also nice to preserve the lovely green colour of the leaves. Allow to cool slightly.
So after this is all done, grab an oven-proof rectangular dish. (I used one 33cm x 5cm x 20cm). Use the melted butter and brush the dish. Line the dish (as rustically as you like) with layers of the filo pastry, let it hang over the sides of the dish quite a bit and these will be tucked in later.
Pour the spinach mixture into the lined dish and flatten it out. Spread a few layers of pastry on the top, brush with butter, and fold over the hanging edges of the pastry. Brush all exposed pastry with butter so it doesn’t cook naked. It will enable a nice crispy pastry.
Bake in the oven for 25-30 minutes. Cut in large slabs and serve with a crispy green salad.

Aubergine Stuffed Ratatouille
Comment voulez-vous gouverner un pays qui a deux cent quarante-six variétés de fromage?
"How can you govern a country which has two hundred and forty-six varieties of cheese?
Charles de Gualle
It is known as the best, most refined and sophisticated cuisines in the world. It is a combination of decadence, rich flavours and beautiful simplicity. We think of France and we think of baguettes, wine, pastries and cheese – but it is so much more. Natural produce from the extremely fertile land brings the best ingredients to the table that requires very little alterations. French cuisine, like the cuisine of Michoacan in Mexico, is listed on UNESCO’s ‘intangible cultural heritage’ list.
Italy had a big influence on French cuisine during Medieval times. It was around about the 17th Century when the cuisine revamped into its’ influential and individual style that it is known for today. French food was built around cuisine du potager (cooking from the garden) or cuisine du marché (cooking from the daily market). These foundations were built out of necessity, ease of access and a cheaper or free option.
This dish – Ratatouille is from the south of France in the Provence-Alpes-Côte d’Azur. This homely, cosy, eat-in your pyjamas with a good glass of reddish is quick and easy to make. They say ratatouille should be cooked in three stages – onions, peppers, garlic and tomatoes first, aubergines separately and courgettes separately. At the end, these veggies are combined and then either baked or simmered for over an hour in a heavy casserole dish.
This recipe???? We know you need time and can’t spend all day in the kitchen so we threw everything in a pot for you (nice of us, huh??). It’s a pretty little presentation with our aubergine boats and a sprinkling of fresh herbs on top – if you want to be totally non-vegan, why not put some cheese on top before baking the ratatouille?
Try it. I dare you.
THE RECIPE
Preparation Time: 20 minutes
Cooking Time: 1hr
Serves: 2
The Ingredients
2 tblsp olive oil
4 cloves garlic
100g/ ¼ large onion, roughly sliced
350g/1 aubergine cut in half and flesh taken out. The flesh cut roughly into cubes about 1.5-2cm
230g/1 courgette cut into 1.5-2cm cubes
170g/ 1 yellow pepper roughly cut into cubes
470g/ 2 large red tomatoes
Handful of roughly chopped parsley
15-20 sprigs of thyme
4 tsp salt
2 tsp black pepper
Handful of torn basil
The Method
Preheat oven to 180’C
Drizzle aubergine halves with olive oil and place them in the oven, skin side down. Bake for about 15 minutes. Meanwhile, score the skin of the tomatoes with a sharp knife and place them in a pot of boiling water for about 10-20 seconds. The skins should start to fall away. Skin the tomatoes, roughly chop.
Heat 1 tbsp olive oil in a heavy based saucepan. Add onion and then garlic, cook until soft.
Now cook the pepper and tomatoes
Once the tomatoes have started to break down (10-15minutes) add courgette and aubergine
Season with salt and pepper. Add thyme and cook on a medium heat for 40 minutes, stirring occasionally
Mix through roughly chopped parsley and scoop mixture into the aubergines.
Bake in the oven for about 20 minutes
Sprinkle with olive oil, basil, parsley and serve with a crusty baguette

An American-Italian Classic
The Recipe
Serves: 4 people
Preparation: 30 minutes
Cooking Time: 40 minutes
Spaghetti and Meatballs, I believe, is the quintessential Italian American dish. When the southern Italians immigrated – meat was in abundance and they used whatever cuts were available and turned it into something magical

Throughout history, immigration patterns as a result of struggle and displacement through war, political upheaval or economic crisis can impact a country’s cuisine. Certain cuisines can also be changed and developed through an abundance of produce and the necessity to adapt. Italian American cuisine, one of the most iconic in the world is a result of the latter. It is a cuisine that stands on its own that has developed through immigrants evolving their traditions with the produce available to them in the Americas.
In the late 1800’s, America had the largest surge of “New Immigrants” into the country consisting of Italians, Slavs and Jews. Over 5 million Italians migrated to the United States between 1876-1930. The majority were from Southern Italy and consisted of labourers, farmers and a small percentage of craftsmen. With grain prices falling in Italy and disease spreading through grapevines that were used to produce wine, The United States seemed to be the answer for many Italians offering lower taxes, better wages and plenty of land to grow produce. Poverty and political hardship were the two driving factors for the mass surge of Italian immigration around this period.

LIttle Italy, NYC, 1956. Credit, Leonard Freed
From the South of Italy came pasta, red sauce and meatballs, however post war America seemed to break away from ‘greasy’ and ‘garlic peasant dishes’ and just as Italian fashion from Milan became recognized as high class, as did Northern Italian food. Ingredients and dishes such as risotto, polenta, porcini mushrooms, balsamic and Parmigiano Reggiano grew more and more popular from the 1970’s onwards. It was also during this time that the American Trade laws were lifted allowing more ingredients to be imported resulting in a more diverse range of regional Italian dishes could be readily cooked.
Many Italian American dishes were born from immigrants having access to very little Italian ingredients yet a plethora of local produce. Dishes became heavy on beef or veal and laden with cheeses such as ricotta and mozzarella. Italian American food today is extremely broad and a mixture of comforting, indulgent, high class and rustic and has developed over time becoming deeply rooted in American culture. Typical Italian American dishes include eggplant parmigiana (layers of eggplant, parmesan and marinara sauce), porchetta (pulled pork usually served as a sandwich), veal marsala (veal cutlets or scaloppini in a mushroom marsala sauce), and lobster fra diavolo (spicy tomato sauce pasta with lobster).
Spaghetti and Meatballs, I believe, is the quintessential Italian American dish. When the southern Italians immigrated – meat was in abundance and they used whatever cuts were available and turned it into something magical.Originally bulked up with bread at a 50/50 ratio, meatballs developed into more meat and less bread. The red sauce known as marinara sauce consisting of garlic, olive oil and canned tomatoes. Canned tomatoes and spaghetti were two of the most common Italian ingredients available at the time.
There are many versions of spaghetti and meatballs and I present to you my version. It is a quick and easy dish where the sauce can be made in advance and if there are too many meatballs you can always freeze them for another time. The key is in the timing of the pasta and sauce which results in a steaming, hot saucy bowl of comfort food and one of the most iconic Italian American dishes in the world.
INGREDIENTS
Red Sauce
4 cloves garlic
1 medium/100g chopped brown onion.
3 cans good, chopped tomatoes (you are welcome to use fresh tomatoes if they are juicy and sweet. There is nothing wrong with good, canned tomatoes)
2 tbsp tomato paste (optional depending on how flavourful your tomatoes are)
200mls red wine
100mls water
1 tsp brown sugar
2 dried bay leaves
2 tsp dried oregano
Salt and pepper to taste
A small handful of chopped basil
Meatballs
250g pork mince
250g beef mince
100g finely chopped brown onion.
2 tsp fennel seeds
2.5 tsp paprika
1 tsp chilli flakes
½ tsp cinnamon powder
40g fine breadcrumbs
1.5tsp salt and pepper
30g grated Parmigiano-Reggiano.
2 eggs
A good handful of chopped Italian parsley.
Extra virgin olive oil
METHOD
Red Sauce
1. Fry the onion until translucent, then add the garlic, bay leaves, canned tomatoes, and tomato paste (if using). Stir until combined and then add the sugar, oregano, red wine, and water.
2. Allow the sauce to reduce (15-25 minutes) on low heat.
3. When it has reached the desired consistency to clinging onto the pasta and meatballs, take off the heat and allow it to cool slightly. Season with salt, pepper, and a handful of basil.
Meatballs
1. Mix paprika, chilli powder, salt, pepper, and cinnamon into the breadcrumbs.
2. Add the breadcrumbs to the mince and set aside
3. In a fry pan, add onions and fennel seeds and fry until the onions are just cooked. Place this in the bowl with the mince.
4. Add egg, Parmigiano-Reggiano, and chopped parsley
5. Mix well and shape into 20 round meatballs
6. Meanwhile cook the pasta while cooking frying the meatballs. Have a medium pot of water and plenty of salt (it should taste like the sea) come to a rolling boil. Add 500g of spaghetti and allow to cook for 7-9 minutes or until al dente.
7. Heat a large fry pan with a bit of olive oil. Cook meatballs (do not overcrowd) until brown on the outside. Add a few spoons of the sauce with a dash of pasta water, cover and cook through (3-5 minutes). Throw in cooked spaghetti, toss then pile it into a pasta bowl.
9. Garnish with plenty of grated Parmigiano-Reggiano, torn basil and extra virgin olive oil.

Gumbo. The Ultimate Comfort Food.
The Recipe
Serves: 4 people
Preparation: 30 minutes
Cooking Time: 2.5 hours
The first gumbo was documented in 1803 and in The Creole Cookery Book (1885), New Orleans gumbo is simply described as “made from scraps of meat or fowl, a few oysters, crabs or shrimp with a couple of spoonfuls of well-cooked rice.

A lifetime ago while travelling through the USA, I was amazed by the extreme diversity the country had and it was as though each state I visited was a country within a country. My naïve belly and mind travelled through South and North Carolina, Mississippi, Florida, Georgia, Texas and Louisiana. The city that really took my breath away for mostly good reasons was New Orleans and it is not until recently, when learning more about Southern food, just how wonderful and diverse the city’s cuisine was, is and has become. From a stew of jambalaya, a muffuletta stuffed with Italian meats and cheeses to oysters Rockefeller or the vast array of shellfish – in particular, crawfish, New Orleans is a wonderful mixture of tradition, culture and innovation.
When was Gumbo Invented?
The first gumbo was documented in 1803 and in The Creole Cookery Book (1885), New Orleans gumbo is simply described as “made from scraps of meat or fowl, a few oysters, crabs or shrimp with a couple of spoonfuls of well-cooked rice”.
Who exactly invented Gumbo is and will forever be unknown. With the inclusion of meat such as pork there is a Spanish influence, the use of roux to encourage the brown colour of a good gumbo could be from the French, the use of okra from Africans and the inclusion of file (“fee-lay”), sassafras leaf powder is undeniably Native American.
Gumbo can be thickened with okra or file, but never both and roux can also be included. It consists of a hearty beef or chicken stock, tomatoes may or may not be added and it will most definitely always contain garlic and onions.
Through my research of history and recipes of gumbo – not one is the same and who is to say what style (Creole or Cajun) is the original or most traditional. However, what is apparent, is that this hearty stew tells a thousand tales of history and the people who came to live in Southern Louisiana. I hope you enjoy my little version of gumbo and eat it by the bowlful.
INGREDIENTS
70g bacon drippings OR unsalted butter
50g plain flour
80g/1 medium green capsicum
80g/2 celery sticks
100g/1 small white onion
120g okra, topped and tailed
1 clove garlic, finely chopped
200g Andouille sausage*
300g uncooked medium prawns (shelled and deveined)
2L good quality chicken stock
1 can chopped tomatoes (425g)
2tblsp Worcestershire sauce
3 old bay leaves
3tsp paprika
½ tsp smoked paprika
1-2 tsp cracked black pepper
1tsp dried thyme
1-2tsp cayenne pepper (more if you like it extra spicy)
Sea salt to taste
5-10g Flat leaf parsley leaves, roughly chopped
Spring onions, finely chopped
*you can also use Mexican chorizo, Polish kielbasa or German smoked sausages. Anything to impart a smokier flavour
METHOD
Roughly chop celery, onion, and green capsicum.
Cut okra into 1cm rounds
Cut the sausage into 5mm rounds and fry until brown and crispy on both sides. Take out the sausage and cook the okra for about 1 minute in the same pan. Set aside.
Place flour and butter or baking drippings in a heavy crockpot on low heat. Whisk constantly until the roux is a dark cinnamon colour (this will take about 15 minutes)
On low heat still, add in the onion, celery, and green capsicum to the roux until the vegetables have softened. Lastly, add garlic.
Add in half the chicken stock slowly while constantly mixing. Throw in bay leaves, spices, Worcestershire sauce and tomatoes. Pour in the rest of the chicken stock and allow the gumbo to simmer for 1hour.
Add in the okra and cook for a further 30 minutes.
Add the cooked sausage and simmer for 40 minutes
When the stew has nicely thickened (thick honey consistency), lastly toss through the prawns until cooked. Turn off the heat and add chopped parsley.
Serve with fluffy white rice with spring onions tossed through it

Nasi Lemak for $25
The Recipe
Serves: 8 people
Preparation: 2 hours
Cooking Time: 1 hour
My version of Nasi Lemak is not traditional in any sense but has the elements of coconut rice, fried chicken, otah, fried egg, and ikan bilas. It was sold for $25 and also had a palate cleanser.

There is a lot surrounding hawker cuisine as Singapore aims to become a cuisine listed on the UNESCO intangible heritage list. The fact of the matter is that hawker food is part of the Singaporean culture but not everyone wants to take on their parents stalls and hence, famous stalls are now closing and becoming a distant memory. However, fear not as bright young things are setting up small restaurants and alternative hawker stalls as an ode to Singaporean cuisine. This is definitely the way forward.
Although I am not Singaporean I do admire the sense of diversity this little island holds. Such a plethora of cuisines available at any time of the day.
Once upon a time I was in a little TV show and had the honour of spending a day with the people at Nasi Lemak Kukus which have now unfortunately ceased operation.
My version of Nasi Lemak is not traditional in any sense but has the elements of coconut rice, fried chicken, otah, fried egg and ikan bilas. It was sold for $25 and also had a palate cleanser.
So…. here is the recipe and if you dare to try it, let me know how you go, just be prepared for the short novel below!
CUCUMBER PANDAN GRANITA
400g Japanese cucumber
10g pandan leaves
40g calamansi juice (160g of calamansi)
*microplane 2 for the rinds in the anchovy crumb
45g icing sugar
20g pandan syrup*
GARNISH
pandan leaves – cut into thin strips (35)
8 calamansi chips (these will be dehydrated over 2 days)
When frozen, place in 35 glass jars ready for service.
Top with calamansi when taken out of the fridge.
*PANDAN SYRUP – Makes about 55g
5g pandan leaves
55g white sugar
105g water
IKAN BILAS CRUMB
30g dried anchovies (fried)
30g grounded peanuts
2 calamansi skin, microplaned
30g anchovy puffed black rice
ANCHOVY PUFFED RICE
30g black rice
10g dried anchovies/ikan bilas
530mL water
1g sea salt
PANDAN INFUSED COCONUT RISOTTO
120g white onion, finely chopped
10g peeled garlic, finely chopped
360g arborio rice
36g extra virgin olive oil
60g butter
1800g water
240g coconut cream
25g pandan leaves
15g chicken stock cubes
Sea salt
PANDAN POWDER
Using the strained pandan from the cucumber pandan granita, place in a dehydrator fo 1-2 days
Blend thoroughly to a fine powder
Place In a metal cocoa shaker for service
SAMBAL BELACAN
25g belacan
140g fresh red chillies
64g dried red chillies (chilli paste)
95g peeled shallots
32g peeled garlic
12g prawn powder
10g peeled galangal
160g water
65g vegetable oil
12g palm sugar
3.5g calamansi juice
Apple cider vinegar (to taste)
Xantham gum
CHILLI PASTE
Cover chillies with hot water
Soak for 30 minutes or until they are soft
Drain and blend
Place in a small bowl and put aside
SOUS VIDE EGG
10 eggs
Place in water bath at 64’C
Cook for 45 minutes
Hold at 40’C
*cook just before service and test
OTAH SPICED CHICKEN BALLOTINE
Chicken
1.2kg chicken thigh, bone out, skin off
*each thigh should weigh about 150g each.
Vegetable oil – for frying
Trim chicken and set aside trimmings to blend
Flatten out chicken thigh
Season with salt and pepper
Otah - Spice
10g belacan, toasted
12g lemongrass
10gg peeled galangal
10g fresh turmeric
8g peeled garlic
20g peeled shallots
32g fresh red chillies
40g water
OTAH - CUSTARD
1g kaffir lime leaves, finely chopped
1 x egg
2g rice flour
1.2g sea salt
2g white sugar
40g coconut cream
Whisk together and set aside
26g extra rice flour
Combine in a large bowl
OTAH - FILLING
80g soaked anchovies, water drained
Chicken trimmings
Blend with a bit of the anchovy water and set aside
Finely blend spice ingredients
Add to the custard mix
Whisk ingredients together
Add this liquid to the anchovy/chicken paste to form a paste
Place paste along the chicken thigh. Roll in cling film and seal tightly
Poach for 15-20 minutes in boiling water. Set aside. Cool slightly
Reserve the rest of the liquid for batter
Add rice flour to form a fluid batter. Dip in batter and fry.
Dip chicken into batter and lightly coat. Fry until golden
Keep at room temperature for service
Slice in 1 cm slices for plating
TO PLATE
Throw a bit of sambal on the plate
Place coconut risotto slightly off-centre on the plate using a small bowl mould.
Make a little well on top and crack the egg into it
Place sliced ballotine pieces on the plate (4-5)
Garnish with fresh cucumber ribbons
Top the egg with the ikan bilas crumb
Dust with pandan powder (dehydrated pandan leaves from the palate cleanser)
SEE - EASY!!!

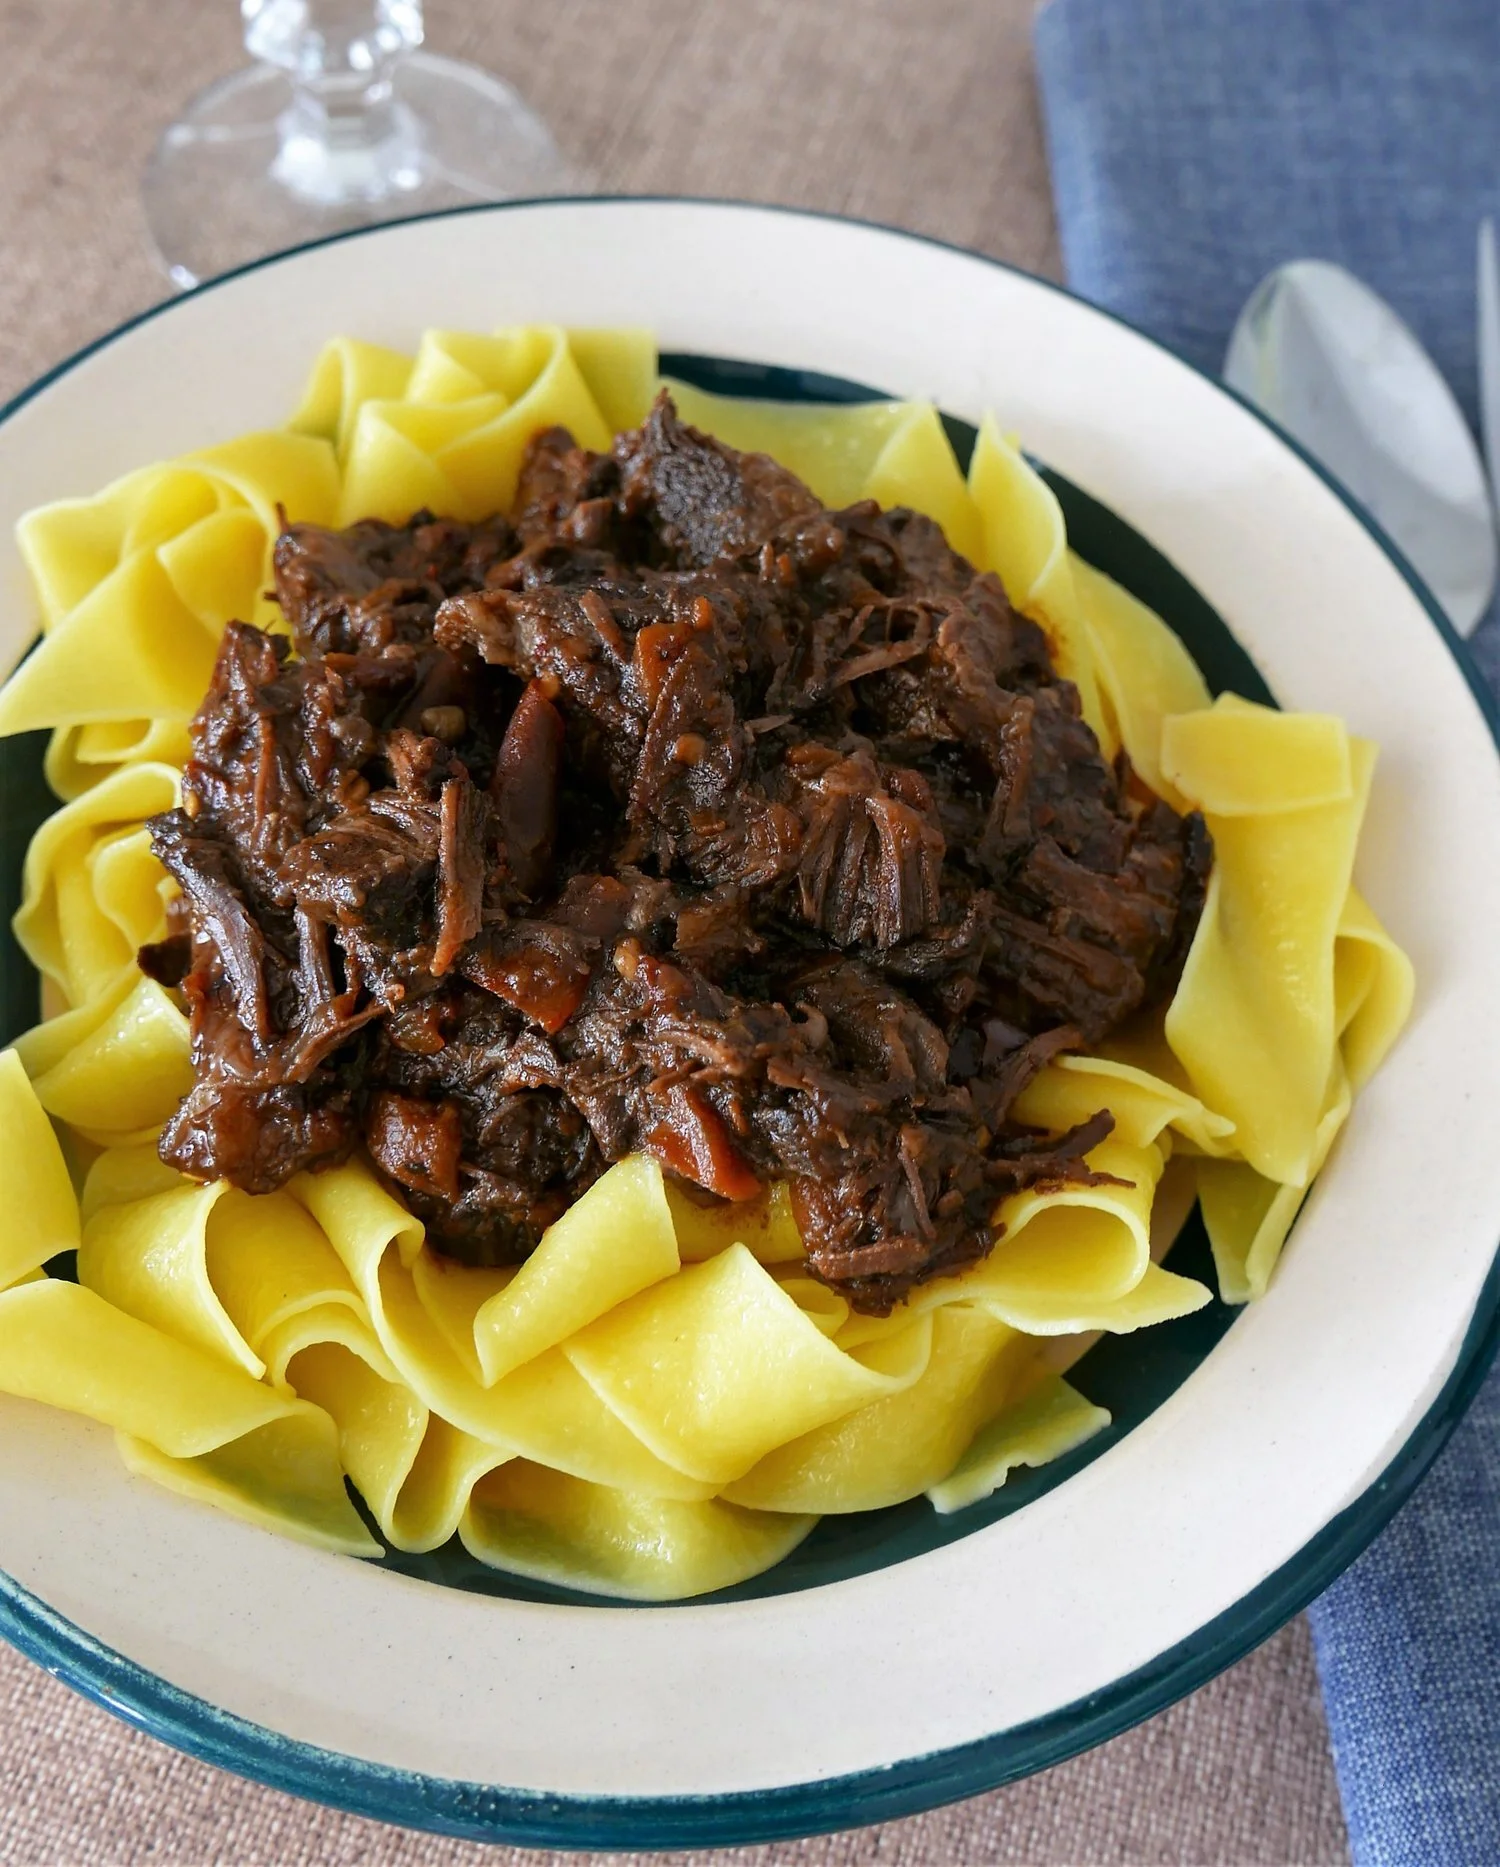
Stout & Pasilla Ragu with Quinoa Pappadelle
The Recipe
Serves: 4 people
Preparation: 40 minutes
Cooking Time: 2-2.5hrs
This recipe is a crazy concoction of many things, however, this dish is still familiar and comforting. With stout, melty beef cheek, pasilla chillies piled on top of some freshly made quinoa pasta - what could be more comforting?
Lately, I have been learning more about beer and thoroughly enjoying it! The complexity of different styles of beer have endless possibilities when pairing with food - but what I particularly love is experimenting with beer in cooking.
This recipe is a crazy concoction of many things, however, this dish is still familiar and comforting. With stout, melty beef cheek, pasilla chillies piled on top of some freshly made quinoa pasta - what could be more comforting?
Warning; this recipe does take some time and patience but I guarantee it will be worth it!
RAGU INGREDIENTS
1kg beef cheeks
Pepper
Salt
5 (80g) pasilla chillies
100g yellow onion (finely chopped)
4 cloves garlic
200g carrot, finely chopped
2.5tsp cinnamon powder
2.5 tsp white pepper
2tsp smoked paprika
250mls stout beer
500g really ripe tomatoes, roughly chopped
200mls good beef stock
100g tomato paste
2tsp brown sugar
1.5 tsp chilli flakes
2 tsp Mexican oregano
3tsp sea salt (more if needed)
Grill the pasilla chillies over an open flame until nice and dark. Cover warm water for 20 minutes. Take out and then slice thinly. Reserve the liquid
Season beef cheeks with salt, pepper and brown them on high heat in olive oil in a heavy casserole pan
Take out the beef and in the delicious fat and oil, turn the heat to medium and fry onions until translucent. Add in the carrot, garlic and chopped pasilla chillies
Mix in the cinnamon, white pepper and smoked paprika
Pour in stout, chicken stock, tomato paste, brown sugar, chopped tomatoes and reserved liquid from the pasilla chillies
Loosely cover with a lid, and simmer for 2-3 hours until the liquid has reduced and the beef cheeks are melty in the mouth fall apart kinda texture and can be broken up easily with a spoon.
Mix in chilli flakes, oregano and salt
QUINOA PAPPARDELLE
Makes about 400g
Preparation Time: 30minutes
Cook time: a few minutes
INGREDIENTS
100g quinoa flour*
50g Tipo ‘00’ flour
2 medium eggs
1 egg yolk
2g fine sea salt
Splash of olive oil
Mix flours and salt together and create a well in the centre
Place eggs and egg yolk in the well and whisk in the flour with a fork a little bit at a time. Add a dash of olive oil
Mix until ingredients are combined and knead until the dough comes together and is smooth.
If you are feeling lazy or a short for time, you can throw the ingredients in an electric mixer until it comes together
Wrap dough in cling film and rest in the fridge for 30-40 minutes
Divide dough into 4 pieces, cover the remainder while working with each portion
Roll out dough on a well-floured surface and pass through pasta machine. Start at 0/1 setting and gradually move to the 3rd last setting. You want the pasta to be thick enough and have enough texture to hold up to the chunky ragu.
When the pasta is the correct thickness, making sure it is well floured, fold over width side on top of each other and slice 2cm thick strips with a sharp knife. Separate with flour, cover and set aside until ready to cook.
In boiling well-salted water, place pappardelle and cook for about 1 minute until aldente. Strain and coat in olive oil. Plate in bowls and scoop generous amounts of the ragu on top.
Garnish with coriander and Mexican cotija cheese if your heart desires!
*I blended quinoa and finely sifted it to make the flour


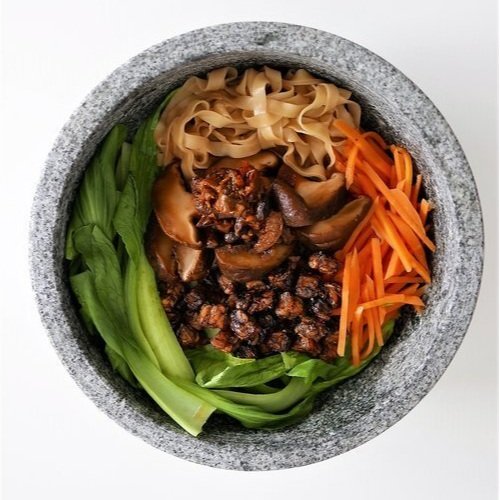
Monday Noodle
The Recipe
Serves: 2 people
Preparation: 20 minutes
Cooking Time: 10 minutes
It is based very loosely on one of my favourite dishes in Singapore - Bak Chor Mee which I always have with Mee Pok (a flat egg noodle).
I am by no means an expert in Chinese or Singaporean dishes, however, I have lived in this country for 6 years and have my favourite hawker foods. I admit I do not eat them often because I always feel like my meal should always have some fresh and crunchy element to it…. so a trip to the hawker is an indulgence for me that I will do probably once every two weeks.
With moving to my new place, I have accumulated some extra kitchen space for my private dining events and am enjoying working from home and experimenting at home.
Why Monday noodle? I had a craving on Monday, it is now Friday and the response from the picture of this dish was overwhelming. It is based very loosely on one of my favourite dishes in Singapore - Bak Chor Mee which I always have with Mee Pok (a flat egg noodle). I was at home and had the ingredients to kind of make a Bak Chor Mee. I had tempeh so I substituted that for the minced pork. I toyed with the idea of adding ikan bilas for a bit of extra crunch but decided to make the dish completely vegetarian.
INGREDIENTS
120g tempeh
1/2 large carrot, sliced thinly
300g leafy chinese greens - your choice!
150g fresh shiitake mushrooms
300g mee pok noodles or whatever takes your fancy
dark soy sauce
soy sauce
fish sauce
oyster sauce
white pepper
vegetarian stock cubes
Chilli sauce of your choice!!!!
Braised Mushrooms
METHOD
Simmer 1 cup water, 2tsp dark soy sauce and 1/2 tsp fish sauce in a small saucepan. Throw in the shiitake until they are cooked and have taken on a nice brown colour. (20 minutes)
Mix 2 tsp oyster sauce, soy sauce, fish sauce, 1/2 a vegetable stock cube (MSG is welcomed), 1 tsp white pepper and 4 tbsp of the mushroom broth with about 500 ml water. Bring to a boil, cook noodles until al dente. Blanche Chinese greens and carrot.
Chop the tempeh in small cubes, season with a bit of sea salt and shallow fry in coconut oil until nice and crispy. Add a small dash of dark soy to give it a nice blackened colour.
Place noodles, vegetables and tempeh in a bowl. Pour over a little bit of stock, take a photo and enjoy.
*disclaimer… I know how strongly Singaporeans feel about their hawker food. This is no replication or traditional recipe for Bak Chor Mee. It’s simply a tasty noodle dish inspired by my favourite hawker fare. Hope that’s ok.

Miso Risotto with Peas & Shiitake Mushrooms
The Recipe
Serves: people
Preparation: 20 minutes
Cooking Time: 30 minutes
This dish conjures up a unity of flavours and ingredients from two different parts of the world, however its flavour profile is familiar to both cultures. Japanese miso meets Italian rice. My apologies in advance if I have offended either of these countries – this dish just seems to make sense.
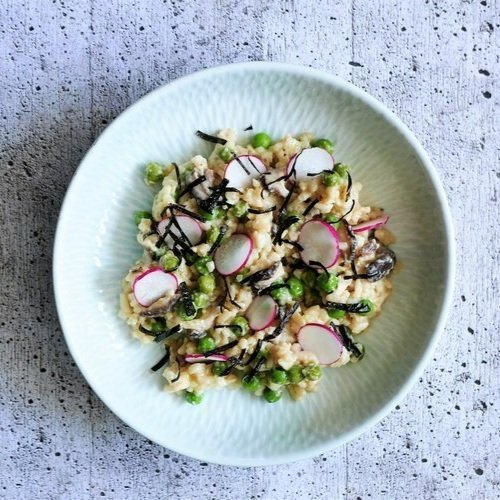
This dish conjures up a unity of flavours and ingredients from two different parts of the world, however its flavour profile is familiar to both cultures. Japanese miso meets Italian rice. My apologies in advance if I have offended either of these countries – this dish just seems to make sense.
It was spurred on by my flat mate, an enthusiastic cook who loves to try new dishes. “Jen, I have just bought a shitload of miso paste – can you write a few recipes on how to use miso that isn’t exactly Japanese???” Krissy. This one is for you.
So, the two important ingredients from two different cultures are miso and Italian rice. Miso encapsulates the very essence of Japanese cooking with an undeniable umami taste.
Umami: “it is usually so faint and overshadowed by other stronger tastes that it is often difficult to recognize it unless attention is specifically directed towards it” Dr. Kikunae Ikeda
Dr Ikeda discovered the amino acid glutamate through many experiments on Konbu, isolating certain compounds by means of evaporation. Umami is found naturally in food such as mushrooms, Parmesan cheese, fermented and cured food products – just to name a few. It is a taste that has existed for many years and although its’ discovery was in the early 1900’s, it took a little over a century to be officially recognized as the fifth taste, adding to sweet, sour, spicy and bitter.
Now rice – in particular rice for making risotto, you will find more about it here.
This recipe can be made in advanced and cooked until the grains are al dente. When it is time to serve guests, add a little water and mix through to heat up the risotto.
The garnish is not essential but dresses up the dish and makes it look that little bit more special.
INGREDIENTS
350g/2cups Arborio or Canaroli Rice
20g butter
A good glug of extra virgin olive oil
140g/1 x Medium onion
10g/1-2 cloves garlic
900mls boiling water
80g/4tblsp miso paste
200g/1.5 cups green peas (fresh or frozen)
150g fresh shitake mushrooms
50g grated parmesan cheese
white and black pepper
Garnish
1 sheet of nori
2-3 radishes
Parmesan cheese
Extra virgin olive oil
METHOD
Finely chop onion and garlic – set aside
Roughly chop the mushrooms as well and set aside
Mix the miso paste and boiling water in a litre jug until the miso has dissolved
In a medium heavy base saucepan, fry onions in oil and butter on a medium heat, when the onions are soft, add in the garlic and then the UNWASHED rice. Mix until all the grains are nicely coated with the buttery oil mixture and the lovely smell of garlic wafts around your nostrils.
Add in the chopped shitake mushrooms.
Now you can add some of the miso stock, 100 mls at a time, mixing the rice constantly until all the grains have absorbed the liquid.
Before the last 200mls of miso stock need to be added, throw in the peas. They won’t take long to cook and we want them looking vibrant and green in our dish!
When all the liquid has been absorbed (you will need to use your instincts here and may need to add more liquid, depending on how well cooked the rice is or not.)
Mix through the grated parmesan cheese, add black and white pepper to taste and a little salt if your palate calls for it.
Plate up the risotto warm and garnish with finely sliced red radishes, nori, grated parmesan cheese and a dash of extra virgin olive oil.

Gnocchi alla Romana with Mushroom Ragù? Ragout?
The Recipe
Serves: 4 people
Preparation: 60 minutes
Cooking Time: 30 minutes
As history would recall, say around late 18th Century when Napoleon and his posse charged into Northern Italy…….. ragù was inspired somewhat by ragout.

How absurd does it seem to mix a traditional Italian dish with a traditional French dish?
If I was to call my mushroom ragout a ragu, technically that would be incorrect….. however, cuisines and traditional dishes are becoming so intertwined sometimes we don’t know what comes from where and who did what first.
As history would recall, say around late 18th Century when Napoleon and his posse charged into Northern Italy…….. ragù was inspired somewhat by ragout.
The Italians were eating their pasta with more of a meat broth but ragout, a fish, vegetable or meat stew provided the inspiration and backbone for that meat broth which became a traditional, wonderful and rich sauce for pasta. And the most famous ragù of all – ragù alla bolognose which is NOT served with spaghetti and does not comprise of minced beef!
Despite the French invading in the 1790’s, there is evidence that Alberto Avisi, a chef for the Cardinal of Imola, was playing around with this mixed meat (veal, pork, beef) slow cooked stew tickled with cinnamon notes as early as 1785. So, my question to you is what came first in Italy? The ragout or the ragù? I’ll leave that one to you. (And it rhymes!)
NOW, bring on the gnocchi – the type that was traditionally made in the time of the Roman Empire. When potatoes didn’t exist until the Colombian Exchange of the 16th Century where a shipment of maize, potatoes, tomatoes and communicable diseases arrived in Europe. Before this transference of staple foods from the Americas, the Romans were making gnocchi from flour and water and that eventually evolved into the glorious addition of eggs, cheese and butter.
Gnocchi alla Romana is made from semolina – a product that is not exactly flour but a course product that is derived from the milling process of durum wheat (the wheat that is used to make pasta). Mix that semolina with whole milk, eggs, Parmesan cheese and you have a dish as comforting as mac and cheese.
I digress….. I just love food history but here is the recipe, my version of mixed mushroom ragout/ragu with Roman style gnocchi.
Enjoy with a nice glass of French or Italian red!
Gnocchi alla Romana
250g semolina (unbleached)
950mls full cream milk
1-2 bay leaves
120g grated parmesan cheese
3 egg yolks
100g salted butter
Sea salt to taste
Mixed Mushroom Ragout A good slurp of olive oil
A good chunk of butter (30g)
2 cloves garlic, finely diced
180g (medium) yellow onion, sliced
150g oyster mushrooms
100g shitake mushrooms
200g portobello mushrooms
10g dried porcini (soaked in 300mls hot water)
50g/ 2 heaped tablespoons tomato paste
300mls/ 1½ cups good red wine
Small handful of chopped flat leaf parsley
7 stalks of thyme
1. Put the milk and bay leaves in a medium sized saucepan and bring to the boil
2. Turn off the heat, remove the bay leaves and slowly add in the semolina while whisking constantly
3. When all the semolina is incorporated, use a spatula to scrape down the sides of the pan
4. Add in 50g of the grated parmesan cheese and 30g butter. Mix well and then finally add in the egg yolks one at a time until all ingredients are combined
5. Add a little salt taste
6. Transfer the gnocchi mixture into a non-stick tin or alternatively brush the tin with olive oil. (I used a 22cm x 30cm x 5cm baking pan)
7. Flatten out the mixture until even and smooth, cover with cling film and refrigerate for about an hour until firm
8. When the mixture is set, turn out and cut shapes with a cookie cutter or knife. ( I used a 5cm round cookie cutter)
9. Place in a baking pan or medium casserole dish, slightly overlapping the gnocchi pieces.
10. Brush each piece with the left-over butter and sprinkle generously with parmesan cheese
11. Place in the oven on bake/grill setting for about 10-15 minutes or until the cheese is nice and golden.
Serve the gnocchi while hot!!!
1. On a medium heat
2. Add in chopped onions and cook until translucent
3. Add in the garlic until fragrant
4. Throw in all the mushrooms and mix through. The porcini mushrooms can do with about 5 minutes of soaking in hot water before adding to the pot
5. Add wine, a few sprigs of thyme and tomato paste
6. Simmer the mixture and reduce until most of the liquid has evaporated, leaving a thick stew
7. Take out the thyme sprigs
8. Throw in a few thyme leaves and chopped parsley
9. Serve immediately with the gnocchi
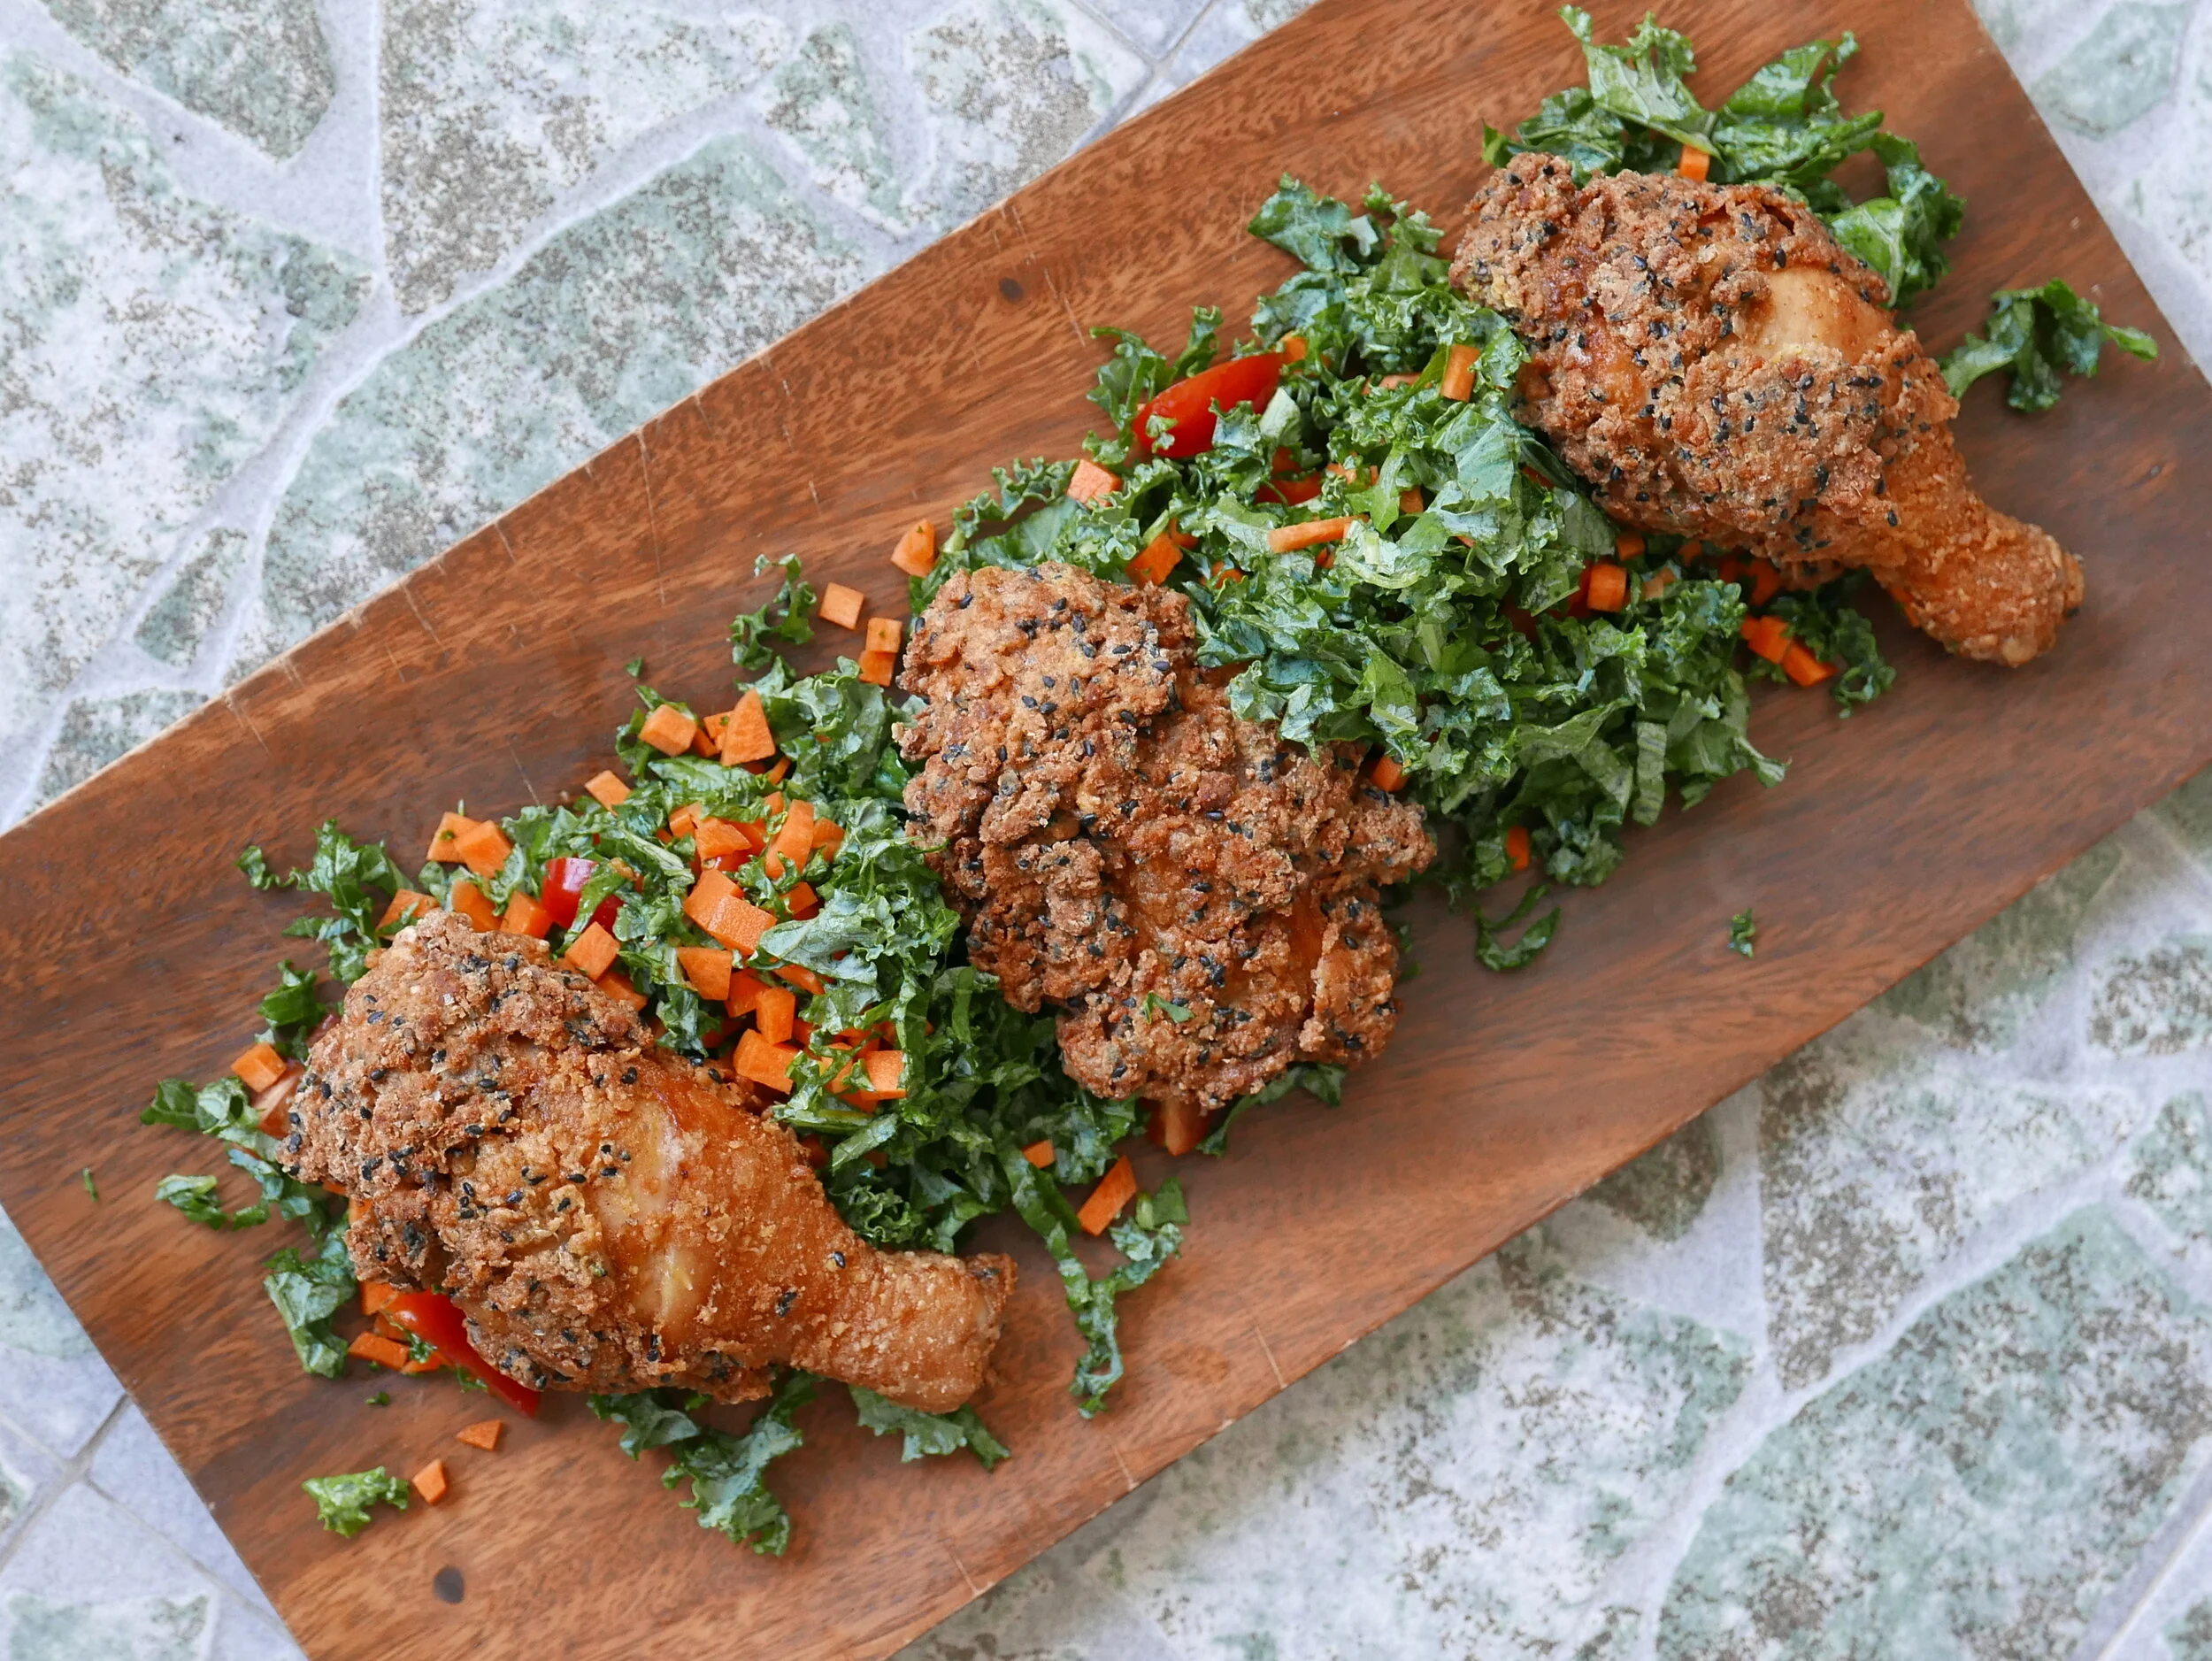
Comfort Fried Chicken with Kale Greens
The Recipe
Serves: 3-4 people
Preparation: 40 minutes
Cooking Time: 20 minutes
Inspired and influenced by my research on fried chicken - in Southern USA, chicken is served with collard greens, however I decided to keep the greens fresh, crisp and green.

I know, I know - everyone has their own style and way to make the ultimate fried chicken. This recipe requires only a short amount of time to marinate the chicken rather than an overnight brine.
Inspired and influenced by my research on fried chicken - in Southern USA, chicken is served with collard greens, however I decided to keep the greens fresh, crisp and green.
If you want to dig in deeper about the history of fried chicken, you can indulge HERE , if not proceed to make this super crispy chicken.
INGREDIENTS
Chicken
650g chicken with the skin on (thigh, drumstick or breast)
Oil for frying (low smoke point oil such as canola or vegetable works)
Marinade
50mls good soy sauce
2 cloves garlic, finely chopped
1 tsp brown sugar
¼ tsp cayenne powder
20g good extra virgin olive oil
Coating
50g plain flour
80g cornflour
3 tsp dried oregano
1½tsp white pepper
3 tsp sweet paprika
1 tsp turmeric
1 tsp sea salt
2 tblsp black sesame seeds
1 egg
The Salad
10 – 15 cherry tomatoes, cut into quarters
2-3 large leaves of kale, stripped of inner stem and finely chopped, sprinkle lightly with salt to take out some of the bitterness
1 medium-sized carrot, peeled and finely diced
Dressing
3 heaped teaspoons of good mayonnaise
1 tblsp lemon juice
¼ tsp salt
1 tsp honey
1 tsp white pepper
½ tsp black pepper
METHOD
1. Mix all the marinade ingredients in a medium-sized bowl
2. Add in the chicken and marinate for 30 minutes
3. Beat the egg lightly in a separate bowl
4. Mix all the coating ingredients until combined
5. After the chicken has been marinated, take some of the marinade and mix it through the coating. This creates lumps in the coating which makes the chicken extra crispy!
6. Dip the chicken into the egg and then into the coating mixture. Press the chicken well with the coating mixture and place on a tray, repeat until all chicken is ready to fry
7. Heat up the oil, it should be at about 160’c. You know when the oil is done if you throw in some flour and it starts to sizzle. Keep the oil at a constant temperature – if it is too high, the coating will burn and the chicken won’t cook. If you are unsure you can always use a thermometer.
8. While the oil is heating up, mix all the salad ingredients in a large bowl
9. Also, combine all of the dressing ingredients
10. Fry the chicken until golden brown, place on a cake cooler or grill similar to allow the chicken to crisp up
11. Mix the dressing through the salad, serve with some generous pieces of crispy fried chicken