
explore the world through the universal language of food
Khmer Herb Linguine
The Recipe
Serves: 2-3 People
Preparation: 12 minutes
Cooking Time: 15 minutes
“As well as for medicinal purposes, Khmer herbs are also used for beauty and culinary applications.”

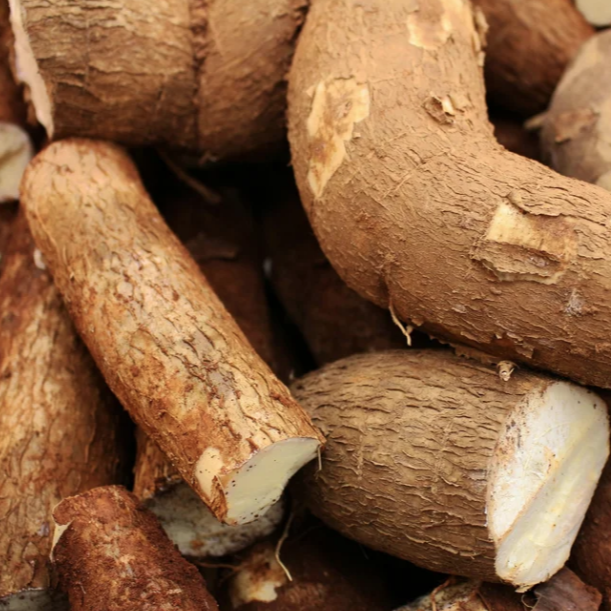
Khmer herbs are one of the unique building blocks of Cambodian cuisine. The country’s rich biodiversity is where around 3000 vascular plant species grow and just over a third of this number are medicinal plants used to treat a variety of illnesses. Traditional medicine practitioners in Cambodia are known as Kru Khmer, who prescribe a variety of herbs and tonics to patients, from a combine lineage of Ayurveda, Theravada Buddhism, and traditional Chinese Medicine. As well as for medicinal purposes, Khmer herbs are also used for beauty and culinary applications.
Herbs such as neem, noni leaves, and holy basil are quite bitter when eaten raw, yet once cooked, take on a different flavour profile, making them an extremely important element in the country’s cuisine. Amok Trei (Fish Amok) is a perfect example of this with the inclusion of noni leaves, creating a unique texture and flavour to one of Cambodia’s most recognised dishes.
When cooking with Khmer herbs, those with a more intense and bitter profile are best chopped or sliced finely before being incorporated into a dish, the others are fine to be blended – I did a lot of tasting to decipher which to blend or slice making this pesto. I just had to add Cambodian cashews (salty skins and all) into this dish, because I am addicted to them!
It’s a simple recipe, allowing the herbs to shine and cling nicely to strands of flat linguine. Some of the herbs listed below may not be available to you but don’t worry, you can simply take a chance and explore the herbs that are, and experiment to make your own unique blend - think coriander and pumpkin seeds, sage and oregano with sunflower seeds, whatever you fancy. I would love to know the results so let me know!!
If you would like to read on, here’s a wonderful study on the medicinal herbs in Cambodia, as well as the culinary herbs.

Credit ChangKran Khmer
THE INGREDIENTS
300g linguine, spaghetti etc
1 tbsp sea salt
KHMER HERB PASTE
80g mixed Khmer herbs.
(sawtooth coriander, rice paddy herb, holy basil, shining bush plant/peperomia pellucida, neem) *
50g cashews
150g olive oil
2 cloves garlic
1 x lime juice
30g parmesan cheese
½ tsp salt, ½ tsp pepper
Sliced red chillies and herbs.
*when using bitter herbs, make sure you include no more than 20% into the paste otherwise it will be extremely bitter… and no one wants that.
THE METHOD
Taste your herbs, and slice the more bitter tasting ones, set them aside
For the more neutral herbs, place into a food processor or blender
Add in nuts, garlic, oil, cheese, lime, salt and pepper.
Blend these dry ingredients first until they are fine, then slowly add in the oil in stages, taking into account the consistency of the paste. Feel free to add more or less oil, it’s entirely up to you, just make sure it is the right consistency to coat the pasta.
Mix the sliced herbs into the paste and set aside.
Meanwhile bring a small pot of water to a rolling boil and add salt
Cook pasta according to instructions
Mix through the paste and plate
Garnish with sliced red chillies and herbs


Cauliflower & Split Pea Daal
The Recipe
Serves: 4
Preparation: 10 minutes
Cooking Time: 25-30 minutes
“Turmeric has been used for almost 4000 years as a culinary ingredient, medicine as well as a holding religious significance in some cultures”.

There was a week or two I was reading and writing a lot about turmeric and the wonderful natural benefits it has on the body. Sure, you can take it in a supplement, but why not put it in your favourite drink, dessert or main meal? This cauliflower and split pea daal is a no-brainer and it is super easy to make, and look, you can serve it straight from the pan. Fry up some roti and you have the perfect sharing dish for 2 or 3 of your favourite people.
So here is a little bit about turmeric….
The vibrantly coloured rhizome turmeric that is turmeric stems from the ginger family and has been used as a culinary ingredient and medicine for 4000 years. It is native to Indonesia and India but is now used widely throughout the world.
It is regarded highly in both Ayurvedic and modern medicine, popularly known for its anti-inflammatory and anti-bacterial properties. The primary active substance in turmeric is curcumin which needs the help of black pepper to allow it to be easily absorbed into the body.
Just a small shpeel for you today - enjoy the recipe as much as I did !
THE INGREDIENTS
250g yellow split peas
2 tbsp of ghee (you can also use butter)
1/2 or 100g brown onion, finely chopped
1 tsp mustard seeds
1 tsp cumin
1/2 tsp black pepper
2 cloves garlic, finely chopped
5 g fresh ginger, grated
10g fresh turmeric (grated) or 2 tsp turmeric powder**
1.5 tsp of chat masala or garam masala*
1.5 tsp salt
400 mls coconut milk
200g water
400g cauliflower (cut into medium sized florets - you can use the stalk as well!)
Squeeze of lemon if you wish
Garnish with sliced red chilli and some green stuff of your choice (coriander or basil)
THE METHOD
Immerse the yellow split peas in water and allow to soak overnight. Drain before using.
In a medium saucepan or pot, heat the ghee on a medium heat and add in the onions. Cook until transluscent.
Add the mustard seeds and cumin seeds until fragrant.
Stir in the ginger, garlic and turmeric and stir until combined.
Now add the cauliflower, split peas, masala, coconut milk and water. Allow to cook on a medium heat until the cauliflower is tender and the split peas are cooked, stir occasionally.
Sprinkle in the salt to taste and add a squeeze of lemon if you wish.
Serve with rice or roti, garnish with greens and chilli.
Eat and enjoy !
* when using chaat masala, you can reduce the amount of salt to the recipe.
** to prevent extreme stains on your fingers when using fresh turmeric, oil your hand slightly before handling.

Silverbeet and Ricotta Pie
The Recipe
Serves: 6 people
Preparation: 20 minutes
Baking Time: 30 minutes
Silver beet is also known as Swiss chard and is from the same family the beetroot comes from, mainly cultivated for its roots. The silver beet has abundantly thick green leaves and white stalks. I, being me, hate to throw any kind of food away so I love that you can use the whole damn leaf and stalk in the recipe

It has been a good 10 years since I last stepped upon the black sandy beaches of Santorini. The sunsets in Ohia really took my breath away, as did driving up there on the windy, windy narrow roads. The beautiful waters and equally beautiful people in Greece have really stayed with me – I hope to return again there in the near future. I remember raiding off the road bakeries, crunching down on crispy spanakopitas, sipping on Rakomelo in Paros as the fishermen brought in their catch of the day and feasting on sun dried octopus while watching the sun set over the Mediterranean sea… Sounds like a dream? Well, yes it was and I had Alex, my partner in crime at the time by my side.
Staring off into space, I forgot for a second that I am inside, sitting on the couch next to my ever-so-adorable nephew and the rain is pouring down in a constant stream outside.
Why does it always rain here??
So I have learned to adapt many a recipe cooking for kids in the last few months, cooking in bulk and cooking more economically. So here it is, not quite a spanakopita, more like a silver beet pie… but loosely, ever much so on my memories of the sun-kissed Mediterranean.
Silver beet, by the kilogram, is so much better price-wise than buying a kilogram of baby leaf spinach. In doing this, you can allow yourself to splurge a little bit more on good crumbly Greek feta as opposed to less lip-smacking Danish feta.
Silver beet is also known as Swiss chard and is from the same family the beetroot comes from, mainly cultivated for its roots. The silver beet has abundantly thick green leaves and white stalks. I, being me, hate to throw any kind of food away so I love that you can use the whole damn leaf and stalk in the recipe. As long as you cut up the stem finely and lightly fry it to take out the bitterness before popping it into a pie.
INGREDIENTS
200g good quality Greek feta
200g fresh ricotta
250g cottage cheese
1kg spinach, most of the stem removed and finely hopped
large red onion, finely chopped
1/4 tsp ground nutmeg
1 tsp paprika
2 medium eggs
200g filo pastry
2 tsp sea salt
1 tsp ground black pepper
20g melted butter
METHOD
Thoroughly wash the leaves of the silverbeet, immersing it in water at least 3 times and completely dry – there’s nothing worse than finding even just a speck of grit in your food!
Now, finely chop the silverbeet.Turn on the oven. Fan forced at about 160’C and take out the filo pastry. Keep the pastry wrapped but allow it to come to room temperature
In a large fry pan, throw in a good knob of butter and fry onions until translucent, add first the stalks of the silverbeet until they have softened, and lastly the leaves.
In a large bowl while the silverbeet is cooking, crack the eggs crumble all the cheeses and throw in some salt and pepper.
Mix and mush all these ingredients up in the bowl with a spoon, or, as I like to do with my hands (it would be nice if you washed them first.)
Sprinkle paprika and nutmeg in the cheese mixture and mix through.
Now the silverbeet onion mix needs to be added to the cheesy stuff. Make sure you just slightly heat the leaves of the silverbeet as it will cook further in the oven. It is also nice to preserve the lovely green colour of the leaves. Allow to cool slightly.
So after this is all done, grab an oven-proof rectangular dish. (I used one 33cm x 5cm x 20cm). Use the melted butter and brush the dish. Line the dish (as rustically as you like) with layers of the filo pastry, let it hang over the sides of the dish quite a bit and these will be tucked in later.
Pour the spinach mixture into the lined dish and flatten it out. Spread a few layers of pastry on the top, brush with butter, and fold over the hanging edges of the pastry. Brush all exposed pastry with butter so it doesn’t cook naked. It will enable a nice crispy pastry.
Bake in the oven for 25-30 minutes. Cut in large slabs and serve with a crispy green salad.


Aubergine Stuffed Ratatouille
Comment voulez-vous gouverner un pays qui a deux cent quarante-six variétés de fromage?
"How can you govern a country which has two hundred and forty-six varieties of cheese?
Charles de Gualle
It is known as the best, most refined and sophisticated cuisines in the world. It is a combination of decadence, rich flavours and beautiful simplicity. We think of France and we think of baguettes, wine, pastries and cheese – but it is so much more. Natural produce from the extremely fertile land brings the best ingredients to the table that requires very little alterations. French cuisine, like the cuisine of Michoacan in Mexico, is listed on UNESCO’s ‘intangible cultural heritage’ list.
Italy had a big influence on French cuisine during Medieval times. It was around about the 17th Century when the cuisine revamped into its’ influential and individual style that it is known for today. French food was built around cuisine du potager (cooking from the garden) or cuisine du marché (cooking from the daily market). These foundations were built out of necessity, ease of access and a cheaper or free option.
This dish – Ratatouille is from the south of France in the Provence-Alpes-Côte d’Azur. This homely, cosy, eat-in your pyjamas with a good glass of reddish is quick and easy to make. They say ratatouille should be cooked in three stages – onions, peppers, garlic and tomatoes first, aubergines separately and courgettes separately. At the end, these veggies are combined and then either baked or simmered for over an hour in a heavy casserole dish.
This recipe???? We know you need time and can’t spend all day in the kitchen so we threw everything in a pot for you (nice of us, huh??). It’s a pretty little presentation with our aubergine boats and a sprinkling of fresh herbs on top – if you want to be totally non-vegan, why not put some cheese on top before baking the ratatouille?
Try it. I dare you.
THE RECIPE
Preparation Time: 20 minutes
Cooking Time: 1hr
Serves: 2
The Ingredients
2 tblsp olive oil
4 cloves garlic
100g/ ¼ large onion, roughly sliced
350g/1 aubergine cut in half and flesh taken out. The flesh cut roughly into cubes about 1.5-2cm
230g/1 courgette cut into 1.5-2cm cubes
170g/ 1 yellow pepper roughly cut into cubes
470g/ 2 large red tomatoes
Handful of roughly chopped parsley
15-20 sprigs of thyme
4 tsp salt
2 tsp black pepper
Handful of torn basil
The Method
Preheat oven to 180’C
Drizzle aubergine halves with olive oil and place them in the oven, skin side down. Bake for about 15 minutes. Meanwhile, score the skin of the tomatoes with a sharp knife and place them in a pot of boiling water for about 10-20 seconds. The skins should start to fall away. Skin the tomatoes, roughly chop.
Heat 1 tbsp olive oil in a heavy based saucepan. Add onion and then garlic, cook until soft.
Now cook the pepper and tomatoes
Once the tomatoes have started to break down (10-15minutes) add courgette and aubergine
Season with salt and pepper. Add thyme and cook on a medium heat for 40 minutes, stirring occasionally
Mix through roughly chopped parsley and scoop mixture into the aubergines.
Bake in the oven for about 20 minutes
Sprinkle with olive oil, basil, parsley and serve with a crusty baguette

Monday Noodle
The Recipe
Serves: 2 people
Preparation: 20 minutes
Cooking Time: 10 minutes
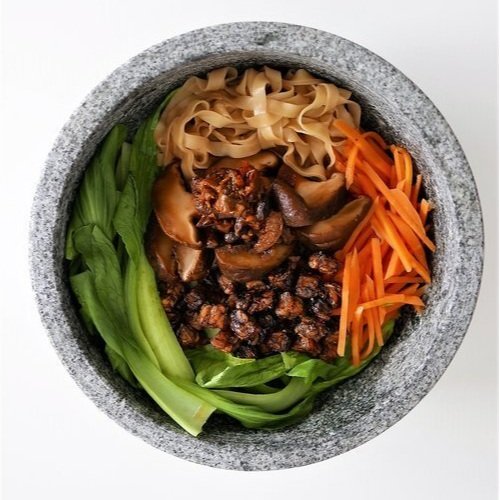
It is based very loosely on one of my favourite dishes in Singapore - Bak Chor Mee which I always have with Mee Pok (a flat egg noodle).
I am by no means an expert in Chinese or Singaporean dishes, however, I have lived in this country for 6 years and have my favourite hawker foods. I admit I do not eat them often because I always feel like my meal should always have some fresh and crunchy element to it…. so a trip to the hawker is an indulgence for me that I will do probably once every two weeks.
With moving to my new place, I have accumulated some extra kitchen space for my private dining events and am enjoying working from home and experimenting at home.
Why Monday noodle? I had a craving on Monday, it is now Friday and the response from the picture of this dish was overwhelming. It is based very loosely on one of my favourite dishes in Singapore - Bak Chor Mee which I always have with Mee Pok (a flat egg noodle). I was at home and had the ingredients to kind of make a Bak Chor Mee. I had tempeh so I substituted that for the minced pork. I toyed with the idea of adding ikan bilas for a bit of extra crunch but decided to make the dish completely vegetarian.
INGREDIENTS
120g tempeh
1/2 large carrot, sliced thinly
300g leafy chinese greens - your choice!
150g fresh shiitake mushrooms
300g mee pok noodles or whatever takes your fancy
dark soy sauce
soy sauce
fish sauce
oyster sauce
white pepper
vegetarian stock cubes
Chilli sauce of your choice!!!!
Braised Mushrooms
METHOD
Simmer 1 cup water, 2tsp dark soy sauce and 1/2 tsp fish sauce in a small saucepan. Throw in the shiitake until they are cooked and have taken on a nice brown colour. (20 minutes)
Mix 2 tsp oyster sauce, soy sauce, fish sauce, 1/2 a vegetable stock cube (MSG is welcomed), 1 tsp white pepper and 4 tbsp of the mushroom broth with about 500 ml water. Bring to a boil, cook noodles until al dente. Blanche Chinese greens and carrot.
Chop the tempeh in small cubes, season with a bit of sea salt and shallow fry in coconut oil until nice and crispy. Add a small dash of dark soy to give it a nice blackened colour.
Place noodles, vegetables and tempeh in a bowl. Pour over a little bit of stock, take a photo and enjoy.
*disclaimer… I know how strongly Singaporeans feel about their hawker food. This is no replication or traditional recipe for Bak Chor Mee. It’s simply a tasty noodle dish inspired by my favourite hawker fare. Hope that’s ok.


Miso Risotto with Peas & Shiitake Mushrooms
The Recipe
Serves: people
Preparation: 20 minutes
Cooking Time: 30 minutes
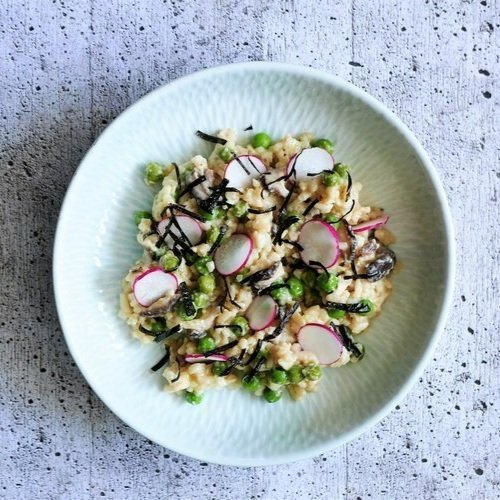
This dish conjures up a unity of flavours and ingredients from two different parts of the world, however its flavour profile is familiar to both cultures. Japanese miso meets Italian rice. My apologies in advance if I have offended either of these countries – this dish just seems to make sense.
This dish conjures up a unity of flavours and ingredients from two different parts of the world, however its flavour profile is familiar to both cultures. Japanese miso meets Italian rice. My apologies in advance if I have offended either of these countries – this dish just seems to make sense.
It was spurred on by my flat mate, an enthusiastic cook who loves to try new dishes. “Jen, I have just bought a shitload of miso paste – can you write a few recipes on how to use miso that isn’t exactly Japanese???” Krissy. This one is for you.
So, the two important ingredients from two different cultures are miso and Italian rice. Miso encapsulates the very essence of Japanese cooking with an undeniable umami taste.
Umami: “it is usually so faint and overshadowed by other stronger tastes that it is often difficult to recognize it unless attention is specifically directed towards it” Dr. Kikunae Ikeda
Dr Ikeda discovered the amino acid glutamate through many experiments on Konbu, isolating certain compounds by means of evaporation. Umami is found naturally in food such as mushrooms, Parmesan cheese, fermented and cured food products – just to name a few. It is a taste that has existed for many years and although its’ discovery was in the early 1900’s, it took a little over a century to be officially recognized as the fifth taste, adding to sweet, sour, spicy and bitter.
Now rice – in particular rice for making risotto, you will find more about it here.
This recipe can be made in advanced and cooked until the grains are al dente. When it is time to serve guests, add a little water and mix through to heat up the risotto.
The garnish is not essential but dresses up the dish and makes it look that little bit more special.
INGREDIENTS
350g/2cups Arborio or Canaroli Rice
20g butter
A good glug of extra virgin olive oil
140g/1 x Medium onion
10g/1-2 cloves garlic
900mls boiling water
80g/4tblsp miso paste
200g/1.5 cups green peas (fresh or frozen)
150g fresh shitake mushrooms
50g grated parmesan cheese
white and black pepper
Garnish
1 sheet of nori
2-3 radishes
Parmesan cheese
Extra virgin olive oil
METHOD
Finely chop onion and garlic – set aside
Roughly chop the mushrooms as well and set aside
Mix the miso paste and boiling water in a litre jug until the miso has dissolved
In a medium heavy base saucepan, fry onions in oil and butter on a medium heat, when the onions are soft, add in the garlic and then the UNWASHED rice. Mix until all the grains are nicely coated with the buttery oil mixture and the lovely smell of garlic wafts around your nostrils.
Add in the chopped shitake mushrooms.
Now you can add some of the miso stock, 100 mls at a time, mixing the rice constantly until all the grains have absorbed the liquid.
Before the last 200mls of miso stock need to be added, throw in the peas. They won’t take long to cook and we want them looking vibrant and green in our dish!
When all the liquid has been absorbed (you will need to use your instincts here and may need to add more liquid, depending on how well cooked the rice is or not.)
Mix through the grated parmesan cheese, add black and white pepper to taste and a little salt if your palate calls for it.
Plate up the risotto warm and garnish with finely sliced red radishes, nori, grated parmesan cheese and a dash of extra virgin olive oil.

Gnocchi alla Romana with Mushroom Ragù? Ragout?
The Recipe
Serves: 4 people
Preparation: 60 minutes
Cooking Time: 30 minutes
As history would recall, say around late 18th Century when Napoleon and his posse charged into Northern Italy…….. ragù was inspired somewhat by ragout.

How absurd does it seem to mix a traditional Italian dish with a traditional French dish?
If I was to call my mushroom ragout a ragu, technically that would be incorrect….. however, cuisines and traditional dishes are becoming so intertwined sometimes we don’t know what comes from where and who did what first.
As history would recall, say around late 18th Century when Napoleon and his posse charged into Northern Italy…….. ragù was inspired somewhat by ragout.
The Italians were eating their pasta with more of a meat broth but ragout, a fish, vegetable or meat stew provided the inspiration and backbone for that meat broth which became a traditional, wonderful and rich sauce for pasta. And the most famous ragù of all – ragù alla bolognose which is NOT served with spaghetti and does not comprise of minced beef!
Despite the French invading in the 1790’s, there is evidence that Alberto Avisi, a chef for the Cardinal of Imola, was playing around with this mixed meat (veal, pork, beef) slow cooked stew tickled with cinnamon notes as early as 1785. So, my question to you is what came first in Italy? The ragout or the ragù? I’ll leave that one to you. (And it rhymes!)
NOW, bring on the gnocchi – the type that was traditionally made in the time of the Roman Empire. When potatoes didn’t exist until the Colombian Exchange of the 16th Century where a shipment of maize, potatoes, tomatoes and communicable diseases arrived in Europe. Before this transference of staple foods from the Americas, the Romans were making gnocchi from flour and water and that eventually evolved into the glorious addition of eggs, cheese and butter.
Gnocchi alla Romana is made from semolina – a product that is not exactly flour but a course product that is derived from the milling process of durum wheat (the wheat that is used to make pasta). Mix that semolina with whole milk, eggs, Parmesan cheese and you have a dish as comforting as mac and cheese.
I digress….. I just love food history but here is the recipe, my version of mixed mushroom ragout/ragu with Roman style gnocchi.
Enjoy with a nice glass of French or Italian red!
Gnocchi alla Romana
250g semolina (unbleached)
950mls full cream milk
1-2 bay leaves
120g grated parmesan cheese
3 egg yolks
100g salted butter
Sea salt to taste
Mixed Mushroom Ragout A good slurp of olive oil
A good chunk of butter (30g)
2 cloves garlic, finely diced
180g (medium) yellow onion, sliced
150g oyster mushrooms
100g shitake mushrooms
200g portobello mushrooms
10g dried porcini (soaked in 300mls hot water)
50g/ 2 heaped tablespoons tomato paste
300mls/ 1½ cups good red wine
Small handful of chopped flat leaf parsley
7 stalks of thyme
1. Put the milk and bay leaves in a medium sized saucepan and bring to the boil
2. Turn off the heat, remove the bay leaves and slowly add in the semolina while whisking constantly
3. When all the semolina is incorporated, use a spatula to scrape down the sides of the pan
4. Add in 50g of the grated parmesan cheese and 30g butter. Mix well and then finally add in the egg yolks one at a time until all ingredients are combined
5. Add a little salt taste
6. Transfer the gnocchi mixture into a non-stick tin or alternatively brush the tin with olive oil. (I used a 22cm x 30cm x 5cm baking pan)
7. Flatten out the mixture until even and smooth, cover with cling film and refrigerate for about an hour until firm
8. When the mixture is set, turn out and cut shapes with a cookie cutter or knife. ( I used a 5cm round cookie cutter)
9. Place in a baking pan or medium casserole dish, slightly overlapping the gnocchi pieces.
10. Brush each piece with the left-over butter and sprinkle generously with parmesan cheese
11. Place in the oven on bake/grill setting for about 10-15 minutes or until the cheese is nice and golden.
Serve the gnocchi while hot!!!
1. On a medium heat
2. Add in chopped onions and cook until translucent
3. Add in the garlic until fragrant
4. Throw in all the mushrooms and mix through. The porcini mushrooms can do with about 5 minutes of soaking in hot water before adding to the pot
5. Add wine, a few sprigs of thyme and tomato paste
6. Simmer the mixture and reduce until most of the liquid has evaporated, leaving a thick stew
7. Take out the thyme sprigs
8. Throw in a few thyme leaves and chopped parsley
9. Serve immediately with the gnocchi