
explore the world through the universal language of food

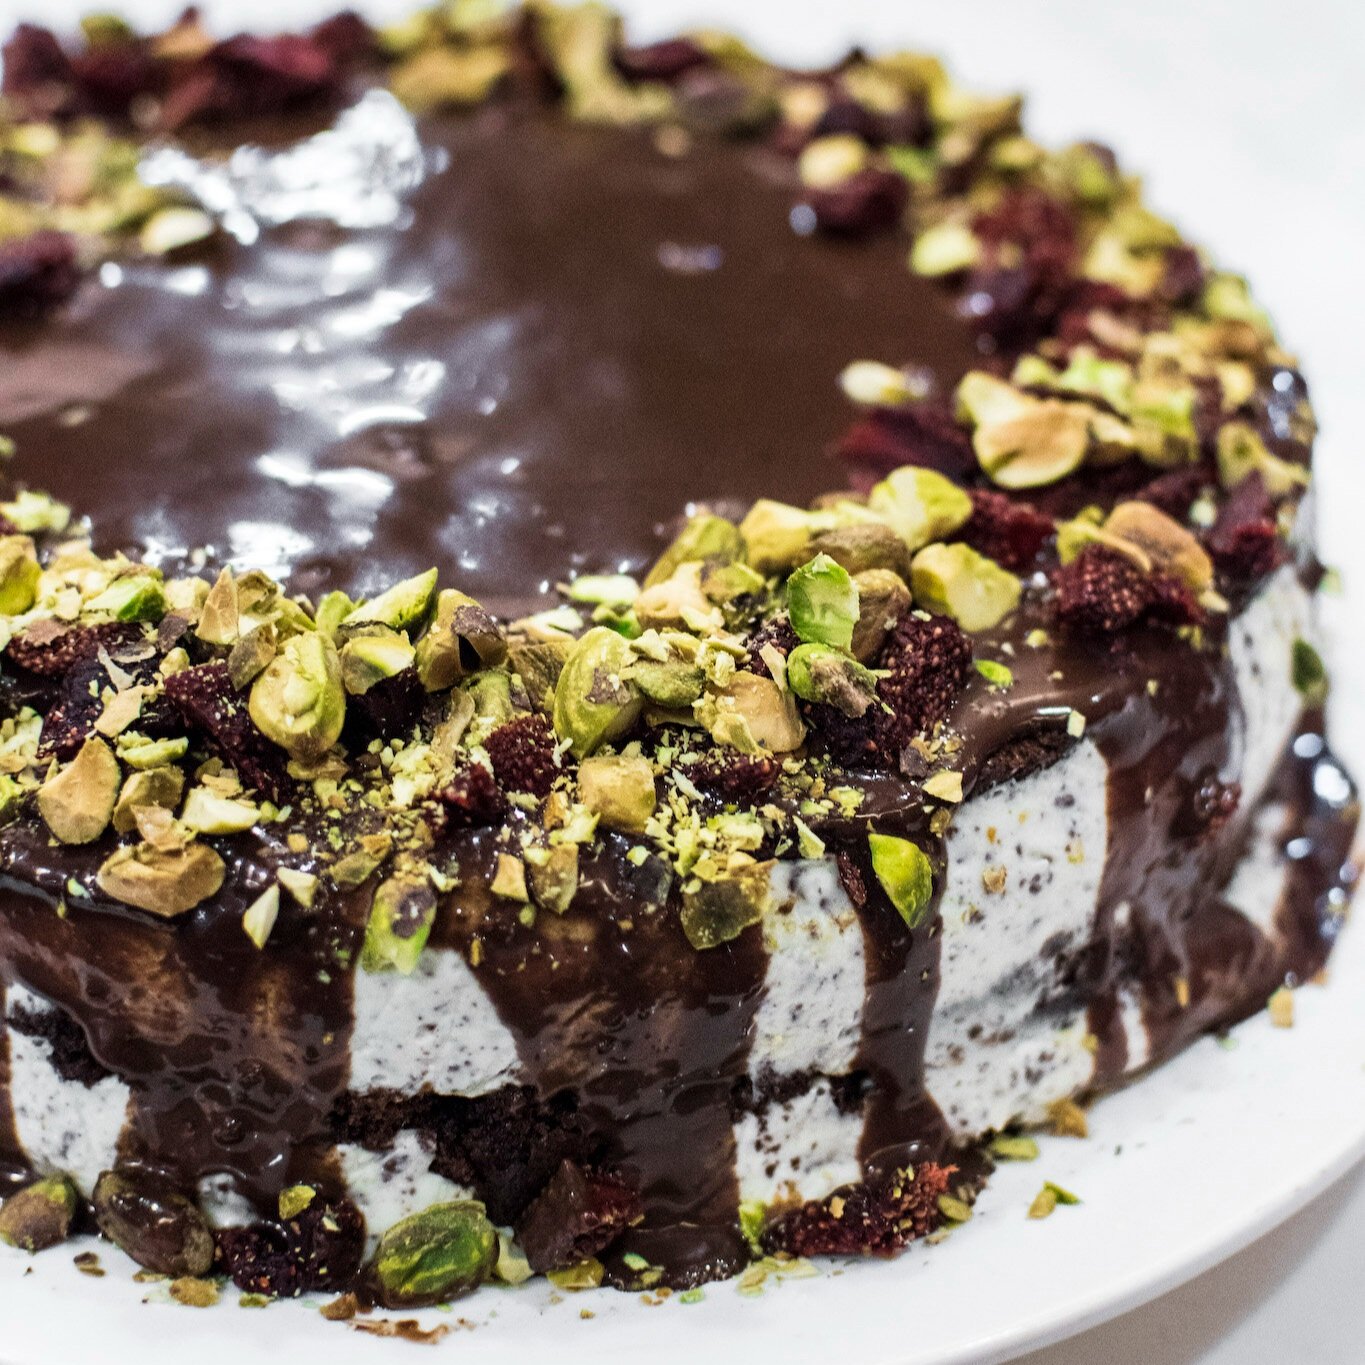
Chocolate and Pistachio Cassata Cake
The Recipe
Makes: 1 x 20cm cake
Preparation: 40 minutes
Baking Time: 40 minutes
Cassata is a traditional sponge layer cake from Sicily. It consists of ricotta, dried fruits, nuts, marzipan, and chocolate.
Credit: @etstudiosg
Although still a region of Italy, Sicily seems like another country with locals referring to themselves as ‘Sicilians’ and not Italians. In Sicily, they speak ‘Sicilian’ and little English in the smaller towns which makes travelling through this part of Italy all the more exciting.
Sicily is the largest island in the Mediterranean Sea and has a rich history and culture, which to my delight, is prevalent through a lot of its architecture and food from region to region. A couscous in Trapani will be the influence of North Africa, Pomodoro (the most amazing in the world), region-wide, is an influence of Spain, spices, citrus, and dried fruits came about from Arab occupation, and ingredients such as melanzane, olives, and seafood have come from my other food country love, Greece.
It was not only the people of Sicily that inspired me and warmed my heart with their open arms, beautiful hospitality, breathtaking beaches, and amazing food, but the travelers I encountered on my journey – free spirits from around the globe that made their way to this beautiful island and took away so much more than we had all expected.
While in Marsala, a beautiful town known famously for the landing of Garibaldi in the 1860s and also for Marsala wine, I learned how to make pasta al forno, arancino, cornetto, pane, and cassata in a traditional bakery/café called Bar Lo Stagnone.
When I travel I always make sure I visit as many local bakeries as possible to learn how they make traditional desserts. I love that traditional recipes always have a twist from region to region and person to person.
My favourite Sicilian desserts, hands down are cannoli and cassata, so I made a cake that was inspired by the two!
Cassata is a traditional sponge layer cake from Sicily. It consists of ricotta, dried fruits, nuts, marzipan, and chocolate. This recipe is inspired by many a cassata I tried while on my travels through Sicily. I remember the tiny wild strawberries and the amazing pistachios found in this region of the world, so I included some dried wild strawberries in the garnish.
The cake is fairly easy to make but will take some time – it is best made the day before so it has time to set and is, therefore, easier to ice.
INGREDIENTS
Chocolate Cake
130g unsalted butter
150g brown sugar
100g white caster sugar
180g plain flour
180mls whole milk
2tsp/8g baking powder
60g cocoa
3 medium eggs
Pinch of fine sea salt
Ricotta Filling
640g ricotta cheese
300g thickened cream
60g sifted icing sugar
4tsp vanilla bean paste
200g semi-sweet chocolate, chopped.
Cake liquor
50mls sweet vermouth
20g water
10g white sugar
Ganache Topping
150g cooking cream
120g semi sweet chocolate
Pinch of sea salt
METHOD
Preheat oven to 160’C. Line a 20cm circular spring-form cake pan.
Beat butter and sugars in an electric mixer until creamy and combined
Sift flour, baking powder, salt and cocoa in a separate bowl
Add eggs one at a time to the butter mixture until the eggs are folded in
Mix in 1/3 flour to the mixture then 1/3 milk. Continue this finishing with the flour.
Allow mixture to combine and then pour into the cake tin.
Bake for 40 minutes. Allow the cake to cool slightly before turning it out on a cake rack so it cools completely
Whip ricotta, cream and icing sugar and vanilla until completely smooth
Add in chocolate pieces and refrigerate.
Heat in a pan over low heat until the sugar is dissolved
Set aside
Heat cream on a low heat
Add a pinch of salt
Add in chocolate until it is melted and the ganache mixture is shiny and smooth. Refrigerate until cool
Assembly
With a serrated knife, slice the top of the cake to make it flat
Slice the cake across into 3 even pieces
Line the cake tin with cling film with extra hanging over the edges
Place one piece of the cake in the tin, brush liberally with cake liquor and then smooth over a layer of ricotta
Continue with the next two layers, finishing with the cake on top
Fold over cling film and set the cake in the fridge ideally overnight or for 2-3 hours until firm and set.
When the cake is set, turn out upside down and remove the cling film
Place ganache on the top of the cake allowing it to spill over the sides
Sprinkle the chopped pistachios and strawberries on top
Decoration/Garnish
80g dried or fresh strawberries
80g roasted pistachios

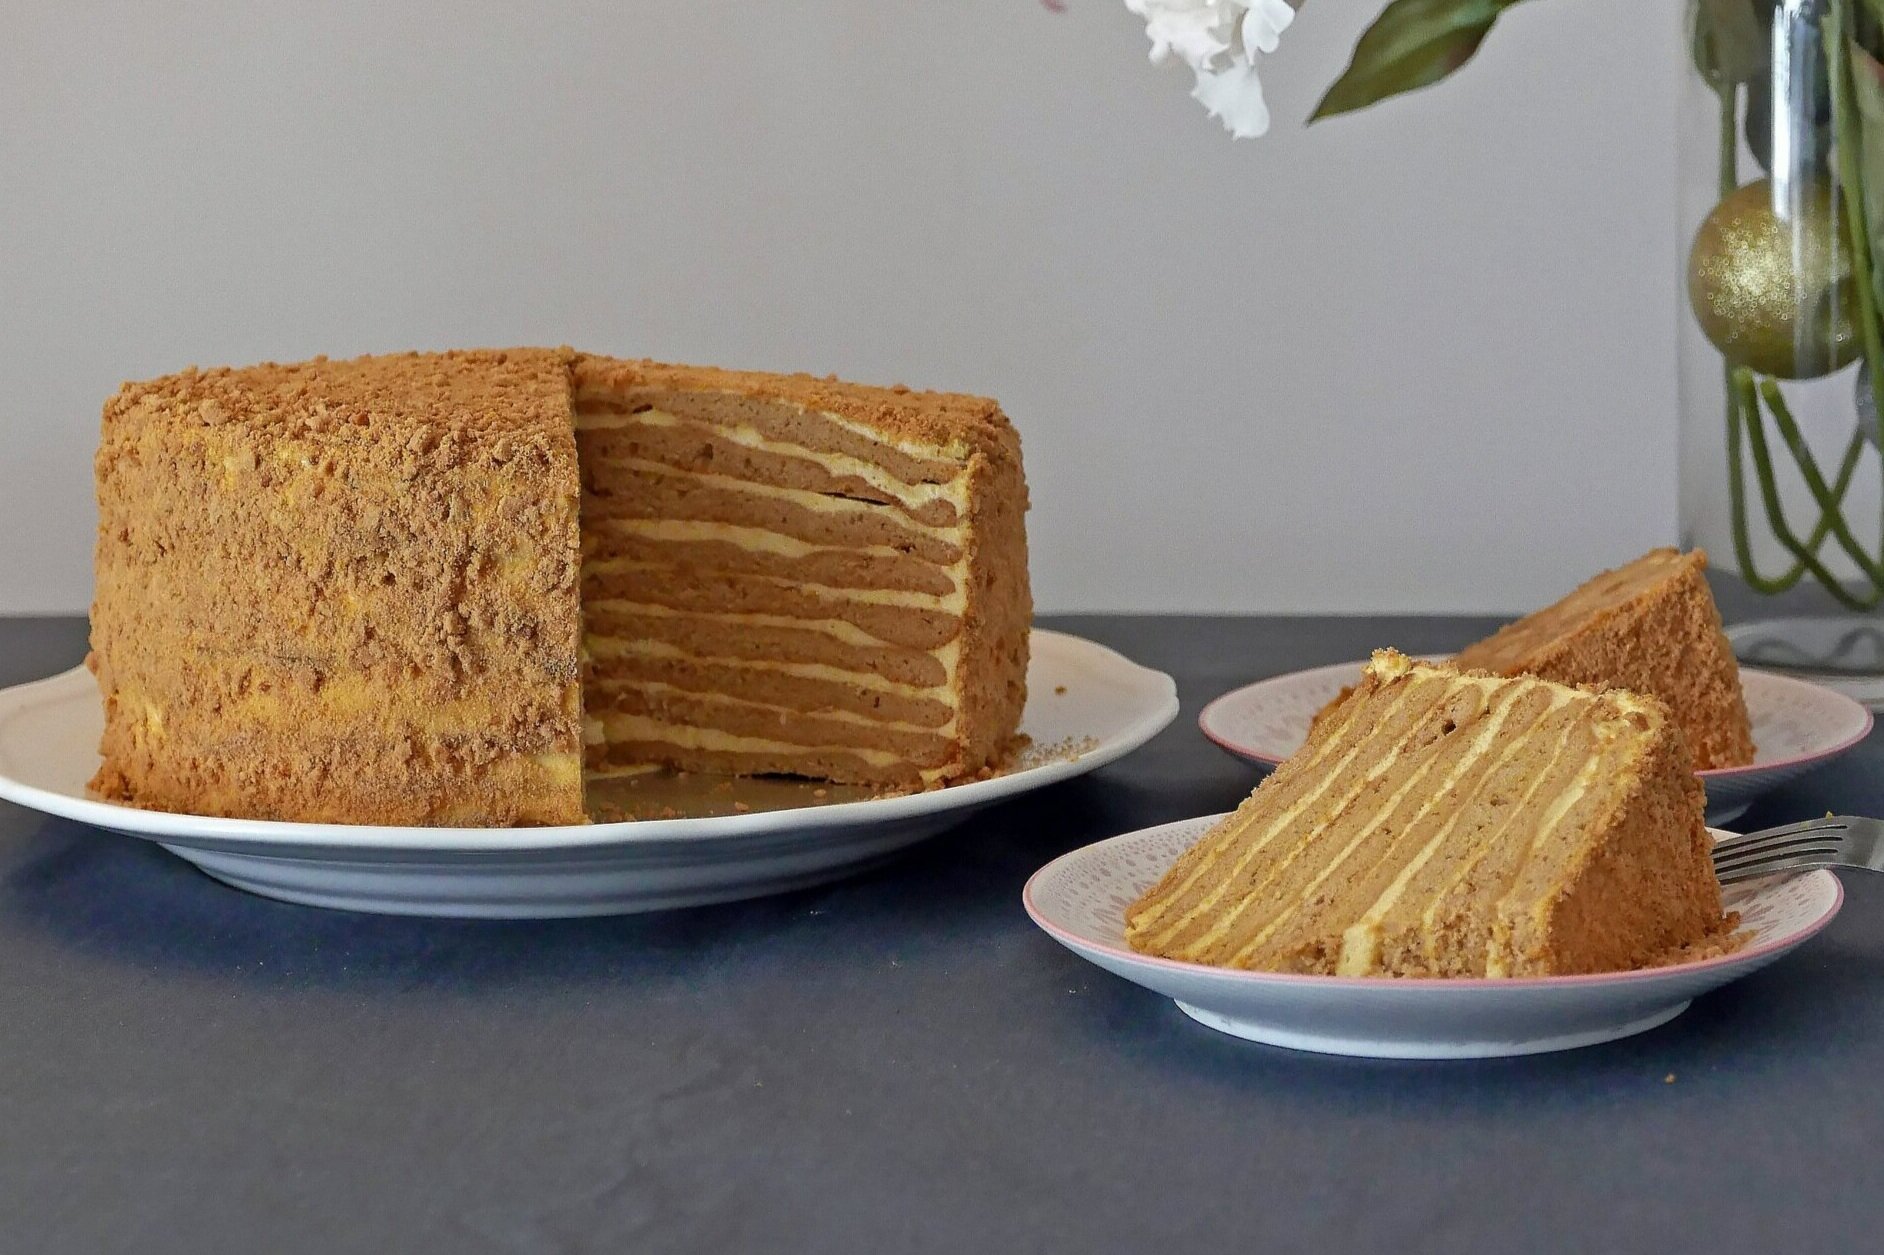
Russian Honey Cake (Medovik Torte)
The Recipe
Makes: 1 x 20cm cake
Preparation: 20 minutes
Baking Time: 1 hour
The Medovik Torte or Russian Honey cake was an invention of a young chef in the Imperial Palace of the Russian Empire in the 19th Century.

The Story of the Medovik Torte
The Medovik Torte or Russian Honey cake was an invention of a young chef in the Imperial Palace of the Russian Empire in the 19th Century. It was developed to incorporate honey into a dessert for Empress Elizabeth Alexeyevna, the wife of Alexander I who was not the biggest fan of honey.
The method of heating the honey to a caramel colour allows it to take on a sweet caramel flavor and the inclusion of a sour cream frosting allows it to balance out quite beautifully.
A word or two about honey
Honey, a wonderful golden liquid that has a composition of a complex mixture of sugars, water, vitamins, minerals, pollen, and protein. It is made by these wonderful little black and yellow foragers known as bees, who collect nectar from flowers (or honeydew) near and far, store it in their honey stomachs (crops) and regurgitate it into the little vessels of the hive. The vessel is then fanned with its wings which leads to water being evaporated and the pure honey remaining.
Bees have been going about their business for more than 100 million years according to fossil evidence of these little creatures that have been preserved in resin. Cave paintings in Spain dating back 8,000 years ago show that humans have relied on bees by raiding their nests and collecting the sweet liquid they produce. The earliest evidence of beekeeping was in Ancient Egypt where hives made of clay from the Nile were placed on rafts that travelled up and down the river depending on the season.
Honey bees, honey, and wax were a part of everyday life in the ancient world. The application of honeybees’ by-products was used for culinary purposes, spiritual and religious rituals, embalming, medicinal treatments, and even as a currency.
Honey is classified according to the floral source (monofloral, poly floral, blend) and by region or country. It can be bought in both its raw form and pasteurized form. Raw honey comes straight from the honeycomb and is mashed and filtered to remove the honeycomb and other debris. Honey in its raw state is unadulterated, containing beneficial health and medicinal properties due to the pollen, propolis, antioxidants, natural vitamins, and minerals present. When honey is pasteurized, it results in a smooth clearer liquid and while it is aesthetically pleasing, will contain a loss of vitamins, essential nutrients, and minerals.

INGREDIENTS
CAKE
120g unsalted butter
300g browned honey
150g brown sugar
½ tsp salt
1 tsp cinnamon
500g plain unbleached flour
1.5tsp bicarbonate soda
4 medium eggs
1 tsp vanilla extract
FROSTING
200g browned honey
½ tsp salt
Zest of 1 orange
600g whipping cream.
400g sour cream
METHOD
Preheat the oven to 180’C. Line as many trays as you have with baking paper and draw a 20cm circle on each bit of paper.
To brown the honey, place 500g In a large saucepan on medium heat and allow it to cook for 10 -15 minutes until it becomes a dark caramel colour. Keep a close eye on it as it may boil over. Turn off the heat and pour 300g into a heat-proof bowl and 200g into a separate bowl for the frosting.
The frosting is best made ahead and allowed to set further in the refrigerator so add sour cream to the cooled browned honey, orange zest, and salt. Mix well. Whip the cream in a separate bowl until firm, then fold it into the sour cream mixture until combined. Cover and store in the refrigerator while you make the cake
In the heat-proof bowl containing the browned honey, add sugar, salt, and butter. Heat slowly over a pot of boiling water until the butter has melted and the sugar has dissolved. Take off the heat and whisk in the bicarbonate soda.
Whisk eggs with vanilla in a separate bowl and then slowly whisk this into the honey-sugar mixture.
Finally sift flour and cinnamon and fold into the liquid mixture until combined
Measure 100 g of the cake batter and spread it evenly inside the drawn circle with a spatula. Repeat this on all the baking paper circles. Place in the oven and cook for 5-7 minutes until the batter is cooked. Allow the cake to cool slightly before transferring it to a cooling rack. Repeat this until you have about 10-12 cookie cake rounds. For the last 1-2 cakes you can cook at 130’C for about 8-10 minutes until the cake is nicely browned – this will be used for decorating later. Allow all the layers to cool completely before icing.
Start with the first layer by spreading a small amount of frosting on a 20cm circular cake board. Place the cake layer on top and then add, smoothing out evenly as you go. Keep layering until all the cake has been used up. Finally, ice the top and the sides of the cake. Return to the refrigerator and allow to set.
Blitz up the cooled cake layer that was baked in the oven slightly longer until you have a coarse breadcrumb consistency. When the cake is set, gently but firmly pat the crumbs to the top and the side of the cake.
Cut into generous slices, drizzle with extra honey, and indulge in this gorgeous cake!


Banana Bread with Pecans
The Recipe
Makes: 1 loaf
Preparation: 10 minutes
Baking Time: 50-60 minutes
Despite the tradition of Australians grabbing a coffee and a slice of banana bread - the origins of this simple quick bread (chemically leavened) have its roots in late 18th Century America where pearlash was discovered - and later on, baking powder was used in the mid-19th Century. It is an easy bread to make so please try it!!

Whenever I touch down in Australia - I have to get my hands on a thick slice of banana bread that is well toasted and slathered in good salted butter. No matter how hard I try I can never replicate the giant loaves that are made in the factory that are dense and light all at the same time. But let’s just say this is a gourmet loaf and kills the craving when in need of banana bread while I’m in Singapore.
Despite the tradition of Australians grabbing a coffee and a slice of banana bread - the origins of this simple quick bread (chemical leavened) has it’s roots in late 18th Century America where pearlash was discovered - and later on baking powder was used in the mid 19th Century. It is an easy bread to make so please try it!!
INGREDIENTS
150g plain flour
100g wholemeal flour
2 tsp baking powder
2 tsp cinnamon
1 tsp nutmeg
70g white caster sugar
70g brown sugar
½ tsp sea salt
2-3 very ripe bananas (about 280g)
2 medium eggs
50g unsalted butter, melted
100g plain Greek yoghurt
100g pecans, roughly chopped
3 tblsp golden syrup (or honey)
40g salted butter
METHOD
Preheat the oven to 180’C and line a loaf pan with baking paper and butter
Mix all the dry ingredients together
Mash up the bananas and mix in eggs, yoghurt and butter
Add the wet to the dry ingredients and mix well.
Pour the mixture into the loaf pan and sprinkle over the pecans
Bake in the oven for 50-60 minutes. Insert a knife into the centre of the loaf, it should come out clean if it is cooked
While the cake is still hot, melt the golden syrup and butter together then pour over the cake.
Allow the cake to sit for 10 minutes before turning out onto a cooling rack
Slice and toast with lashings of butter.


Chocolate Glazed Doughnuts - and a Vanilla Milkshake
The Recipe
Makes: 16 x 60g doughnuts
Preparation: 30 minutes
Cooking Time: 10 minutes
Baroness Elizabeth Dimsdale who was the wife of Baron Thomas Dimsdale, a smallpox pioneer, compiled a recipe book in the 1800s containing a recipe by a local cook that made 'dow nuts' which were pieces of dough cut into the size of nuts, fried in pork lard.

Despite doughnuts being a modern-day American symbol of gooey, sweet goodness that can be eaten at any time of the day, the humble doughnut finds its origins not from the Dutch but from a home cook residing in Hertfordhire, England.
Baroness Elizabeth Dimsdale who was the wife of Baron Thomas Dimsdale, a smallpox pioneer, compiled a recipe book in the 1800s containing a recipe by a local cook that made 'dow nuts' which were pieces of dough cut into the size of nuts, fried in pork lard.
Before the 1800's there is also evidence that of variation of doughnuts were dabbled with, excluding eggs. The Romans ad Greeks used to fry pastry dough and drizzle it with honey or syrup and the Germans used to stuff the doughnuts with savoury ingredients at a time when sugar was scarce.
It is said that the Dutch Immigrants brought their 'oliekoeks' (oily cakes) to Manhattan (New Amsterdam) in the early 1800's. In the mid-1800's, Elizabeth Gregory, mother to a New England ship captain made fried dough for her son and crew for their long voyages. Her son claim that it was his invention of the whole inside the doughnut, but nobody really knows.
Either way, doughnuts evolved into an American staple, so much so, they were eaten by the troops in France during the first World War. Doughnuts were big in the states and mass production of these fried doughy sweets began when Adolph Levitt, a Russian refugee inveted the first doughnut machine in the 1920's.
The wholly sweet dough is an indulgent snack and breakfast.... I upped the indulgence scale by throwing in a vanilla bean milkshake... I hope you enjoy making these doughnuts as much as I did and learned a little bit of food history on the way!
INGREDIENTS
DOUGHNUTS
14g instant yeast
60mls warm water
325 mls milk (don't even think about using light milk)
2 medium eggs (they should be around 50g-55g each)
100g fine caster sugar
1/2 tsp salt
70g unsalted butter (melted)
625g plain flour
oil for deep frying
CHOCOLATE GLAZE
200g unsalted butter
40g good cocoa powder
100g icing sugar
70g milk
METHOD
In a mixing bowl, sprinkle yeast over water and allow to stand for 5 minutes
With the paddle beater attachment, add the sugar, milk, salt, eggs, and half the flour. Once the ingredients are incorporated, mix in the melted butter and the rest of the flour.
Knead the dough with dough hook or if you feel like a workout, by hand until nice and smooth.
Place in a well-oiled bowl and cover with cling film or a damp cloth. Allow the dough to double in size.Once the dough has doubled, take out all your anger and punch down the dough. Knead lightly on a well-floured surface and use a round cookie cutter about 8 cm in diameter to cut out your shapes. Dip your finger in flour and poke in the centre of the cut circle, move it around and around so a hole is formed.
Heat a good amount of oil for deep frying at 180'c/360'f. If you don't have a thermometer, throw a small piece of dough into the oil to see if it is ready. Place the dough onto a slotted spoon and carefully into the oil.
Fry the doughnuts on one side and then flip them over. They should be a nice golden colour. Take out the doughnuts and place onto a cooling rack and allow them to chill for a bit before dunking them in some chocolate glaze.
For the chocolate glaze, over a low heat, melt butter and whisk in cocoa, icing sugar and milk until smooth.
Allow to cool slightly. Dunk one side of the doughnuts into the velvety glaze, turn the right way up and place back on the cooling rack. Let the excess chocolate glaze drip down the sides and allow them to set slightly before dunking them in your very vanilla milkshake.
MILKSHAKE - serves 1!
A milkshake is a wonderful thing. It is so simple to make but you really can get it wrong by using artificially flavoured ingredients.
80g fresh full-fat milk
1/2 tsp good vanilla bean paste or extract (Use an artificial vanilla flavouring and you will regret it)
180g good vanilla ice cream
Blend together and pour into a chilled glass.

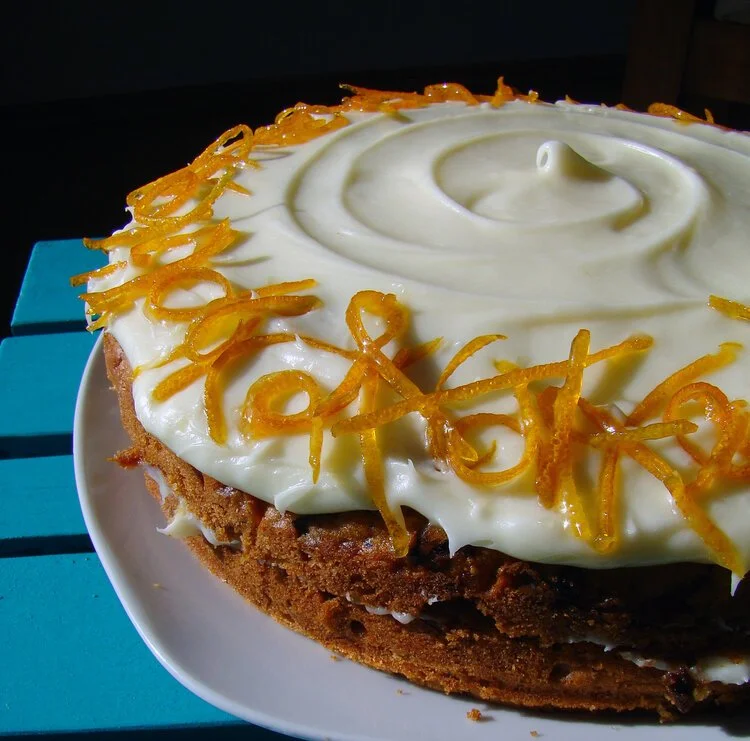
Classic Carrot Cake with Cream Cheese Frosting
The Recipe
Makes: 1 x 20cm cake
Preparation: 20 minutes
Baking Time: 45 minutes
A classic carrot cake with a sprinkling of candied orange peel to decorate the rich cream cheese frosting
Brownies last week and today, pastel de zanahoria or carrot cake. It appears to be birthday month in Mexico and I love having the excuse to bake like nobody’s business.
It’s an oldie, a goody and a classic. If you consume a dry carrot cake – there is something very wrong.. it has either been in the oven for a good few hours, the recipe has too much flour or not enough carrot. I’ve tried thousands of carrot cake recipes and eventually came up with this one. In all of my cakes I use butter but traditionally the carrot cake was supposedly born in the United States, hence the use of oil, however Britain claims some of the fame during rationing of food in the second world war. Whoever invented it and for whatever reason, this cake is always a crowd-pleaser.
You can use olive oil if you like but the flavour will be super strong. Use a neutral-tasting oil such as sunflower if you want to taste the carrots and spices rather than the oil.
INGREDIENTS
CAKE
4 medium eggs
150g muscovado sugar
150g sunflower oil
350g peeled and grated carrots
300g unbleached wheat flour
1.5 tsp baking powder
1tsp ground cinnamon
1/2 tsp ground ginger
1/2 tsp ground cardamom
80g toasted pecans roughly chopped
80g dark raisins (the juicer the better)
fine zest of 1 orange
dash of vanilla
FROSTING
125g unsalted butter, softened
200g icing sugar, sifted
250g of softened cream cheese
juice of half an orange
CANDIED ORANG PEEL
1 large orange, nice and bright and preferably wax free
100g unrefined sugar
100g water
METHOD
Grease your pan!! If it is a fairly good pan, you can do without lining the sides but always line the base of your pan to prevent it from sticking. You want to use a round 23cm springform pan. It is best. If you use a smaller-sized pan – the cooking time MAY increase, depending on how good your oven is.
Preheat oven to 180’C.
Crack the eggs in a bowl and add the sugar. Whisk and whisk and whisk if you don’t have the privilege of owning a kitchen aid (or if you are me, longing to pick up my kitchen aid from a friend babysitting it in Singapore). So you want to whisk it until it changes colour and thickens slightly.
Toast the pecans in a pan or in the oven. Allow to cool slightly and roughly chop.
Grate the carrots and put aside with the nuts and raisins. We will add all of these together soon!
Add the oil and whisk more, throw in the vanilla while you are at it at this stage.
Sift in the flour, spices, salt and baking powder. Mix until all combined.
Now add the chunky ingredients (raisins, carrots and nuts) and fold in nicely.
Pour the batter into the pre-greased tin and bake for a good 40-60 minutes (mine is a gas oven so it takes a little longer. You should know the temperament of your own oven so gauge it within this time frame)
Remove and allow to cool in the tin for about 5 minutes. Unmould and turn out onto a cooling rack. Allow the cake to cool completely before icing.
Make sure both butter and cream cheese are at room temperature and are quite soft. If one is colder than the other, the fat in the product will seize and you will get a lumpy texture.
Mix both butter and cream cheese really well until nice and smooth. Incorporate the juice and finally, bit by bit, sift in the icing sugar. The texture should be smooth and the consistency should not be too runny. If so, feel free to sift in more icing sugar to thicken it up. You will get a good workout if you do this by hand but I advise you to use an electric mixer if you have one to achieve a fluffier frosting.
You can choose to ice just the top of the cake or if you want a little bit more work to do, you can slice the cake in half, slap on some frosting midway, sandwich it and pop the rest on top.
It’s your cake, do whatever you want!
Pop the water and sugar in a saucepan and stir a little. Zest the peel of the orange and then add it to the sugar mixture. Boil until the liquid has become a toffee consistency and the liquid has pretty much evaporated. Allow to cool at room temperature or to speed up the process – throw it in the fridge.
The strands should be nice and crunchy. Place on top of the frosting however your heart desires.
I hope you enjoy baking, assembling, decorating, and eating this cake as much as I did.