explore the world through the universal language of food

Bollo de Cenoura
The Recipe
Makes: 1 x 20cm round cake
Preparation: 15 minutes
Baking Time: 35-40 minutes
“Simple as it is, this cake was popular in the mid-20th century, shaped by 20th-century technology and industrial ingredients. ”
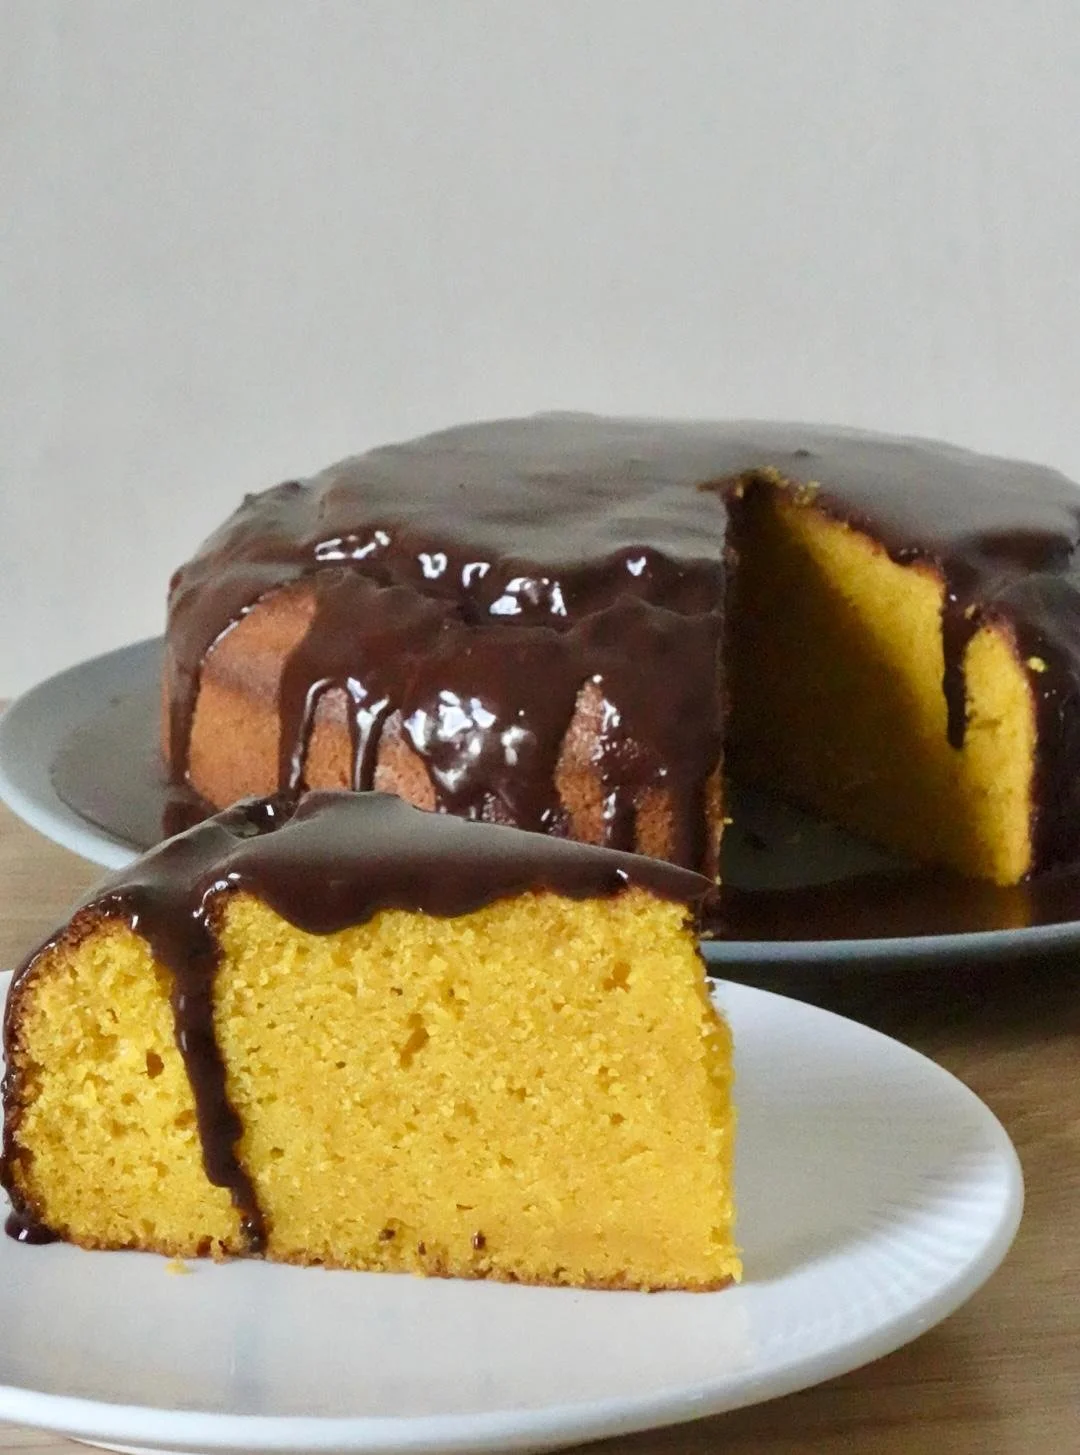
The first time I tried Brazilian carrot cake (bollo de cenoura) was in London, at my friend’s house party. When this glazed square cake was presented at the party, I had no idea it was a carrot cake inside. When the cake was sliced, a vibrant orange colour emerged. The flavour was just carrot and chocolate, extremely moist and surprisingly, the two flavours, well, just worked!
The history of carrot cake in Brazil follows a less romantic story than the Anglo carrot cakes (grated carrot, nuts and walnuts), which were a result of wartime sugar rationing. Simple as it is, this cake was popular in the mid-20th century, shaped by technology (blenders) and industrial ingredients (sugar and vegetable oil).
I made a simple glaze for the cake, as there was no condensed milk around to make a traditional brigadeiro frosting, but the result was just as glossy, so that is all that matters!
INGREDIENTS
CAKE
280g carrots
3 medium eggs
2 tsp vanilla
150g neutral-tasting oil (I used olive oil)
200g unrefined caster sugar
2 tsp vanilla (optional)
280g plain flour
2 tsp baking powder
pinch of salt
GLAZE
30g cocoa
30g unsalted butter
60g milk
60g sugar
METHOD
Preheat the oven to around 180’C in a fan-forced oven
Peel and chop carrots in chunks
Place carrots, sugar, eggs and oil into the blender, blitz until smooth
Pour out carrot mixture into a bowl, fold in baking powder and flour
Tip out ingredients into a 20cm lined spring form cake tin
Tap to flatten and bake for 35-40 minutes
For the glaze, combine all ingredients in a saucepan, combine and cook until thick, yet pourable
When the cake has been turned out and cooled slightly, pour the glaze over the entire cake
Allow the cake to cool, slice a big piece and enjoy!


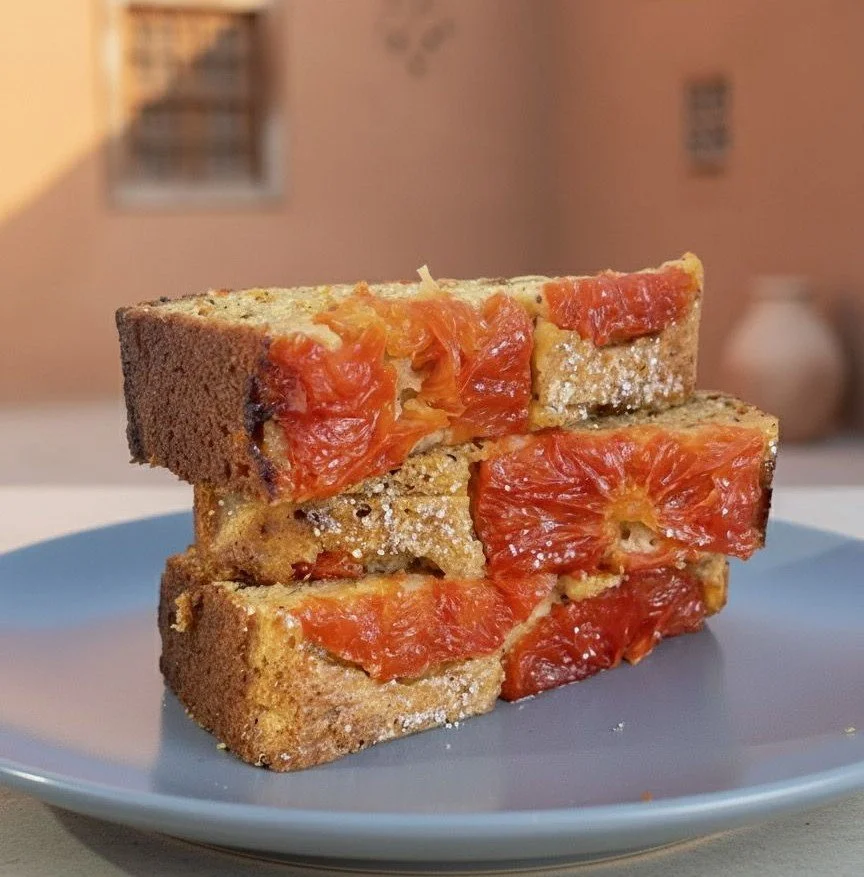
Grapefruit Sumac Cake
The Recipe
Makes: 1 x 20cm x 8cm loaf cake
Preparation: 20 minutes
Baking Time: 50-60 minutes
“Sumac is a crimson red ‘spice’ with both citrus and sweet notes and can be considered as one of the oldest seasonings in the world”
Sumac is a crimson red ‘spice’ with both citrus and sweet notes and can be considered as one of the oldest seasonings in the world. Made from crushed and dried berries of the Rhus Corairia plant, its applications as a culinary ingredient and medicine dates back to Ancient times.
Originally from the Middle East, Sumac has evolved into a cultural anchor of the region and is sprinkled in Iranian kebabs and stews, Palestinian beef and chickpea stew, sumaghiyyeh, and used to season or colour fish dishes and onions in Turkey. It was added to dishes in the Mediterranean as a souring agent before citrus was commonly used.
Sumac is rich in antioxidants and has been used since Ancient Roman times to ease digestive issues and traditionally was used to heal wounds as it contains antimicrobial properties.
Despite its versatile flavour profile, many dishes that use sumac are savoury, and I thought it would be a wonderful experiment to incorporate it into an almond grapefruit cake to enhance this unique spice.
INGREDIENTS
220g unsalted butter
220g unrefined caster sugar
1 tsp vanilla extract
1 pink grapefruit zest
1 grapefruit, juice (around 100mls)
3 eggs
150g plain flour
80g ground almonds
2 tsp baking powder
2.5 tsp sumac
pinch of salt
50g labneh or yoghurt
1 pink grapefruit as garnish
METHOD
Preheat the oven to around 180’C
Cream caster sugar, butter, vanilla and zest until light and fluffy
Add in eggs and mix to combine
In a separate bowl, mix flour, almonds, baking powder, and sumac
Add the dry ingredients to the wet ingredients, and lastly add in the yoghurt until combined
Peel and slice the grapefruit into wheels
Line the loaf tin with baking paper and line the base with sliced grapefruit wheels
Pour cake batter over the grapefruit into the tin. Tap to even out the batter
Bake in the oven for 50-60 minutes. When a knife is inserted, it should come out reasonably clean
Allow the cake to cool slightly in the tin before turning it out to cool completely. Cool with the grapefruit side up
Slice and serve with cream and dust with icing sugar
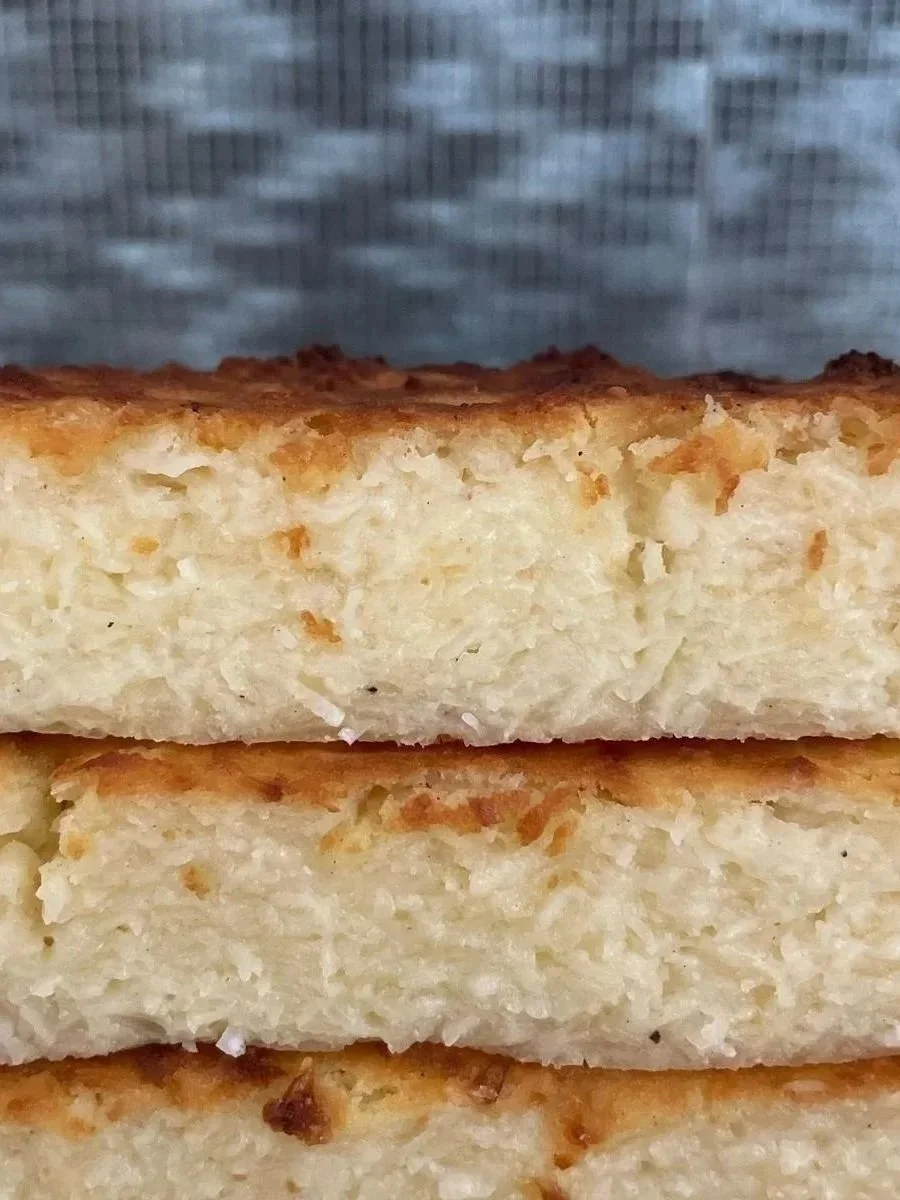
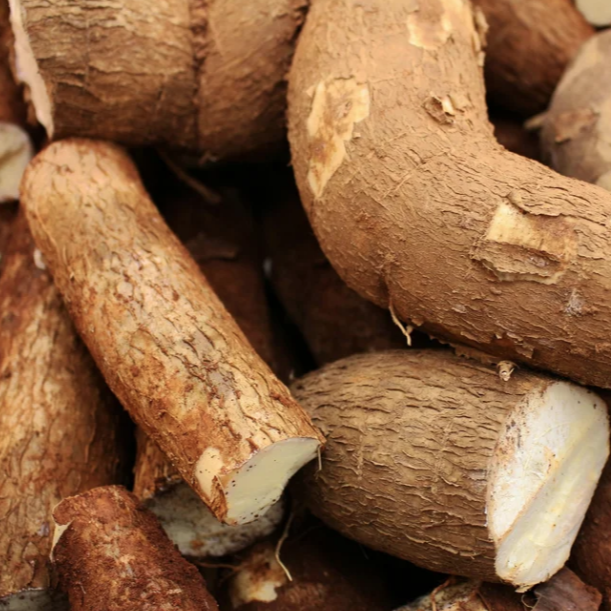
Cassava Cake (Enyucado)
The Recipe
Makes: 1 x 20cm (8’) square cake
Preparation: 30 minutes
Baking Time: 40-45 minutes
“Cassava has been a significant crop of survival and symbolism for the Indigenous people of the Americas.”
Enyucado is a popular cake made predominately in Colombia, however, variations of it can be found in other countries within the region where yuca/cassava is a staple such as Venezuela, Nicaragua and El Salvador.
This not overly sweet and dense cake is the perfect example of the culinary evolution in the Americas. Yuca, originating on the continent, mixed with coconut, a reflection of African and Caribbean influence all mixed with cheese, a Spanish import.
You can read more about Cassava and its importance throughout history in the Americas HERE, or we can push on with the recipe.
INGREDIENTS
450g grated yuca
150g grated coconut
2 medium eggs (50g each)
150g full cream milk
75g melted butter
280g piloncillo (or coconut sugar, caster sugar is also ok)
160g softened cream cheese
130g caster sugar
Condensed milk to serve
METHOD
Preheat the oven to around 170’C
Heat caster sugar over a medium heat until golden brown Pour into baking tray and allow it ti set
Peel the cassava and grate coarsely, squeeze out any excess liquid and set aside
in a large bowl, beat eggs with sugar until the sugar has dissolved
Then mix in cream cheese, milk, coconut, butter and lastly the grated cassava
Mix well until combined - the batter is very dense but this is what we want!
Pour into the lined cake tray and tap to spread the mixture evenly
Place in the oven and bake for 40-45 minutes
Take out, and allow to cool before turning it out of the tin completely, alternatively, you can pour condensed milk straight onto the cake in the pan and spoon the cake into a bowl.

Orange & Almond Cake - the perfect match
The Recipe
Makes: 1 x 23cm (9’) round cake
Preparation: 1.5 hrs (ish)
Baking Time: 50-60mins
“The colour orange was derived from the fruit! Before then the colour was described as yellow-red”
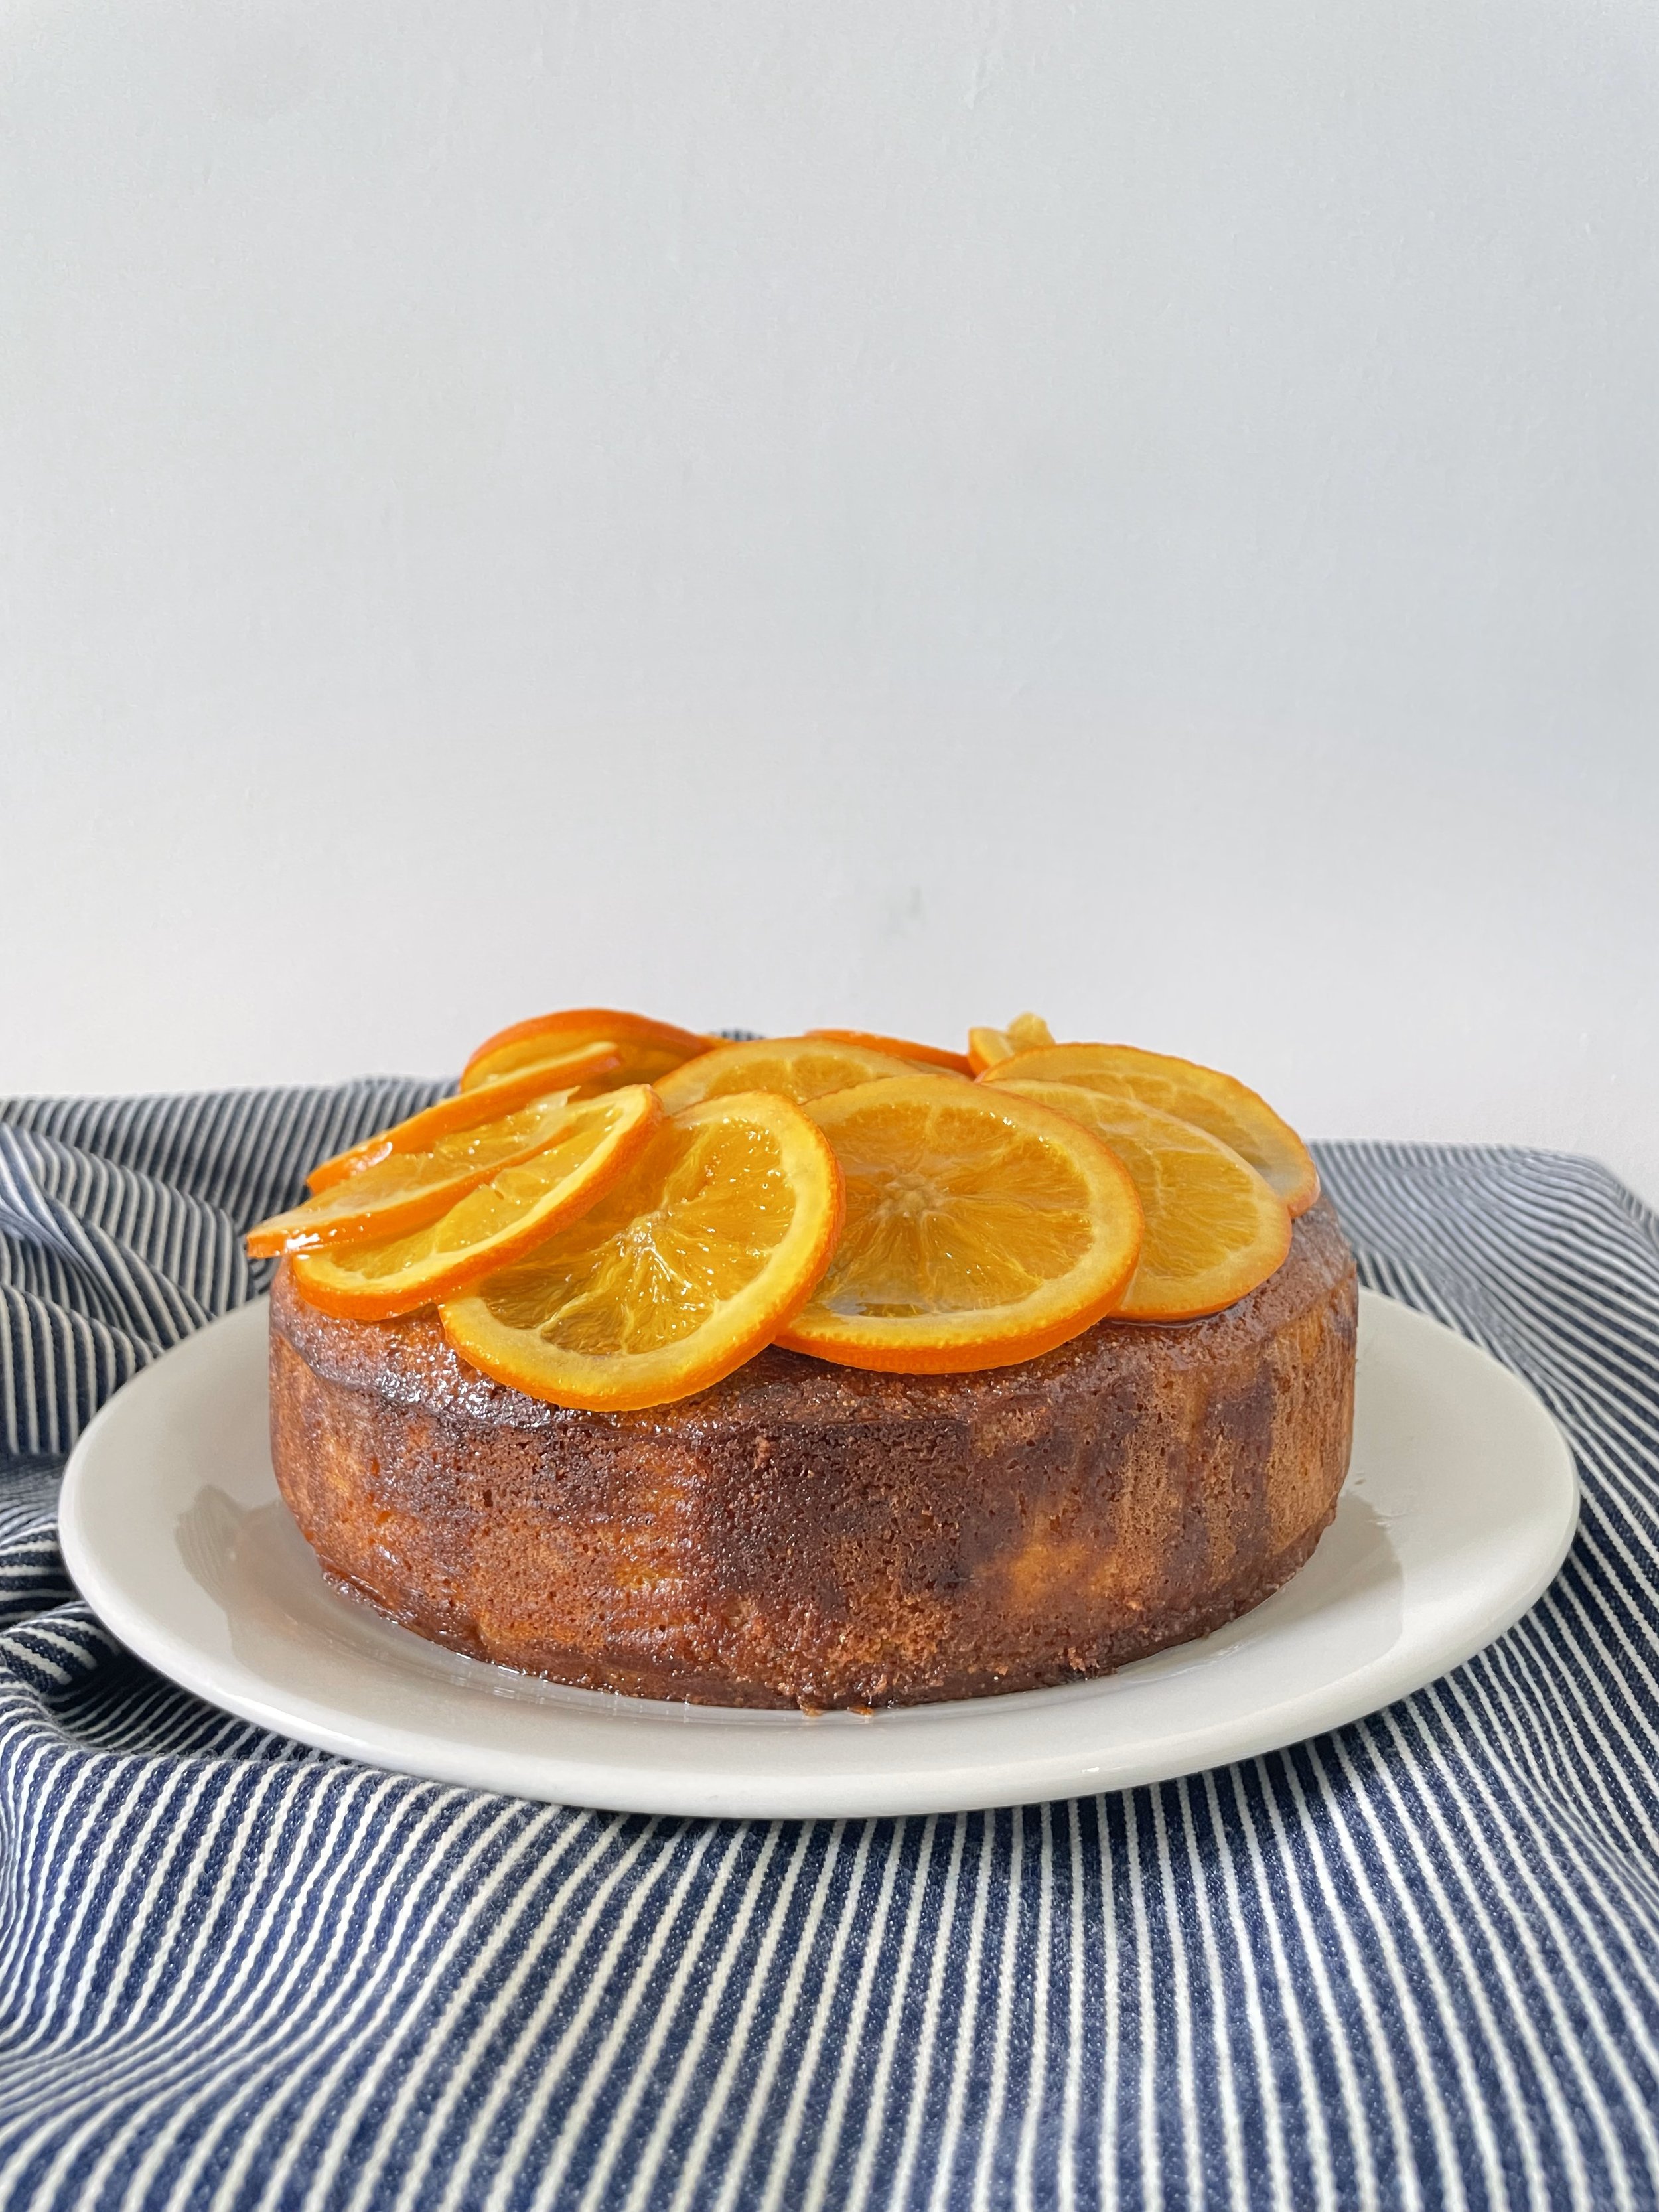
Orange and Almond Cake
It really is the perfect match of sweet, moist, moreish goodness. Boiling the oranges and baking the cake takes up most of the preparation time in this cake, however, it is worth it.
Oranges are technically classified as berries due to their soft interior and hard rind. They were once a luxury and now are one of the most common fruits in the world, with Brazil being the largest producer of these Vitamin C powerhouses.
Versatile in every way - they can be eaten raw, juiced, included in sweet and savoury dishes as well as essential oils and beauty products. I like them because they are available all year round, and I always try different varieties whenever I pick them up.
This cake was made with Argentinian oranges with a thinner skin and juicy interior. I would recommend using a thinner skin variety of oranges to cut down preparation time, and toreduce the bitterness (which comes from the pith).
I decorated the cake with sliced candied oranges, or you can simply dust it with some icing sugar to save on time.
INGREDIENTS
3 - 4 oranges (thin skin variety)
6 medium eggs
125g caster sugar
125g coconut sugar (you can use brown sugar if you like)
250g ground almonds
1 tsp baking powder
1 tsp ground cardamom (optional)
DECORATION (OPTIONAL)
1 - 2 sliced oranges (around 8mm thick)
100g caster sugar
150g water
cook in shallow pan on medium heat until orange slices are soft
top with orange syrup
METHOD
Preheat the oven to around 170’C
Prepare the cake tin by buttering it and lining it with baking paper
Thoroughly scrub and wash oranges in warm water to remove wax and excess dirt
Boil the oranges for around 1.5 hours on a medium heat until they are soft all the way through
Once the oranges are soft, run cold water over them and roughly chop them. Blend until smooth (skin and all).
In a large bowl, crack eggs and beat them with both the sugars until the sugar has dissolved
Add in the blended oranges
Fold in ground almonds, baking powder and a pinch of salt
Place batter into the lined baking tin and bake for 50-60minutes
Allow to cool slightly before turning out onto a cooling rack
Dust with icing sugar or decorate with candied oranges… buttercream will also work!
Enjoy with a big scoop of double cream
Coconut Lime Cake with Gula Melaka Caramel
The Recipe
Makes: 8 slices
Preparation: 20 minutes
Baking Time: 30-35 minutes
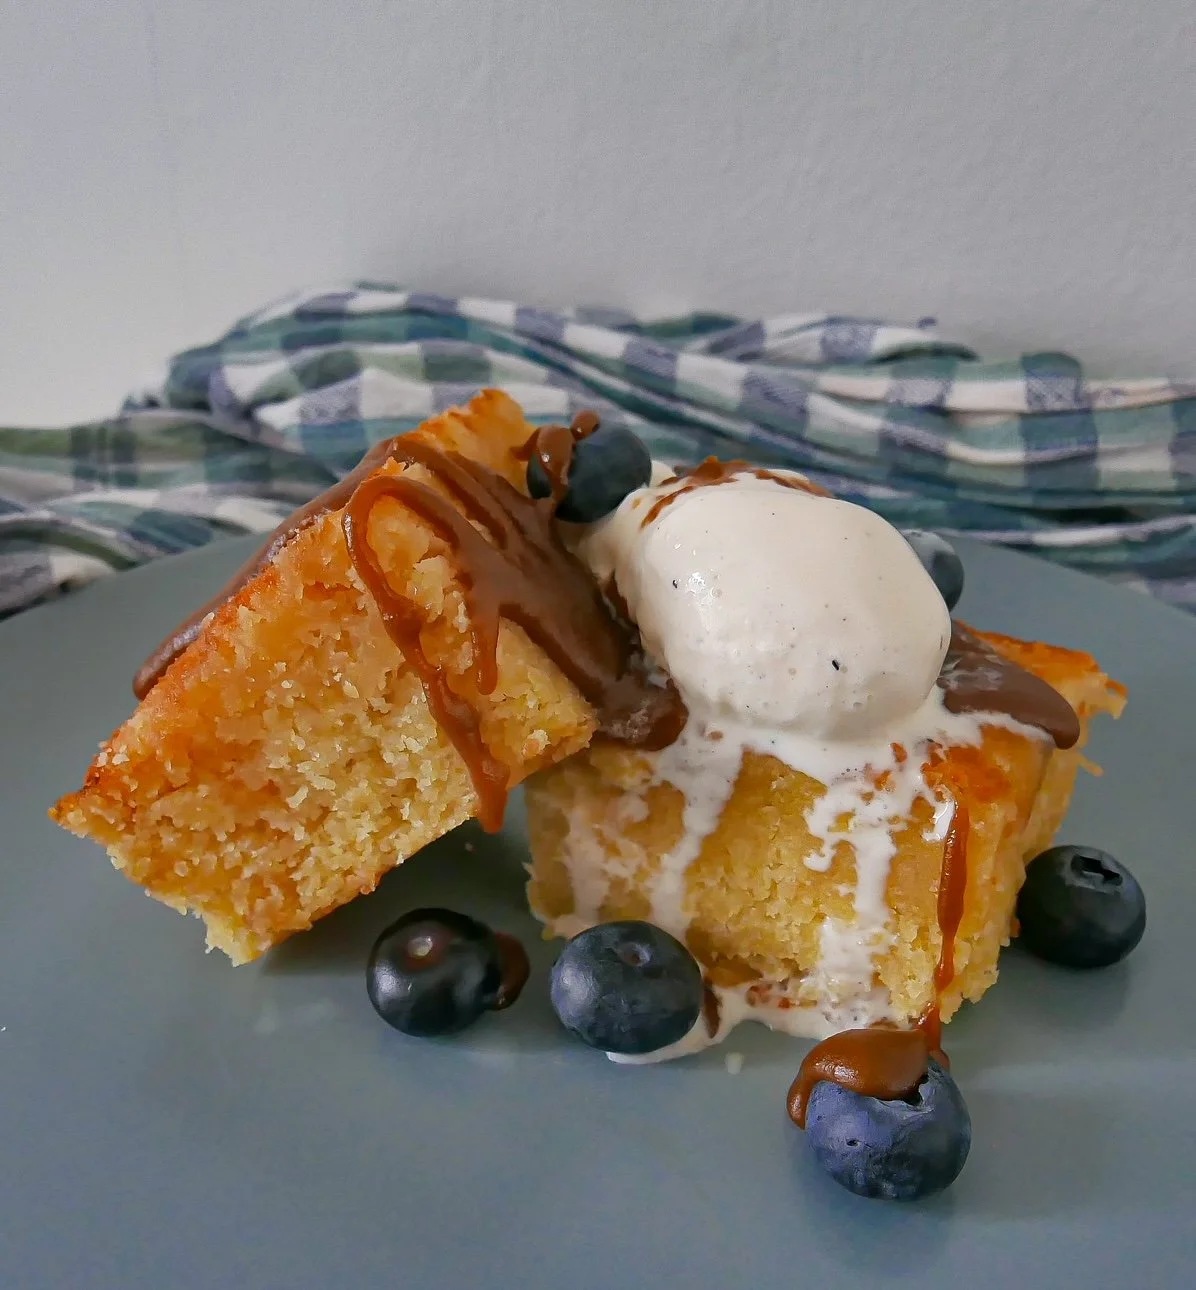
“To be honest, I am not the biggest fan of coconut and coconut cream can be a little challenging on my stomach, however, I always stop by the fresh coconut stall at the market that grates coconut to order.”

I have lived in Southeast Asia for a big chunk of my life and despite the time spent here, the markets throughout the region never ceases to amaze me.
From the variety of chillies in Thailand to the plethora of herbs and flowers in Cambodia, I see and learn every time I venture into the markets.
This is what I love about anything related to food, its constant journey of learning!
To be honest, I am not the biggest fan of coconut and coconut cream can be a little challenging on my stomach, however, I always stop by the fresh coconut stall at the market that grates coconut to order. I always purchase it and arrive home thinking, hmmm what do I do with this now??
Bake it, in a cake, with lime and drench it in gula Melaka caramel, and that is what I did.
Oh and you can read more about what GULA MELAKA IS HERE.
INGREDIENTS
Preparation time 15 minutes
Baking Time 30-35 minutes
Serves 8
Cake
225g unsalted butter
225g caster sugar
3 medium eggs
2 limes, zest and juice
1 tsp good vanilla extract
30mls coconut milk
225g plain flour
2 tsp baking powder
1.4 tsp salt
225g fresh coconut (or dried and rehydrated)
20g grated gula Melaka
METHOD
Preheat the oven to around 170’C and line a 20cm square cake tin (you can use a round one if you fancy)
Add butter and sugar into a large bowl and cream the two until nice and fluffy. Continue to beat in lime juice and zest, coconut milk, and vanilla extract.
Crack the eggs in a separate bowl and whisk gently, then add them to the buttery mixture
Once combined, ditch the mixture and grab a spatula to fold in sifted flour, baking powder, and salt until just combined.
Finally, add in the coconut milk and stir.
Place the batter in the lined cake tin and grate gula Melaka over the top.
Bake in the oven for 30-35 minutes, when a sharp knife is inserted in the centre, it should come out clean – meaning it is already!
Allow to cool slightly in the pan before turning out onto a cooling tray.
This cake is quite crumbly, so allow it to cool completely before slicing it into squares.
Serve slices with good vanilla bean ice cream, berries, and gula Melaka caramel.
Gula Melaka Caramel
Never heard of gula Melaka? Read more about it here. If gula melaka is not available where you live, it can be substituted for brown sugar or coconut sugar.
225g gula Melaka
80mls cream or coconut milk
50g unsalted butter
Salt
1. Chop gula Melaka into small pieces
2. Place gula Melaka, with a tablespoon of water, heat until the gula melaka has melted and continue cooking until the mixture has slightly thickened.
3. Lower the heat and mix in salt, butter and cream or coconut milk
4. Stir until combined and heat until the caramel reaches to the desired consistency.
5. Drip generously over the cake.

Lavendar and Lemon Scones
The Recipe
Makes: 6-8 large scones
Preparation: 15 minutes
Baking Time: 15 minutes
“The word lavender is derived from the Latin word ‘lavare’ meaning to wash”
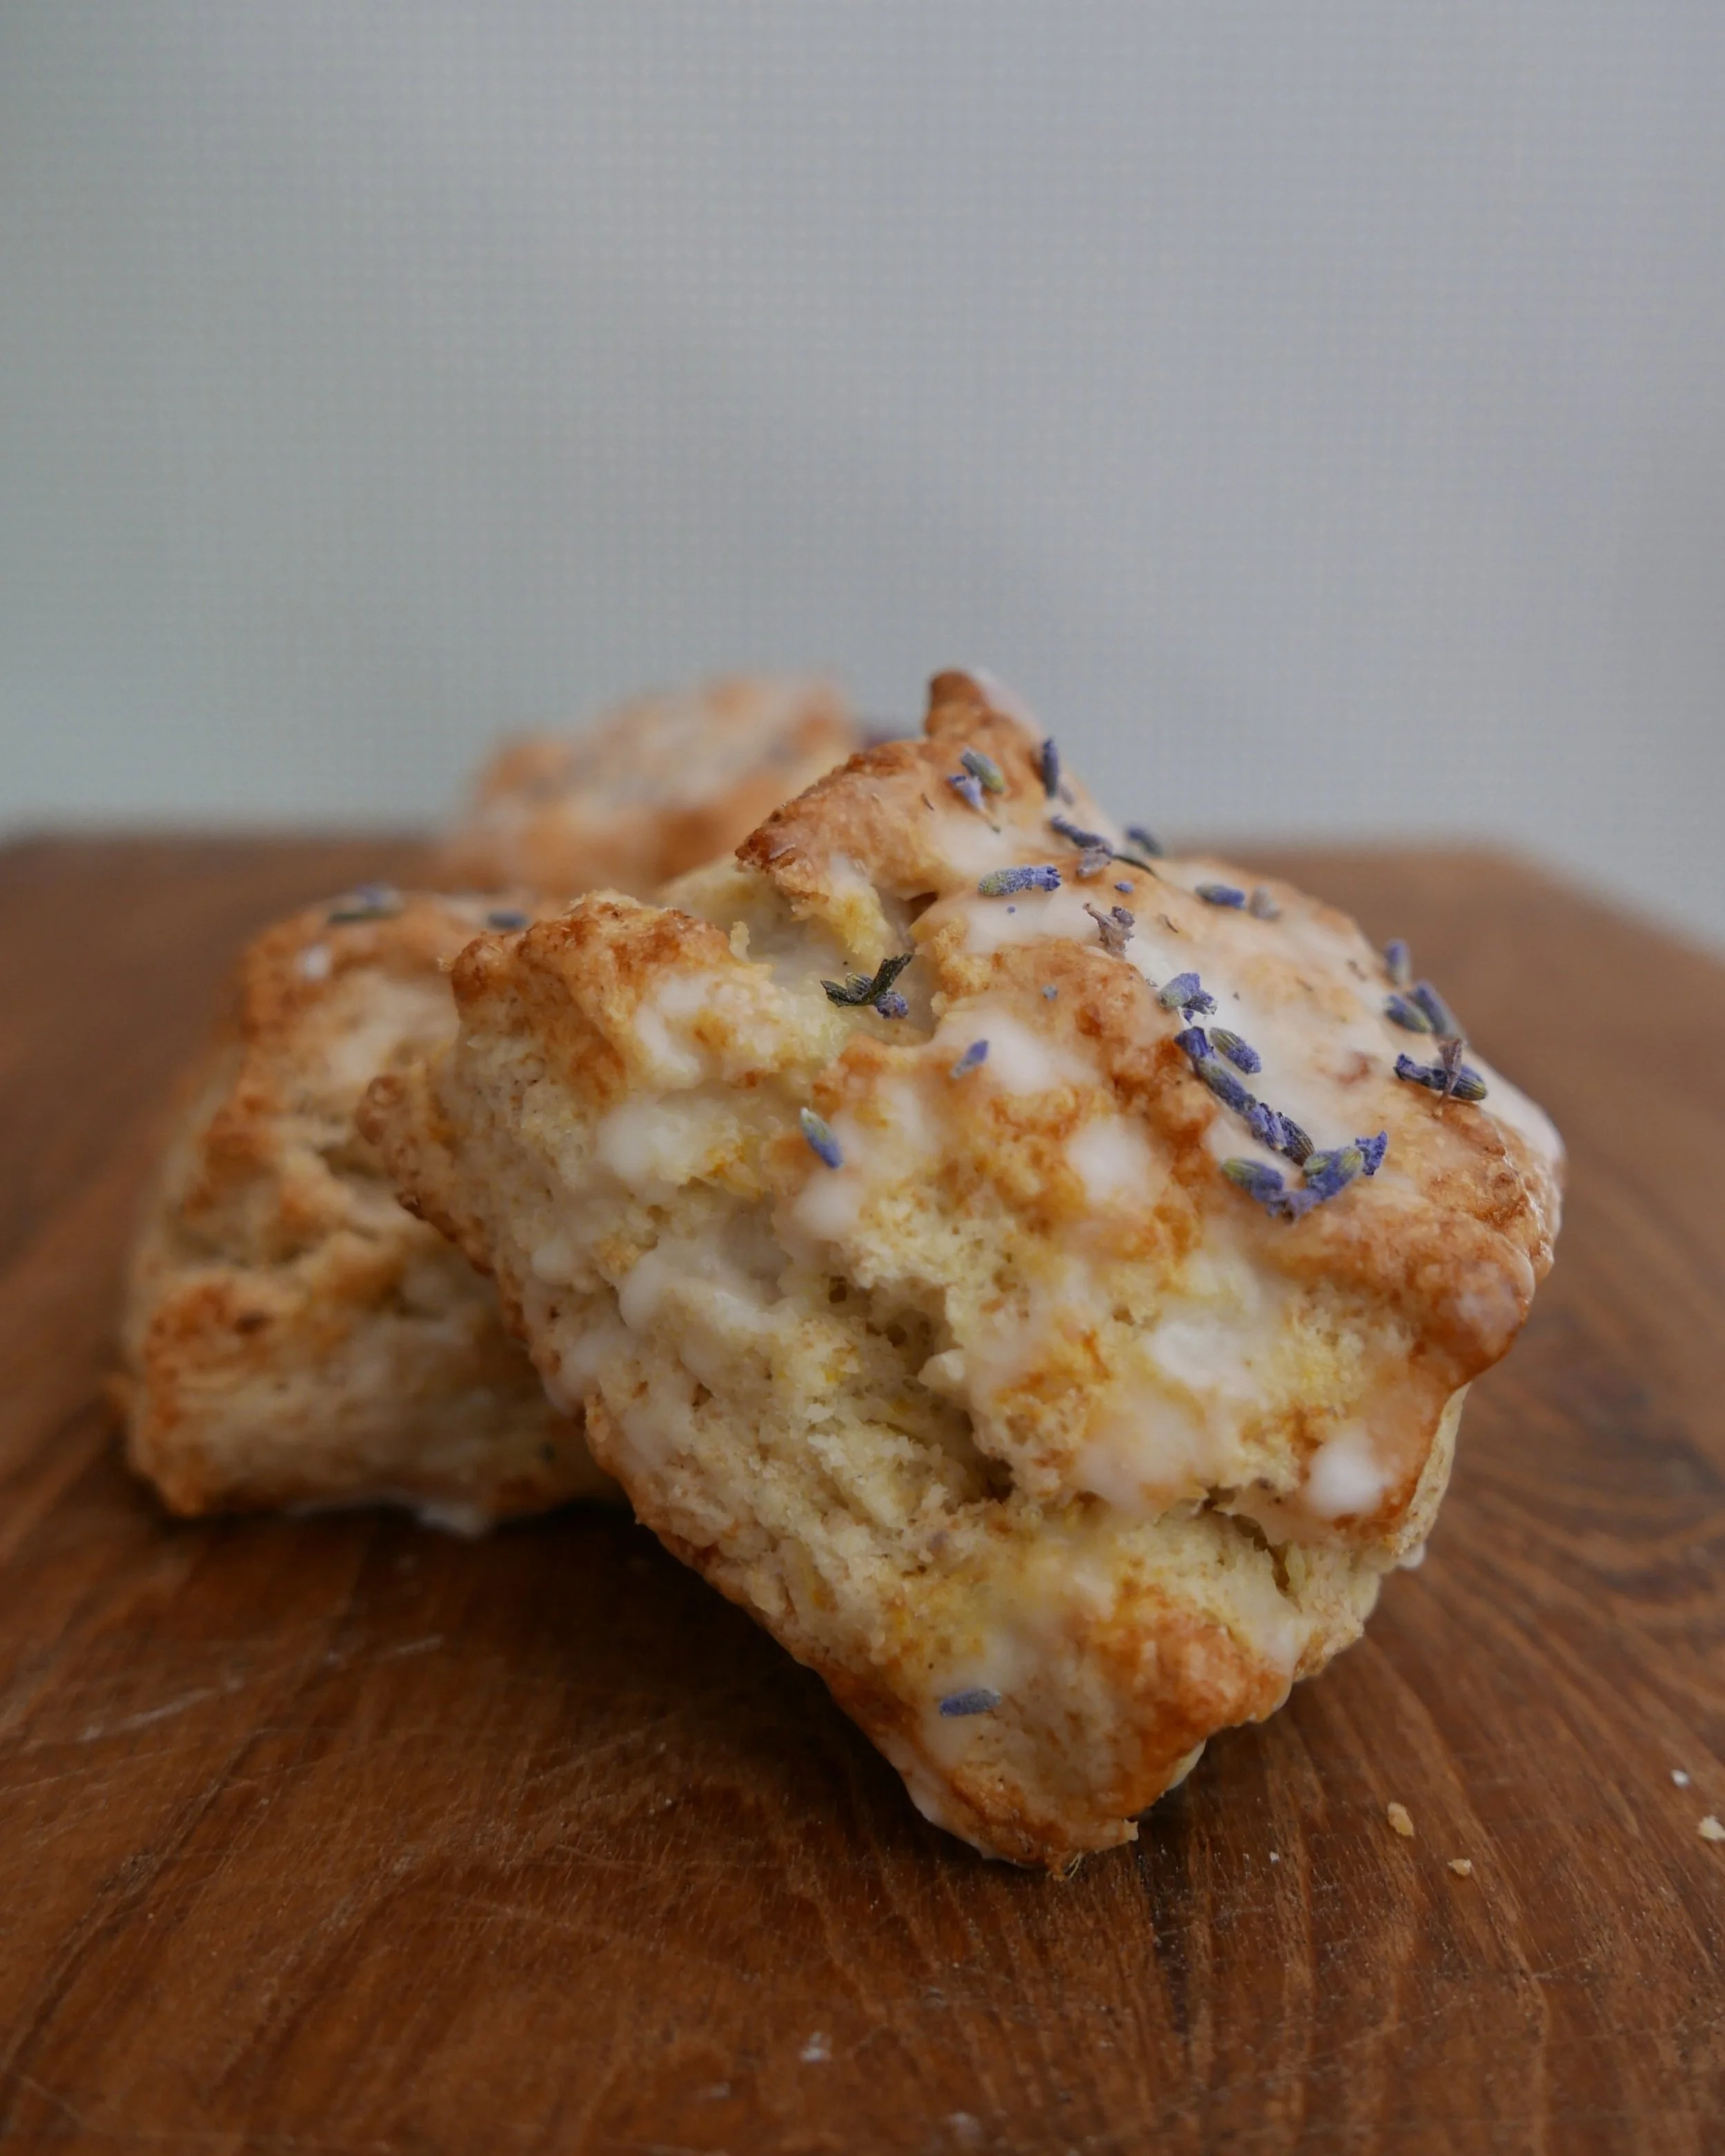
Lavender is not everyone’s favourite flower when it comes to baking, to be honest I am more partial to rose, yet I made these scones and with the hint of citrus, pungent purple flower (to me), seemed to mellow out somewhat.
Lavender is said to have originated in the Mediterranean, yet there is also evidence of it being used in Ancient Egypt for embalming and its aromatic properties. It is perfect for soothing headaches and soothing weary muscles, and also is pretty tasty when combined with chocolate.
For a lighter taste I added it to the scones which turned out really well and this recipe is super simple to make. Try it!
INGREDIENTS
Topping
2 oranges (cut the ends off and slice into 3mm wheels)
100g fine-cut citrus marmalade
50mls water
20g brown sugar
30g salted butter
Cake
200g unsalted butter
200g white caster sugar
4 medium eggs
1 tsp good vanilla paste
2 oranges zest and juice
80g yoghurt
2tsp baking powder
200g plain flour
100g nut flour (almond or hazelnut works)
½ tsp fine sea salt
2tsp cardamom powder
METHOD
1) Heat the marmalade, water and sugar over medium heat, stirring occasionally
2) When it reduces slightly, add the butter and stir in until melted and combined.
3) Turn off the heat and set aside
1) Preheat the oven to 170°C
2) Grease and line a 20cm springform cake pan
3) Beat the sugar and butter together until light and fluffy
4) Add in the eggs one at a time and then the vanilla paste
5) Mix the juice and zest of oranges with the yoghurt
6) Sift the flour, baking powder and salt in a medium bowl, add the nut flour
7) Add ½ of the dry mixture to the sugar and egg mixture, and mix until just
combined.
8) Then add the yoghurt, juice, and zest mix.
9) Finally finish up with the dry mixture, stirring until all ingredients are incorporated
10) Pour the topping mixture into the lined cake tin and layer the slices of oranges to cover the entire base.
11) Lastly, add the cake batter and tap lightly to even it out.
12) Place in the oven and bake for 40-45 minutes.
Allow to cool slightly before turning out the cake onto a plate.
Admire the bottom of the cake which is now the decorative top! Cut a generous slice and enjoy.

Orange Marmalade Cardamom Cake
The Recipe
Makes: 1 x 20cm cake
Preparation: 15 minutes
Baking Time: 40-45 minutes
“The earliest recording of citrus can be found in Chinese literature dating around 314BC”

Oranges are an extremely vitamin-rich fruit that can be used in many cooking applications.
The earliest recording of citrus can be found in Chinese literature dating around 314BC. From Asia, the Arabs were influential in the journey of oranges through the Mediterranean in the 7th Century.
Christopher Colombus was most likely responsible for transporting one of the first orange seed trees to the United States, the second-largest producer of oranges in the world.
The sweet orange we know today is actually a hybrid of pomelo and mandarin and is the most common citrus available all around the world.
I have used some Egyptian oranges in this month’s recipe that calls for one of my favourite and unique spices – cardamom. The bottom of the cake layered with wheels of orange and buttered marmalade ends up being the decorative top of the cake.
All that is needed is a good scoop of thick double cream.
INGREDIENTS
Topping
2 oranges (cut the ends off and slice into 3mm wheels)
100g fine-cut citrus marmalade
50mls water
20g brown sugar
30g salted butter
Cake
200g unsalted butter
200g white caster sugar
4 medium eggs
1 tsp good vanilla paste
2 oranges zest and juice
80g yoghurt
2tsp baking powder
200g plain flour
100g nut flour (almond or hazelnut works)
½ tsp fine sea salt
2tsp cardamom powder
METHOD
1) Heat the marmalade, water and sugar over medium heat, stirring occasionally
2) When it reduces slightly, add the butter and stir in until melted and combined.
3) Turn off the heat and set aside
1) Preheat the oven to 170°C
2) Grease and line a 20cm springform cake pan
3) Beat the sugar and butter together until light and fluffy
4) Add in the eggs one at a time and then the vanilla paste
5) Mix the juice and zest of oranges with the yoghurt
6) Sift the flour, baking powder and salt in a medium bowl, add the nut flour
7) Add ½ of the dry mixture to the sugar and egg mixture, and mix until just
combined.
8) Then add the yoghurt, juice, and zest mix.
9) Finally finish up with the dry mixture, stirring until all ingredients are incorporated
10) Pour the topping mixture into the lined cake tin and layer the slices of oranges to cover the entire base.
11) Lastly, add the cake batter and tap lightly to even it out.
12) Place in the oven and bake for 40-45 minutes.
Allow to cool slightly before turning out the cake onto a plate.
Admire the bottom of the cake which is now the decorative top! Cut a generous slice and enjoy.

Chocolate and Pistachio Cassata Cake
The Recipe
Makes: 1 x 20cm cake
Preparation: 40 minutes
Baking Time: 40 minutes
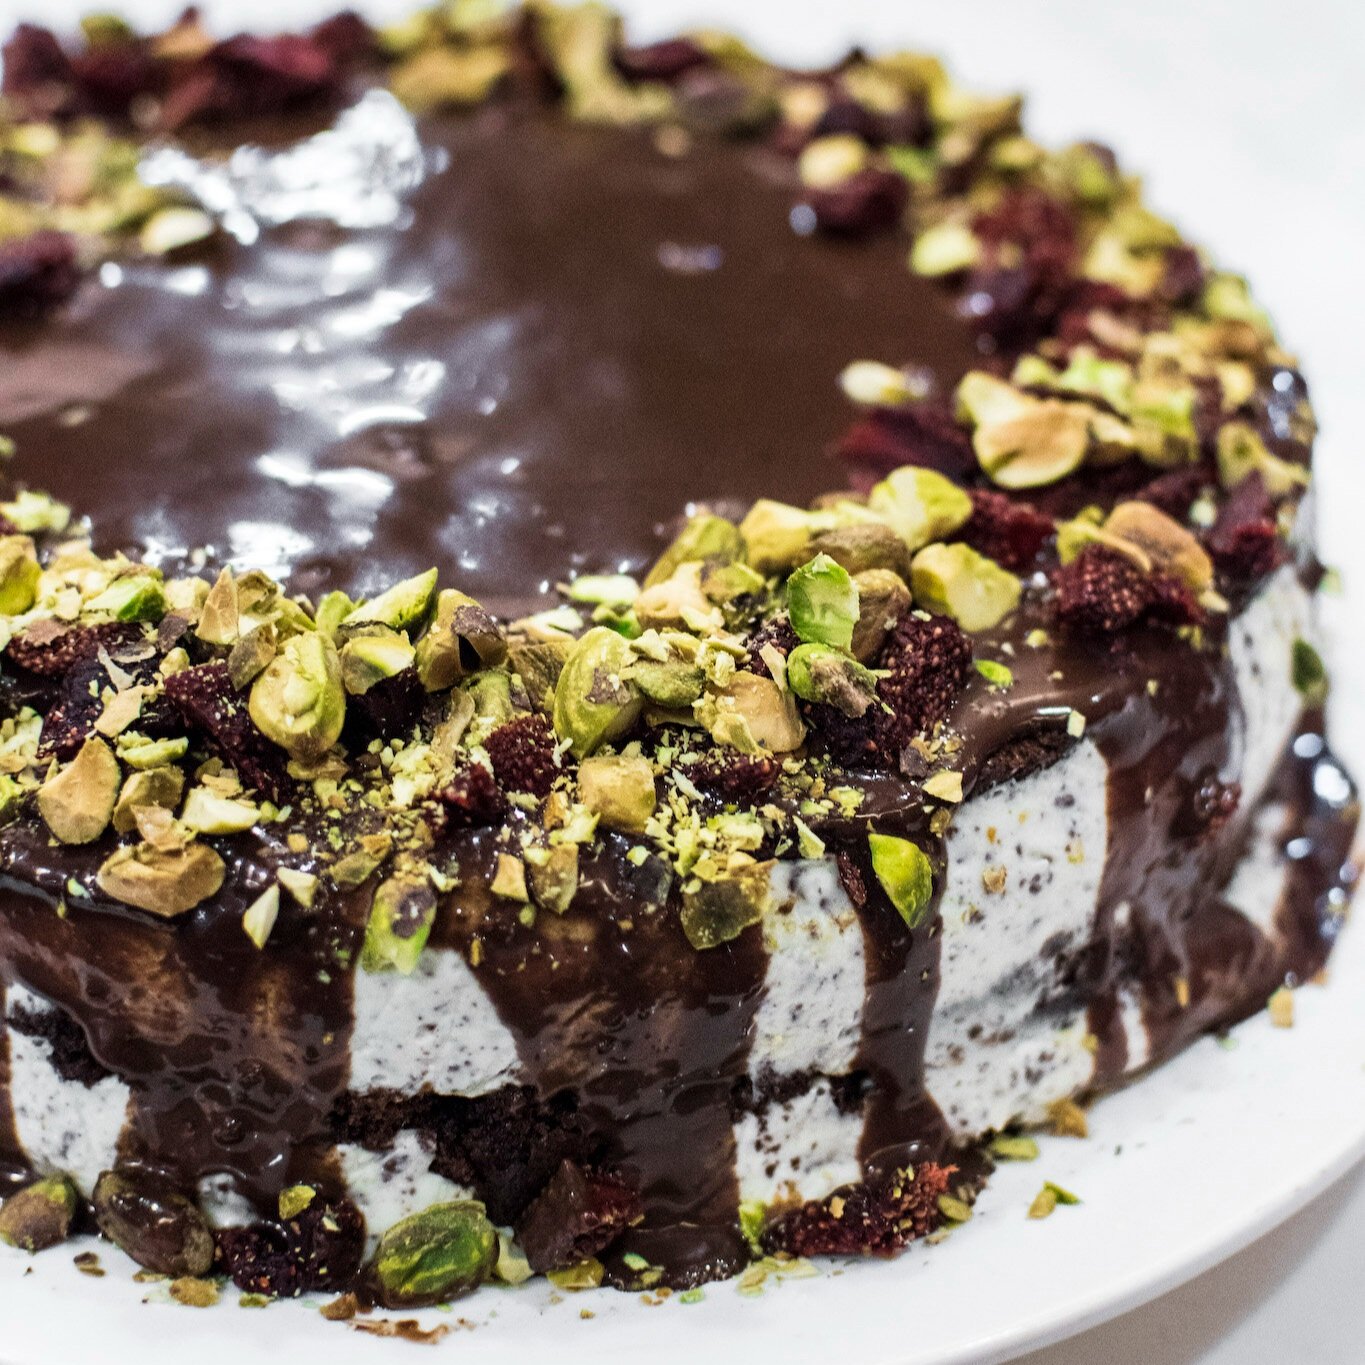
Cassata is a traditional sponge layer cake from Sicily. It consists of ricotta, dried fruits, nuts, marzipan, and chocolate.
Credit: @etstudiosg
Although still a region of Italy, Sicily seems like another country with locals referring to themselves as ‘Sicilians’ and not Italians. In Sicily, they speak ‘Sicilian’ and little English in the smaller towns which makes travelling through this part of Italy all the more exciting.
Sicily is the largest island in the Mediterranean Sea and has a rich history and culture, which to my delight, is prevalent through a lot of its architecture and food from region to region. A couscous in Trapani will be the influence of North Africa, Pomodoro (the most amazing in the world), region-wide, is an influence of Spain, spices, citrus, and dried fruits came about from Arab occupation, and ingredients such as melanzane, olives, and seafood have come from my other food country love, Greece.
It was not only the people of Sicily that inspired me and warmed my heart with their open arms, beautiful hospitality, breathtaking beaches, and amazing food, but the travelers I encountered on my journey – free spirits from around the globe that made their way to this beautiful island and took away so much more than we had all expected.
While in Marsala, a beautiful town known famously for the landing of Garibaldi in the 1860s and also for Marsala wine, I learned how to make pasta al forno, arancino, cornetto, pane, and cassata in a traditional bakery/café called Bar Lo Stagnone.
When I travel I always make sure I visit as many local bakeries as possible to learn how they make traditional desserts. I love that traditional recipes always have a twist from region to region and person to person.
My favourite Sicilian desserts, hands down are cannoli and cassata, so I made a cake that was inspired by the two!
Cassata is a traditional sponge layer cake from Sicily. It consists of ricotta, dried fruits, nuts, marzipan, and chocolate. This recipe is inspired by many a cassata I tried while on my travels through Sicily. I remember the tiny wild strawberries and the amazing pistachios found in this region of the world, so I included some dried wild strawberries in the garnish.
The cake is fairly easy to make but will take some time – it is best made the day before so it has time to set and is, therefore, easier to ice.
INGREDIENTS
Chocolate Cake
130g unsalted butter
150g brown sugar
100g white caster sugar
180g plain flour
180mls whole milk
2tsp/8g baking powder
60g cocoa
3 medium eggs
Pinch of fine sea salt
Ricotta Filling
640g ricotta cheese
300g thickened cream
60g sifted icing sugar
4tsp vanilla bean paste
200g semi-sweet chocolate, chopped.
Cake liquor
50mls sweet vermouth
20g water
10g white sugar
Ganache Topping
150g cooking cream
120g semi sweet chocolate
Pinch of sea salt
METHOD
Preheat oven to 160’C. Line a 20cm circular spring-form cake pan.
Beat butter and sugars in an electric mixer until creamy and combined
Sift flour, baking powder, salt and cocoa in a separate bowl
Add eggs one at a time to the butter mixture until the eggs are folded in
Mix in 1/3 flour to the mixture then 1/3 milk. Continue this finishing with the flour.
Allow mixture to combine and then pour into the cake tin.
Bake for 40 minutes. Allow the cake to cool slightly before turning it out on a cake rack so it cools completely
Whip ricotta, cream and icing sugar and vanilla until completely smooth
Add in chocolate pieces and refrigerate.
Heat in a pan over low heat until the sugar is dissolved
Set aside
Heat cream on a low heat
Add a pinch of salt
Add in chocolate until it is melted and the ganache mixture is shiny and smooth. Refrigerate until cool
Assembly
With a serrated knife, slice the top of the cake to make it flat
Slice the cake across into 3 even pieces
Line the cake tin with cling film with extra hanging over the edges
Place one piece of the cake in the tin, brush liberally with cake liquor and then smooth over a layer of ricotta
Continue with the next two layers, finishing with the cake on top
Fold over cling film and set the cake in the fridge ideally overnight or for 2-3 hours until firm and set.
When the cake is set, turn out upside down and remove the cling film
Place ganache on the top of the cake allowing it to spill over the sides
Sprinkle the chopped pistachios and strawberries on top
Decoration/Garnish
80g dried or fresh strawberries
80g roasted pistachios
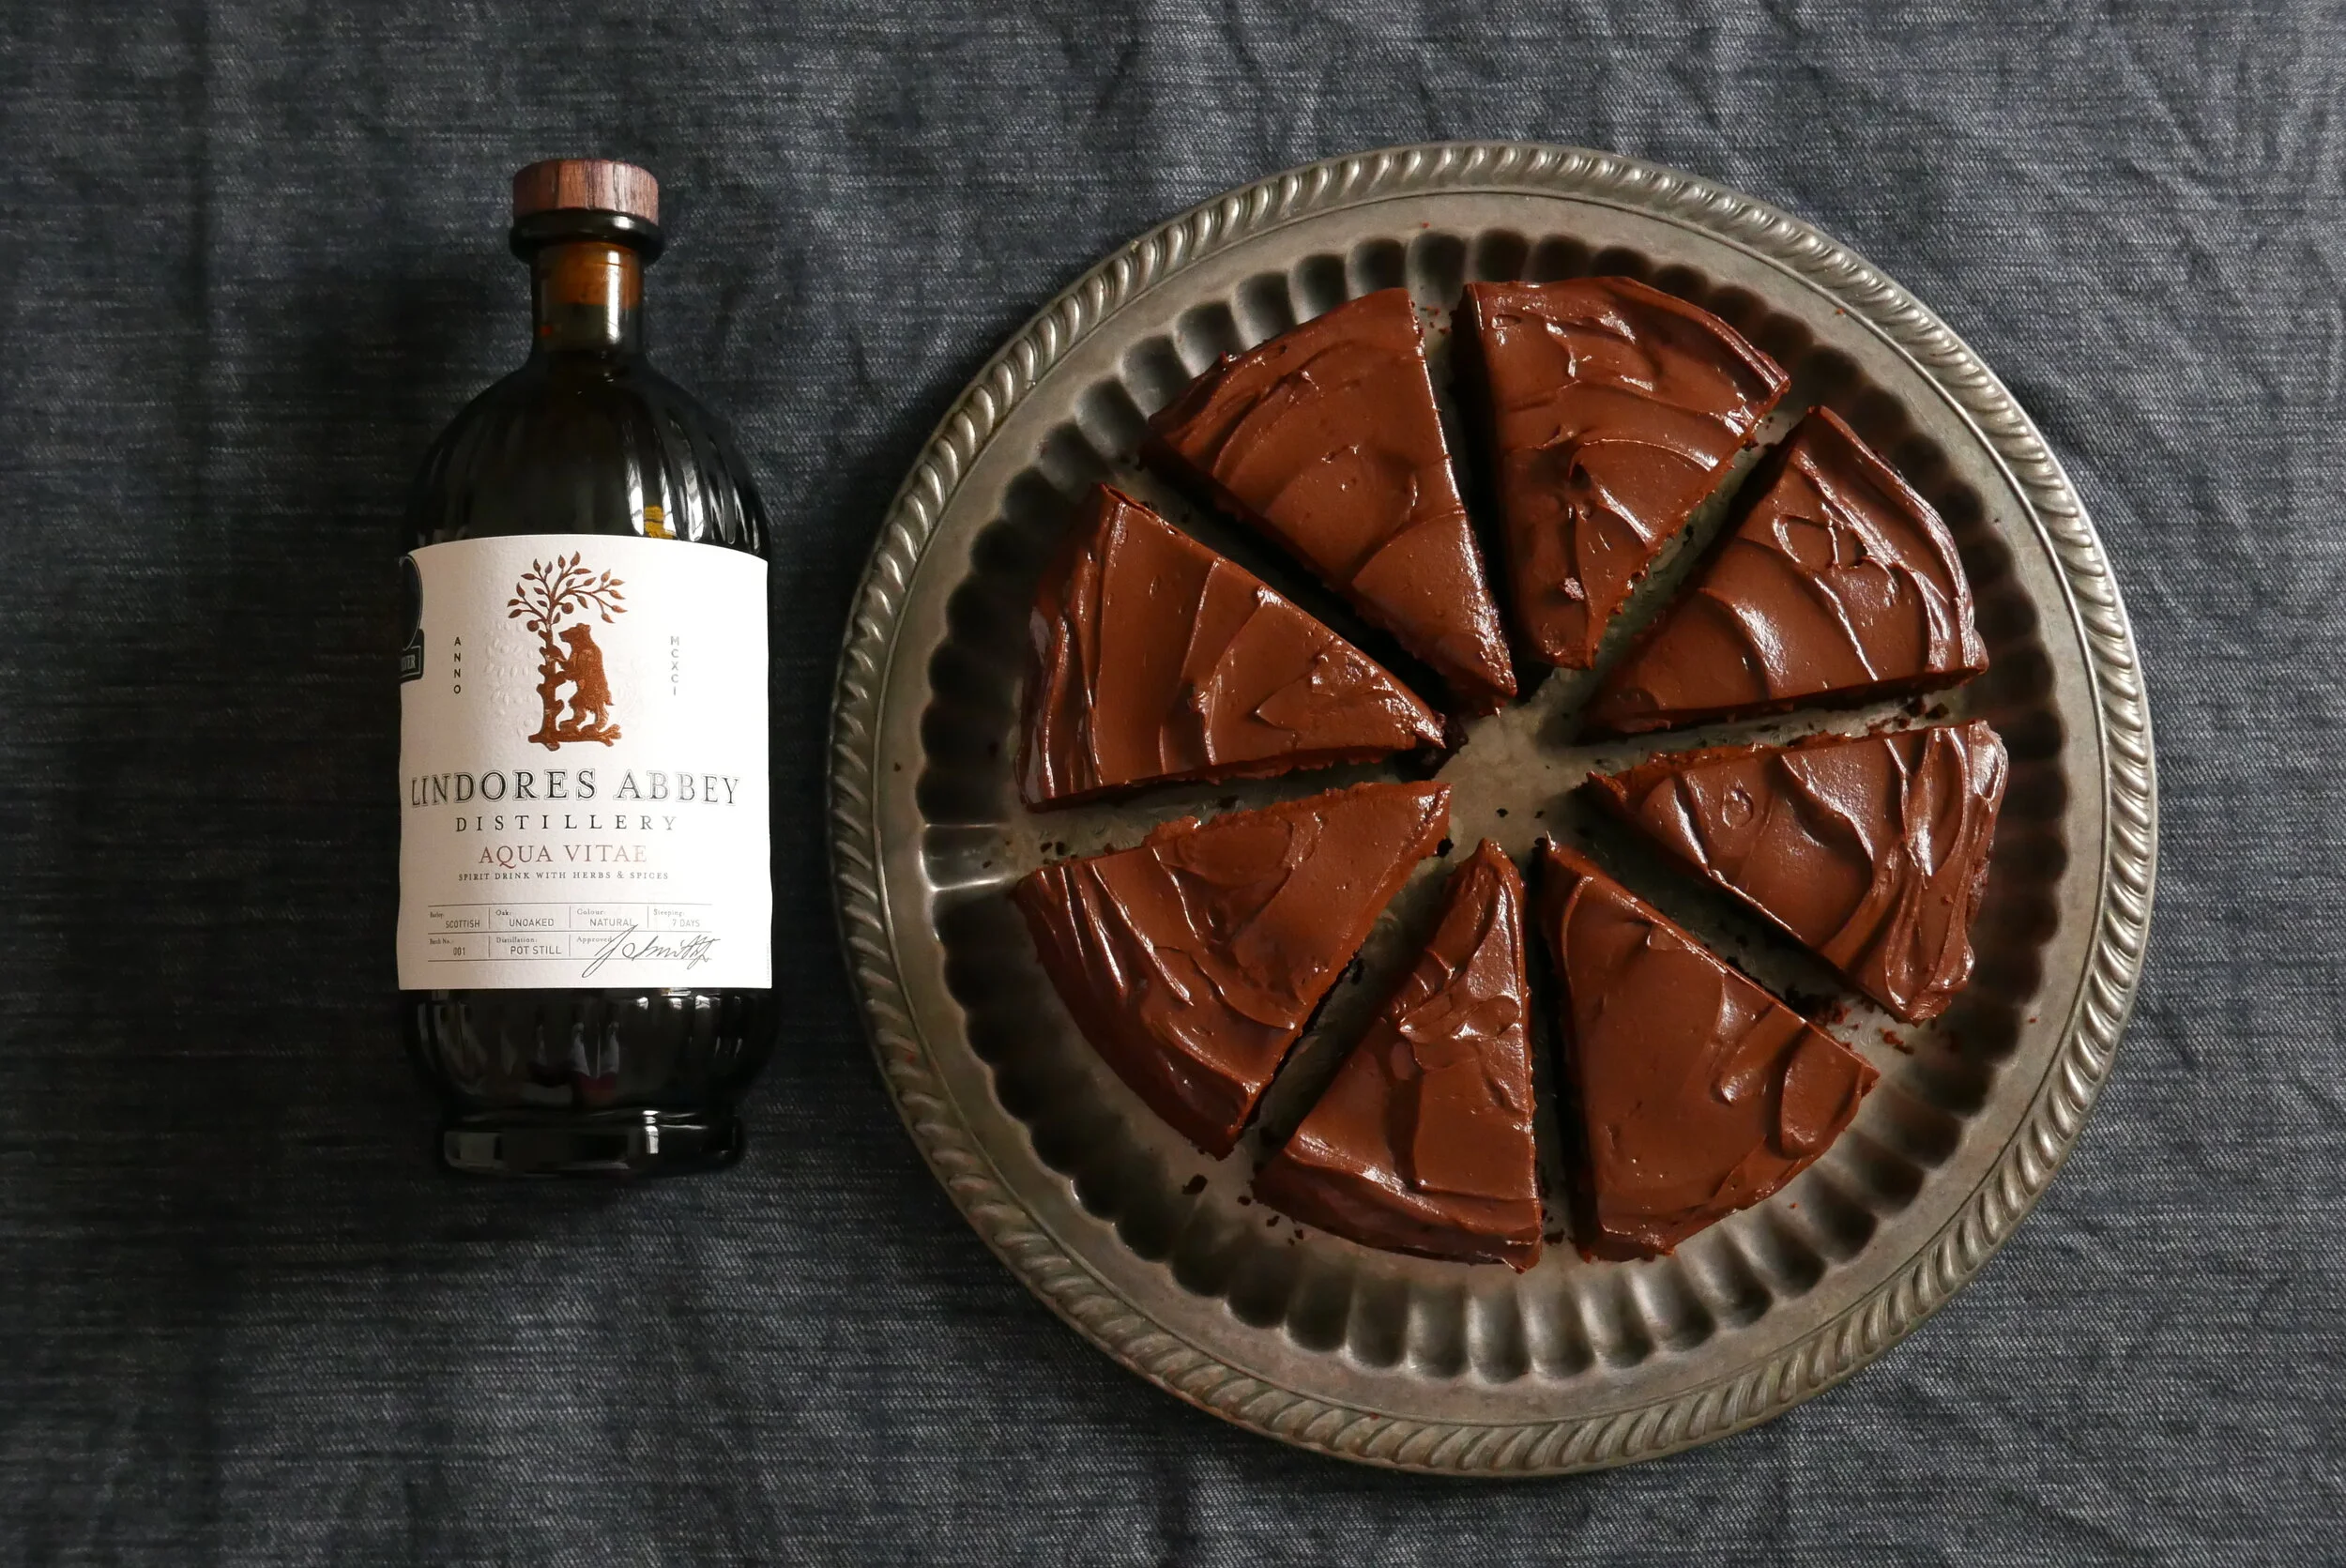
Dark Chocolate & Aqua Vitae Prune Cake
The Recipe
Serves: 6-8 people
Preparation: overnight
Baking Time: 45 minutes

This lusciously indulgent cake is made with some absolutely delicious Aqua Vitae from Lindores Abbey Distillery in Fife, Scotland. If you can, get your hands on this balanced malt spirit with a myriad of balanced fruit, spices and locally grown herbs.
If you can’t do so, this recipe can be substituted with rum or even a whisky.
INGREDIENTS
Aqua Vitae Prunes
200g pitted prunes
100mls Lindores Abbey aqua vitae (if not, a dark rum, whiskey)
1 tblsp sugar
Combine all ingredients and soak for a minimum of two days until the prunes are deliciously plump and juicy.
Ingredients - Cake
200g unsalted butter
100g caster sugar
100g brown sugar
3 eggs
60g cocoa
¼ tsp sea salt
250g plain flour
1.5tsp baking powder
100g dark melted chocolate (65% or more)
Dark Chocolate Ganache
300g dark chocolate (70%), chopped into bits
300g cream
1 tbsp honey
METHOD
Heat the cream on a medium setting and melt in the chocolate and honey until combined Take off the heat and allow to cool completely.
Preheat the oven to 180 °Celsius and grease and line a round 20cm (ish) cake tin.
Strain the prunes, reserving the liquid, and roughly chop the prunes.
In an electric mixer, cream the butter and sugars until light and fluffy.
Crack the eggs in a separate bowl individually before mixing them into the creamed butter mixture until combined. At this stage, you can add the reserved liquid from the soaked prunes.
Sift the cocoa, baking powder, salt, and cocoa in a separate bowl.
Mix the melted chocolate into the wet mixture and then fold in the dry ingredients
Place the batter in the lined cake tin and bake for 35-40 minutes
When the cake is done, allow to cool slightly before turning it out onto a cooling rack to cool completely.
Dress the cooled cake with the ganache on top or just the sides, whatever you fancy
Cut into not-so-generous slices as this cake is sumptuously rich, you can always go back for a second – don’t worry, I won’t judge.


Super Easy Pita Bread
The Recipe
Makes: 10 x pieces (100g)
Preparation: 40 minutes
Baking Time: 5-8 minutes
Pita bread is not what it was many years ago. It began as a flat bread without any leavener and eventually morphed into a puffy round piece of goodness.

Pita bread is a wonderfully versatile simple bread. You can stuff them with meatballs, salads, or felafels, dip them into a dip such as hummus or simply eat them on their own (preferably warm).
Pita bread is not what it was many years ago. It began as a flat bread without any leavener and eventually morphed into a puffy round piece of goodness.
Its roots are found in the middle east and the Mediterranean. If you want to learn more about bread check this out, or simply go ahead and bake some pita! It will last for a week and is also easy to freeze and defrost when you need it.
Make sure you use good flour that is unrefined and unbleached - you won’t regret it.
INGREDIENTS
400mls warm water
10g instant yeast
2tsp white caster sugar
900g strong bread flour (you can also do 50/50 with wholemeal)
2tsp fine sea salt
2tbsp extra virgin olive oil
METHOD
Add 300mls of warm water to the yeast and sugar. Stir a little and allow until the mixture becomes a little frothy
Add the oil to the water/yeast mixture and have the remaining 100mls of water on standby
Mix salt and flour together
With a dough hook on your mixer, combine the water/yeast mixture and the dry ingredients until it comes together. Add a little extra water if needed.
Mix until the dough is smooth and supple.
Place the dough into a well-oiled bowl and cover it with cling film, a clean shower cap, or a damp tea towel until it has doubled in size.
Weigh out 100g pieces and place them on a floured tray, covered for 20-30 minutes.
In an oven preheated at 220°C, bake for 5-8 minutes until brown and a little puffy.
Stuff with your favourite fillings and enjoy. If you bake too many you can always freeze them for another day.

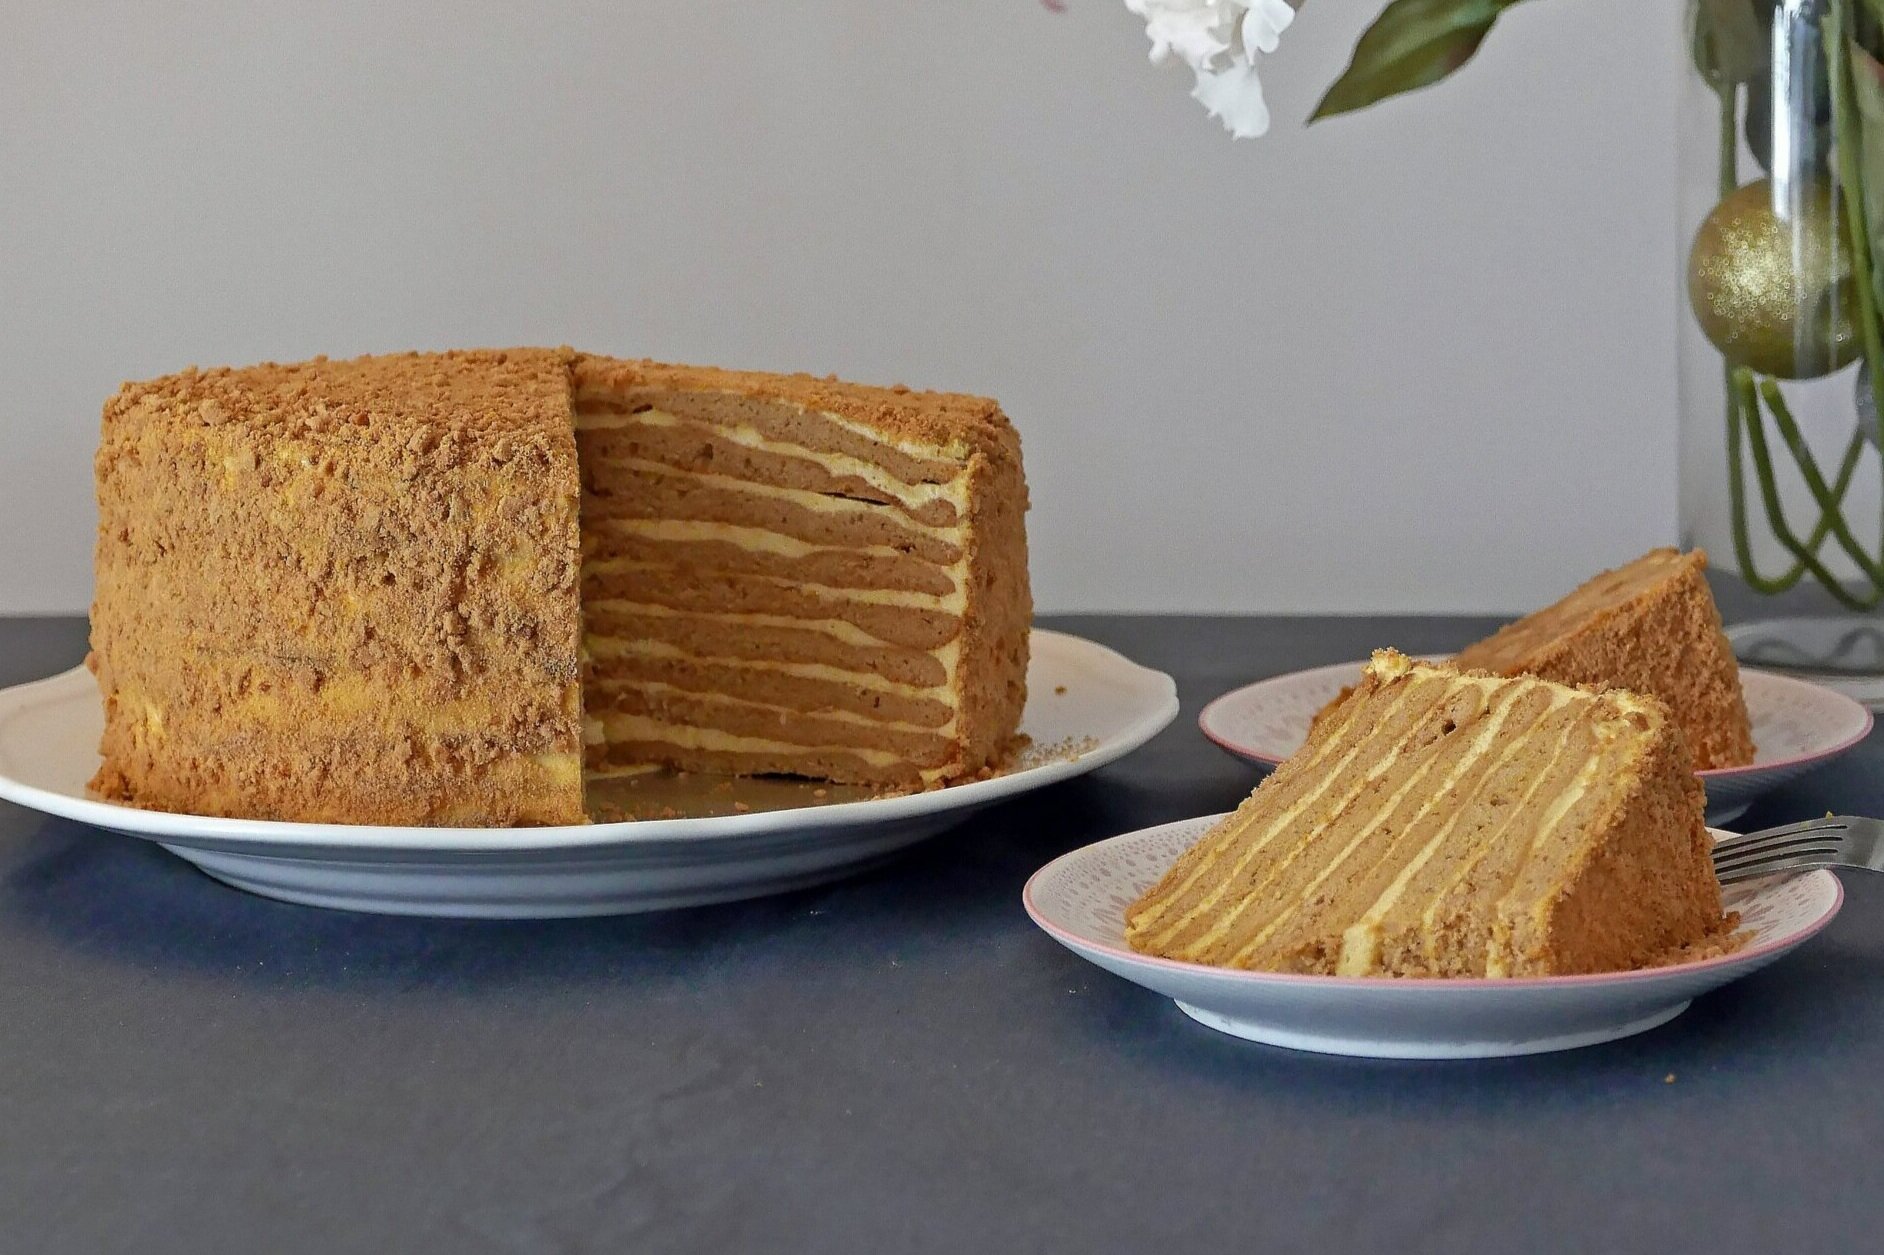
Russian Honey Cake (Medovik Torte)
The Recipe
Makes: 1 x 20cm cake
Preparation: 20 minutes
Baking Time: 1 hour
The Medovik Torte or Russian Honey cake was an invention of a young chef in the Imperial Palace of the Russian Empire in the 19th Century.

The Story of the Medovik Torte
The Medovik Torte or Russian Honey cake was an invention of a young chef in the Imperial Palace of the Russian Empire in the 19th Century. It was developed to incorporate honey into a dessert for Empress Elizabeth Alexeyevna, the wife of Alexander I who was not the biggest fan of honey.
The method of heating the honey to a caramel colour allows it to take on a sweet caramel flavor and the inclusion of a sour cream frosting allows it to balance out quite beautifully.
A word or two about honey
Honey, a wonderful golden liquid that has a composition of a complex mixture of sugars, water, vitamins, minerals, pollen, and protein. It is made by these wonderful little black and yellow foragers known as bees, who collect nectar from flowers (or honeydew) near and far, store it in their honey stomachs (crops) and regurgitate it into the little vessels of the hive. The vessel is then fanned with its wings which leads to water being evaporated and the pure honey remaining.
Bees have been going about their business for more than 100 million years according to fossil evidence of these little creatures that have been preserved in resin. Cave paintings in Spain dating back 8,000 years ago show that humans have relied on bees by raiding their nests and collecting the sweet liquid they produce. The earliest evidence of beekeeping was in Ancient Egypt where hives made of clay from the Nile were placed on rafts that travelled up and down the river depending on the season.
Honey bees, honey, and wax were a part of everyday life in the ancient world. The application of honeybees’ by-products was used for culinary purposes, spiritual and religious rituals, embalming, medicinal treatments, and even as a currency.
Honey is classified according to the floral source (monofloral, poly floral, blend) and by region or country. It can be bought in both its raw form and pasteurized form. Raw honey comes straight from the honeycomb and is mashed and filtered to remove the honeycomb and other debris. Honey in its raw state is unadulterated, containing beneficial health and medicinal properties due to the pollen, propolis, antioxidants, natural vitamins, and minerals present. When honey is pasteurized, it results in a smooth clearer liquid and while it is aesthetically pleasing, will contain a loss of vitamins, essential nutrients, and minerals.

INGREDIENTS
CAKE
120g unsalted butter
300g browned honey
150g brown sugar
½ tsp salt
1 tsp cinnamon
500g plain unbleached flour
1.5tsp bicarbonate soda
4 medium eggs
1 tsp vanilla extract
FROSTING
200g browned honey
½ tsp salt
Zest of 1 orange
600g whipping cream.
400g sour cream
METHOD
Preheat the oven to 180’C. Line as many trays as you have with baking paper and draw a 20cm circle on each bit of paper.
To brown the honey, place 500g In a large saucepan on medium heat and allow it to cook for 10 -15 minutes until it becomes a dark caramel colour. Keep a close eye on it as it may boil over. Turn off the heat and pour 300g into a heat-proof bowl and 200g into a separate bowl for the frosting.
The frosting is best made ahead and allowed to set further in the refrigerator so add sour cream to the cooled browned honey, orange zest, and salt. Mix well. Whip the cream in a separate bowl until firm, then fold it into the sour cream mixture until combined. Cover and store in the refrigerator while you make the cake
In the heat-proof bowl containing the browned honey, add sugar, salt, and butter. Heat slowly over a pot of boiling water until the butter has melted and the sugar has dissolved. Take off the heat and whisk in the bicarbonate soda.
Whisk eggs with vanilla in a separate bowl and then slowly whisk this into the honey-sugar mixture.
Finally sift flour and cinnamon and fold into the liquid mixture until combined
Measure 100 g of the cake batter and spread it evenly inside the drawn circle with a spatula. Repeat this on all the baking paper circles. Place in the oven and cook for 5-7 minutes until the batter is cooked. Allow the cake to cool slightly before transferring it to a cooling rack. Repeat this until you have about 10-12 cookie cake rounds. For the last 1-2 cakes you can cook at 130’C for about 8-10 minutes until the cake is nicely browned – this will be used for decorating later. Allow all the layers to cool completely before icing.
Start with the first layer by spreading a small amount of frosting on a 20cm circular cake board. Place the cake layer on top and then add, smoothing out evenly as you go. Keep layering until all the cake has been used up. Finally, ice the top and the sides of the cake. Return to the refrigerator and allow to set.
Blitz up the cooled cake layer that was baked in the oven slightly longer until you have a coarse breadcrumb consistency. When the cake is set, gently but firmly pat the crumbs to the top and the side of the cake.
Cut into generous slices, drizzle with extra honey, and indulge in this gorgeous cake!


Chocolate & Yoghurt Mini Bundt Cakes
The Recipe
Makes: 12 small Bundt cakes
Preparation: 20 minutes
Baking Time: 10-12 minutes
Bundt tins were inspired by the shape of a raisin and almond-yeasted bread known as ‘Kugekhopf’ that is found in Germany, Austria, Alsace & Switzerland. They are a recent invention around the 1950s by David Dalquist, a metallurgist based in Minnesota.

So I dropped into a bargain discount store, as I do, to see if anything for the kitchen would catch my eye, and stumbled upon a mini Bundt baking tin. As soon as I see bundt cakes I think of the most delicious bundt/tea cakes at Ottolenghi when I lived in London (I absolutely love all their bakery treats). Unfortunately, they are a rare sight in Singapore and bakeries usually have mini cakes in the form of muffins or mini loaves.
Bundt tins were inspired by the shape of a raisin and almond yeasted bread known as ‘Kugekhopf’ that is found in Germany, Austria, Alsace & Switzerland. They are a recent invention around the 1950s by David Dalquist, a metallurgist based in Minnesota.
A Bundt cake today doesn’t really follow a specific recipe. It is simply baked in a bundt tin and because of the hole in the middle, cooks faster than regular cakes and results in a more dense texture.
As with all baking recipes, the timing and texture of the cake will depend on the oven and how much moisture the flour and cocoa will absorb. I recommend using your gut instinct and add a little more liquid if the cake batter is a little too thick.
INGREDIENTS
80g unsalted butter
150g brown sugar
1 medium egg
100g melted dark chocolate.
1/2 tsp baking powder
1/2 tsp cinnamon powder
1/4 tsp bicarbonate soda
1/4 tsp fine sea salt
40g cocoa
170g plain flour
150g Greek yoghurt
METHOD
Preheat the oven to 170’C
In an electric mixer, beat butter and sugar together until nice and fluffy
Sieve the flour, cocoa, cinnamon, salt, baking powder and baking soda into a bowl
Add in the egg and a little bit of flour to bind the eggs and sugar
Incorporate the melted chocolate
Turn the electric mixer to low and add a half the flour/cocoa mixture and half the yoghurt. Allow the batter to be combined then add the rest of the yoghurt and finish up with the flour/cocoa mixture.
The mixture will be slightly firmer than a regular cake batter, if needed you can add a little more yoghurt.
Place into a plastic bag and cut off the tip. Pipe into a well-greased bundt tin or muffin tin about 3/4 full.
Bake for 10-12 minutes and allow to cool slightly before turning out onto a cake rack
Allow the cakes to cool completely sifting over some snowy white icing sugar.

Blueberry Crumble Muffins
Crispy and crumbly on top and deliciously moist inside. Make these super duper easy blueberry muffins
The Recipe
Makes: 12 medium muffins
Preparation: 15 minutes
Baking Time: 20-25 minutes
Muffins were developed around the end of the 18th Century. This is when pearlash, or potassium carbonate was adventurously added to a dough.

So in case you were unaware - there are two types of muffins in the baking world.
You have English style muffins which came about around 10th or 11th Century. They contain yeast, need a little time to rise and are cooked in a pan. These kind of muffins you will be wanting to slather some monkey nut butter on, top with salmon, poached eggs and hollandaise sauce and the like - yes those kind.
However... we are here talking about American-style muffins. The quick bread type, classified in that group along with scones.
Muffins were developed around the end of the 18th Century. This is when pearlash, or potassium carbonate was adventurously added to a dough. The leavening agent added carbon dioxide gas to the dough, allowing it to rise considerably and resulted in a lighter cakey texture. Pearlash was actually exported to Europe in large quantities until baking powder was developed commercially around the 1860's.
So with that little history lesson - let's move on to the recipe and discover how easy it is to make these delicious blueberry muffins. Get dirty and mix with your hands (that's what baking is all about!) and always be in a happy mood when you bake - believe it or not, this affects the end result.
INGREDIENTS
CRUMBLE
125g plain unbleached white flour
60g unrefined caster sugar
60g cold unsalted butter, cut into cubes
a pinch of salt
Combine all ingredients in a bowl and rub in the butter with your fingertips until a rough large bread crumb consistency. Refrigerate or freeze until ready to use.
MUFFINS
115g unsalted butter (at room temperature)
240mls whole fresh milk
2 medium eggs
400g plain unbleached flour
1 tbtbspaking powder
200g unrefined caster sugar
250g fresh or frozen blueberries
pinch of fine sea salt
METHOD
Preheat the oven to 180'C. Brush the muffin tin with butter and dust lightly with plain flour. Turn the tin upside down to remove excess flour. Place the prepared muffin tin in the fridge until the batter is ready.
Put flour, salt, baking powder, and sugar in a large mixing bowl
Add the cubed butter to the flour mix and rub in with your fingertips until you reach a fine breadcrumb consistency.
In a small mixing bowl or jug, add milk and eggs. Stir until combined and then add to the flour/butter mix. Stir until just incorporated.
Lastly add the blueberries and mix through until the fruit is evenly dispersed. Don't over-mix your muffin batter as the end muffin result will be a dry hard muffin.
Spoon the mixture into the prepared muffin tin which should be nice and chilled. Fill the holes right to the top of the tin. When the muffins rise they will spill over and create a lovely muffin top.
Finally add 2.5 tablespoons of the prepared crumble to the top of the wet muffin mix in the tins. Pack down lightly.
Bake for about 20-25 minutes (depending on the quality of your oven) until lovely and golden. Allow cooling slightly before turning them out onto a cooling rack.
Eat them fresh out of the oven with a good strong cup of coffee and you are ready to start your week!!!
Store in an airtight container for a few days or you can also freeze these muffins.
NOTE; you can make the crumble in advance and have it already frozen for when you have the urge to make crumble muffins or a basic fruit crumble. Add any fresh or frozen fruit to this recipe if you are not too partial to blueberries.

English Tea Scones for Merienda
The Recipe
Makes: 12 x 50g scones
Preparation: 10 minutes
Baking Time: 12-15 minutes
The perfect cream scones for afternoon tea - clotted cream and strawberry jam is a must!

We all know about the age old tradition of afternoon tea in the United Kingdom.. consisting of cream scones, cute little crustless sandwiches and loose leaf tea... It is a tradition that was common amongst the upper-class societies in the 1800s and was a light meal, served between 4 and 6.
The tradition of this afternoon tea today is prevalent throughout the world with hotels and established restaurants offering this in-between meal that can be most opulent.
It is also a big tradition in Argentina, which is a reminder of the migration of British citizens to the country between 1837-1901. This was the Victorian Era when Argentina had gained independence from Spain and at the time it was an informal empire of the United Kingdom due to economic influences.
The immigrants to Buenos Aires in particular were industrialists and potential landowners who established their cultures with sports clubs (Cordoba Athletics Club, The Hurlingham Club), Harrods in 1912, and afternoon tea, known as Merienda consisting of baked goods, mate (an infusion of ground leaves and stems from the yerba mate shrub), coffee and always, always, dulce de leche.
A super easy recipe for these traditional scones (Skones or Skons, however, you want to pronounce it).
Enjoy crumbling in the flour and butter between your fingertips (my favourite bit), and of course.. eating them!
INGREDIENTS
260g plain flour
Pinch of fine sea salt
30g caster sugar
15g baking powder
120g unsalted butter, cubed
110g cream
1 Egg yolk (brushing on top)
METHOD
Preheat the oven to 200’C
Whisk the flour, salt, sugar, and baking powder
Rub in the cold butter to coarse breadcrumb consistency
Stir through the cream until the dough comes together
Cut/shape the scones into 50g pieces. It should be about 2.5cm thick before baking. If you don't want to weigh the scones - that's fine with me. You can even use cookie cutters to create different shapes if your heart desires so.
When shaped, place onto a lined tray and brush with egg yolk. Bake for 12-18 minutes until golden brown. Cool on the tray for 5 minutes before transferring them to a cooling rack
It is most important to eat scones slightly warmed, with clotted (or thick double) cream and always good strawberry jam.
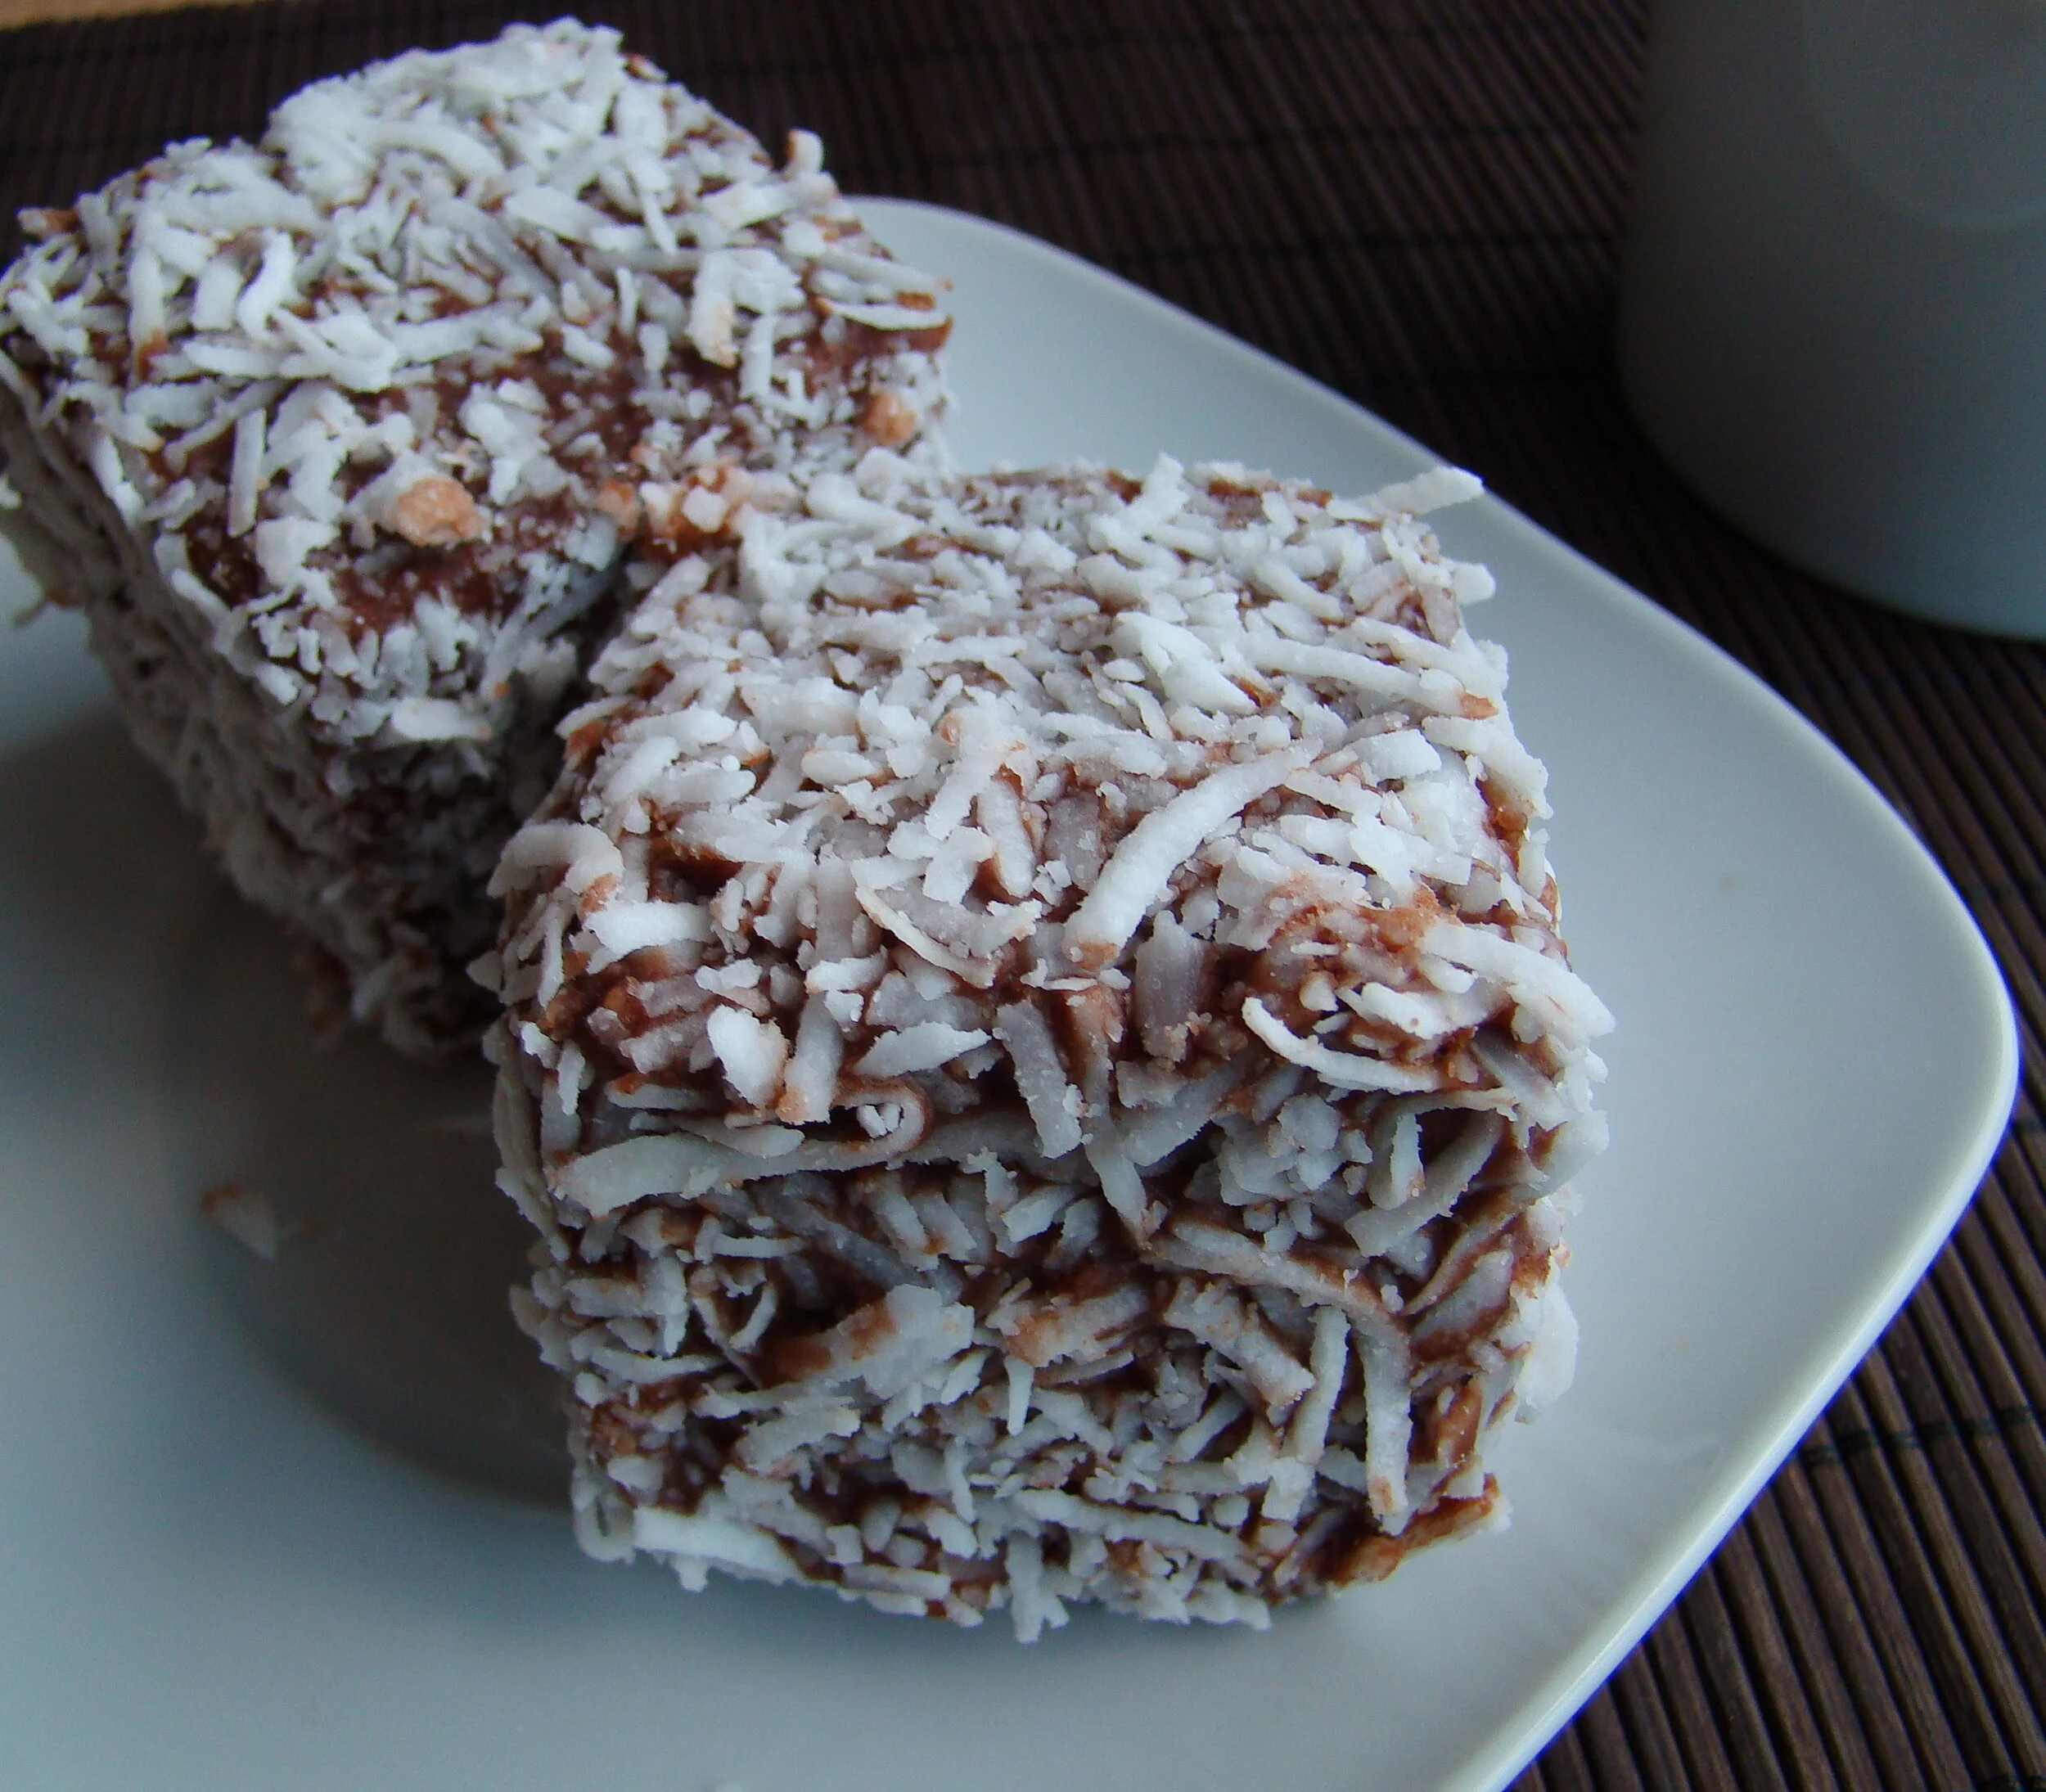
Lamingtons for Milo
The Recipe
Makes: 12 medium lamingtons
Preparation: 30 minutes
Baking Time: 20-30 minutes
Supposedly named after Lord Lamington, the governor of the northern state, Queensland in the late 1800s these little vanilla cakes rolled in chocolate and coconut have become a cake that one either loves or hates.

I don't think that there are many foods that are iconic to Australia. Sure, we have pavlova, meat pies, sausage rolls and hamburgers with egg, canned beetroot, and pineapple, amazing seafood and then we have lamingtons.
Supposedly named after Lord Lamington, the governor of the northern state, Queensland in the late 1800s these little vanilla cakes rolled in chocolate and coconut have become a cake that one either loves or hates.
I remember the lamington drives when I was in primary school. The school would order a massive amount of artificial looking and tasting blocks of stale cake squished together with stark white cream and a small slathering of jam that resembled a little bit of a strawberry flavour. We raised quite a bit of money for these drives; however, the memory of those artificial cakes left a bad taste in my mouth....
Fast forward, to Singapore, in 2012. I was a proud owner of a cafe where I served just as many Australian ex-pats as I did local Singaporeans. It was here I started making my version of lamingtons. using fresh cake, good vanilla, and quality chocolate. Baking a batch at 5am, ensured a sell-out by 10am.
Fast forward, to Mexico, in 2014. A bright young Canadian Mexican graced us with his ever-enthusiastic presence and questioned me... "Do you know how to make lamingtons?", I sure do.
INGREDIENTS
CAKE
260g all-purpose flour
2 tsp baking powder
¼ tsp salt
113g butter unsalted (room temperature)
150g caster sugar
100mls milk
2 medium eggs (50g in weight each) @ room temperature
1 tsp good vanilla extract or ½ tsp vanilla bean paste
ICING
454 g icing sugar
30g cocoa (sifted)
42g salted butter
120 mls milk (4oz)
100g desiccated coconut
METHOD
Preheat the Oven to 180’ Celsius and grease and line with baking paper a 20cm square pan.
Beat butter, vanilla & sugar together until smooth and creamy.
In a separate bowl, sift flour & baking powder.
Add eggs to the butter mixture one by one
Add 1/3 of the flour and 1/3 of the milk and mix. Continue doing this until all the ingredients are used up, ending with the flour.\
Spoon into the pan and level off with a spatula.
Bake in the preheated oven for about 20-30 minutes. When a skewer is inserted into the centre of the cake it should come out clean.
Allow the cake to cool completely then wrap it in cling film and refrigerate overnight.
Once the cake is set and nice and firm, cut it into even squares.
Over a double boiler on medium heat, mix all ingredients (except the coconut) until melted and combined
Put the coconut in a separate bowl.
Take a square of the vanilla cake and dip it into the chocolate mixture until completely covered. Next roll the square in the coconut.
Place on a cooling rack to set
*The cake can be refrigerated for up to 3 days. If not used right away it can also be frozen and then defrosted (room temperature)

Damper with Almond & Wattleseed Dukkah
The Recipe
Makes: 1 x 20cm damper
Preparation: 10 minutes
Baking Time: 25-35 minutes
Damper is a simple ‘bush tucker’ bread that was made by stockmen who were in remote areas for many weeks and days at a time. This simple bread was mixed and ‘damped’ into the coals of a campfire until it was cooked through.

From a simple recipe of water, flour and a bit of salt…. You have all the ingredients you need to make traditional Australian damper. Damper is a simple ‘bush tucker’ bread that was made by stockmen who were in remote areas for many weeks days at a time. This simple bread was mixed and ‘damped’ into the coals of a campfire until it was cooked through.
Over time damper recipes have been altered and made with milk, butter, sugar and baking powder. The texture, however, remains the same – a dense bread with a crispy exterior. Damper must always be paired with the Australian nickname for golden syrup, “Cocky’s Joy”.
Dukkah, originally an Egyptian condiment of nuts, herbs and spices has become extremely popular in Australia with everyone making their own versions. It originally is a savoury dish but I’ve made mine sweet to pair with the damper. Dukkah is also a beautiful thing to be sprinkled on yoghurt, ice cream or granola.
When you are making damper at home, you don’t need a campfire… An oven will do the job. For this recipe, I baked my damper in a cast-iron skillet which resulted in a pretty good texture.
INGREDIENTS
DAMPER
350g plain flour
2 tsp baking powder
½ tsp fine sea salt
160mls water
50g butter
DUKKAH ( makes 130g)
100g almonds, skin on
10g/2tblsp of roasted ground wattleseed
¼ tsp ground ginger
2 tsp black sesame seeds
18g/3 tsp brown sugar
A pinch of salt
*You can substitute with aniseed, caraway, or fennel.
METHOD
Preheat the oven to 200’C
Mix salt and flour with baking powder and rub in the butter so it resembles coarse breadcrumbs.
Add in the water and mix until combined.
Knead the dough on a well-floured surface until smooth
Shape into a 20cm disk and place in the oven in a skillet or baking tray
Dip a sharp knife in flour and score the top into wedges and sprinkle with a little flour.
Bake in the oven for 35-35 minutes… when turned out and knocked on the bottom it should sound hollow
Dust with flour, serve with butter, cocky’s joy and dukkah.
Toast the almonds in the oven or in a frying pan. Set aside and allow to cool completely
Toast the black sesame seeds, you can use white sesame seeds if that works for you
In a food processor, lightly pulse the nuts, sesame seeds and then add the sugar, salt, ginger and herbs.
Mix until well combined
Dukkah should have a nice crunchy texture so it is important not to blend the nuts and sesame seeds too much.

Banana Bread with Pecans
The Recipe
Makes: 1 loaf
Preparation: 10 minutes
Baking Time: 50-60 minutes
Despite the tradition of Australians grabbing a coffee and a slice of banana bread - the origins of this simple quick bread (chemically leavened) have its roots in late 18th Century America where pearlash was discovered - and later on, baking powder was used in the mid-19th Century. It is an easy bread to make so please try it!!

Whenever I touch down in Australia - I have to get my hands on a thick slice of banana bread that is well toasted and slathered in good salted butter. No matter how hard I try I can never replicate the giant loaves that are made in the factory that are dense and light all at the same time. But let’s just say this is a gourmet loaf and kills the craving when in need of banana bread while I’m in Singapore.
Despite the tradition of Australians grabbing a coffee and a slice of banana bread - the origins of this simple quick bread (chemical leavened) has it’s roots in late 18th Century America where pearlash was discovered - and later on baking powder was used in the mid 19th Century. It is an easy bread to make so please try it!!
INGREDIENTS
150g plain flour
100g wholemeal flour
2 tsp baking powder
2 tsp cinnamon
1 tsp nutmeg
70g white caster sugar
70g brown sugar
½ tsp sea salt
2-3 very ripe bananas (about 280g)
2 medium eggs
50g unsalted butter, melted
100g plain Greek yoghurt
100g pecans, roughly chopped
3 tblsp golden syrup (or honey)
40g salted butter
METHOD
Preheat the oven to 180’C and line a loaf pan with baking paper and butter
Mix all the dry ingredients together
Mash up the bananas and mix in eggs, yoghurt and butter
Add the wet to the dry ingredients and mix well.
Pour the mixture into the loaf pan and sprinkle over the pecans
Bake in the oven for 50-60 minutes. Insert a knife into the centre of the loaf, it should come out clean if it is cooked
While the cake is still hot, melt the golden syrup and butter together then pour over the cake.
Allow the cake to sit for 10 minutes before turning out onto a cooling rack
Slice and toast with lashings of butter.

Black & White Tsoureki
The Recipe
Makes 4 20cm x 10xm braids
Preparation: 2 hours (including proving time)
Baking Time: 20-25 minutes
Tsoureki comes from the Turkish word “Corek”, which is referred to any bread made from a yeast dough.

As Easter comes around year by year - I always want to make something different from your normal hot cross bun. Don’t get me wrong - I love hot cross buns with plump juicy raisins, slightly toasted and smothered in salted butter, but I also like to learn something new and see if it exceeds my expectations.
Tsoureki comes from the Turkish word “Corek”, which is referred to any bread made from a yeast dough. The bread evolved from Byzantine times and was originally molded into a variety of shapes to ward off evil spirits. Now, in Greece it is commonly braided into a wreath and dotted with red eggs that symbolise the blood of Jesus.
Now the tradition of Easter today and the Pagan Festival of Spring equinox does overlap somewhat. Easter, supposedly named after Eostre, a goddess was symbolised by a rabbit or hare. Traditions of baking, exchanging eggs and are related to rebirth, generation and change.
Whether it is a traditional celebration, the resurrection of JC or the official start of spring - it’s always a wonderful excuse to find chocolate eggs the mysterious Easter bunny has hidden and also to bake in your pjs.
I have included the recipes for both of my versions of tsoureki that follow the same method – do let me know what version you liked the best!!!
INGRDEDIENTS
CHOCOLATE & CHERRY TSOUREKI
10.5g yeast
210g plain flour
A pinch or two of salt
40g cocoa powder
80mls milk
50mls warm water
1 medium egg (50g)
70g caster sugar
1 tsp vanilla extract
70g dried cherries
40g unsalted butter
ANISEED TSOUREKI
10.5g yeast
250g plain flour
A pinch or two of salt
50g caster sugar
1 medium egg (50g)
70mls milk
50mls warm water
Zest of an orange
40g butter
Good chocolate Easter eggs are difficult to find in Singapore (they don’t celebrate it much here!) so to satisfy my chocolate craving I baked a chocolate sour cherry version of tsoureki and he traditional recipe uses mahlepi (a spice made from the seeds of a certain type of cherry) but I threw in some aniseed because - why not??
METHOD
Preheat the oven to 180’ celsius
Put the flour, sugar, yeast, salt and cocoa (if using) into the mixing bowl
Separately mix milk, egg, aniseed, zest and 50mls warm water
Mix the two together with dough hook until a soft dough forms (at this stage you can add the cherries if you are using them)
Lastly add in the butter bit by bit until combined
Throw the mixed dough that’s nice and supple into a well greased bowl (olive oil or melted butter will do the trick), cover and set aside until the dough has doubled in size.
Knock back the dough with a fist or two and divide it into 9 equal portions and plait 3 reasonably similar braids
Place the braids on a tray lined with baking paper and brush with
Brush the braids with egg wash and poke in the dyed eggs randomly in the dough
Bake for 20-25 minutes
Brush with melted honey or jam of your choice for a nice sticky glaze
Although this recipe is supposed to be made on a Thursday and eaten on a Sunday – best you eat it on the day it’s baked!
TO DECORATE
18 dyed quail eggs.
The quail eggs are boiled and cooled and dipped in baths of a teaspoon of vinegar, 1/2 cup water and a good dash of food colouring and stored overnight. Drain the eggs and allow them to completely dry on a cake rack before using.

Pan de Muerto
The Recipe
Makes: 8 large buns
Preparation: 20 minutes plus proving time
Cooking Time: 30-40 minutes
Pan de Muerto is a traditional Mexican sweet bread that's commonly enjoyed during Dia de los Muertos, a holiday that celebrates and honors deceased loved ones.

Back when I was living in Mexico I learned how to make this bread.
It is an iconic symbol of Dia de los Muertos or Day of the Dead. It is one of the symbols that are placed at offrendas or altars that will coax and feed the souls as they return to their loved ones once a year.
Learn more about Dia de los Muertos HERE.
You are more than welcome to freeze this bread and heat it up when you get a craving, but if you taste it straight out of the oven you will not stop at just one. Enjoy the recipe and let me know how it goes!!
INGREDIENTS
14g instant dry yeast
1 cup / 235mls whole milk
4 medium eggs
2 oranges, zest and juice (approximately ¾ cup juice)
170g unsalted butter
180g caster sugar
2 tsp aniseed
¼ tsp fine sea salt
800g plain flour
Extra flour for rolling
1 egg for egg wash
GARNISH
100g sugar
100mls orange juice
120 g fine caster sugar for sprinkling
METHOD
Mix 50g sugar, yeast, ½ cup warm milk, and ¾ cup flour. Allow sitting for about 20 minutes to activate the yeast.
Whisk the rest of the sugar, milk, eggs, zest and juice, aniseed in a separate bowl
Sift flour and salt separately.
Whisk the egg and yeast mixture together.
In an electric mixer, on low speed with the dough hook attached, pour in the wet mixture and add 1/3 of the flour. Add ½ of the melted butter and allow to mix for about 3 minutes. Continue this until both butter and flour is mixed in.
Mix for 5-8 minutes at a medium/high speed until everything is incorporated and the dough comes away from the sides of the mixing bowl.
Transfer the mixture into a large, oiled container with a secure lid. Allow to rise for about an hour, or until it has doubled in size, and then transfer to the fridge to sit overnight.
Make sure the container is big enough as the dough will rise quite a bit.
The next day….
Preheat the oven to 180’C
Turn out the dough on a floured surface and shape 8 x 150g balls of dough. Place on a lined baking tray.
With the remaining dough, shape 16 lengths of dough (15 cm each), the thickness of a pen.
Make small balls at the ends of the dough, and place them on the buns so they cross over.
Roll a small ball of dough and place it in the centre of the crosses.
Brush with egg yolk and bake in the oven for 30-40 minutes
Heat 100g sugar and orange juice in a small saucepan until the sugar has dissolved
When the bread is ready, take it out of the oven and allow it to rest for about 5 minutes before transferring it to a cooling rack.
Brush with orange juice sugar mixture and dust generously with sugar.
Store in an airtight container or the bread can be frozen for up to 3 months.
CHOCOLATE PECAN BABKA WITH MAPLE GLAZE
The Recipe
Makes: 1 medium loaf
Preparation: overnight proofing
Baking Time: 30-40 minutes
The traditional babka, meaning “Little Grandmother” is an Eastern European bread that is dense, rich and light all at the same time. Swirled with chocolate, nuts and cinnamon – this was only a version that seemed to develop mid-century by the American Jews.

Babka is not the easiest bread to make but it is also not the most difficult. It takes a bit of time and patience, a lot of love but the benefits and joys of munching down on this nutty, dense, chocolatey bread is worth it.
A sweet, yeasted bread that finds its origins in Eastern Europe, developed by the Ashkenazi Jews in Poland, Ukraine, Russia, and Lithuania. This Jewish community has a very coloured history with ancestral routes tied to Germany and Austria. It is a bread that is traditionally served on special occasions such as the Jewish Sabbath (Shabbat) or holidays and represents good fortune and prosperity.
It can be found throughout the year in Jewish bakeries around the world and there are many variations of babka that exist today, yet the original recipe was either a plain or nut-filled dough that was braided and then baked into a tall cylindrical shape.
This chocolate version is messy and extremely delicious and I hope you have fun making it!
THE INGREDIENTS
BABKA DOUGH
280g plain flour
60g white sugar
7g instant yeast
150mls milk, room temperature
Zest of 1 orange
½ tsp vanilla essence
2 x medium eggs
¼ tsp salt
140g butter, cubed
Oil (for greasing)
CHOCOLATE FILLLING
120g unsalted butter, room temperature
1 tsp cinnamon
2tblsp/20g cocoa
80g brown sugar
Pinch of salt
80g semi sweet chocolate, roughly chopped or chocolate chips
80g toasted pecans, roughly chopped.
GLAZE
50g maple syrup
10g butter
THE METHOD
The Day Before
Mix milk with vanilla, salt, and eggs
Place the sugar, yeast, zest, and flour in a mixing bowl with a paddle attachment
Add milk mixture to the flour until combined
Switch to a dough hook and then start adding the butter, bit by bit until all is incorporated.
Mix for about 5-8 minutes until the dough is nice and smooth
Place in a well-oiled bowl and cover with cling film and allow the dough to rise and double in size then place in the refrigerator overnight so it can work its magic
The Next Day
Turn the dough out onto a well-floured surface and roll it out into a rectangle 25cm width x 40cm length
For the chocolate filling, mix cinnamon, sugar, cocoa, and butter together until combined.
Have it on stand-by for when the dough is ready to be rolled.
Spread the chocolate mixture over the surface of the dough, leaving about a 1.5cm edge all aroundRoll the dough lengthwise to form a 25cm cylinder. Place in the fridge for about 10-15minutes to firm up (you will thank me for this later)
Take out the dough and with a sharp knife, cut it in half so you have long strips
Braid the two pieces of dough over each other so they are nicely twisted firmly together
Place into a greased and lined loaf tin (about 20cm in length), cover with a damp cloth, and allow to rise for 30-40 minutes. For the maple glaze, heat the ingredients at a low temperature until the butter is just melted.Preheat the oven to 190’C and bake the babka for 30-40 minutes until well risen and golden.
Allow the bread to cool slightly before turning it out and brush the babka while still warm with the maple glaze
MORE BAKING RECIPES